Table of Contents
Advertisement
Advertisement
Table of Contents

Related Manuals for Samsung NY90T5010SS


Summary of Contents for Samsung NY90T5010SS
- Page 1 FREE STANDING OVEN User & Installation manual NY90T5010SS...
- Page 2 Dear User, Our objective is to make this product provide you with the best output which is manufactured in our modern facilities in a careful working environment, in compliance with total quality concept. Therefore, we suggest you to read the user manual carefully before using the product and, keep it permanently at your disposal.
- Page 3 FOR YOUR SAFETY “Important: Read these instructions for use carefully so as to familiarize yourself with the appliance before connecting it to its gas container. Keep these instructions for future reference”. This appliance is adjusted to operate on LPG only. IF YOU SMELL GAS: •...
- Page 4 IMPORTANT INFORMATION FOR THE USER This appliance may only be installed by a registered SAQCC Gas installer. All registered installers are issued with a card carrying their registration number. Ask to be shown the card before allowing the installation work to commence and make a note of the Installer registration number.
-
Page 5: Table Of Contents
CONTENTS Important warnings Electrical connection Gas connection Introduction of the appliance Accessories Technical features of your oven Installation of your oven Installation of the oven feet Chain lashing illustration Control panel Using oven heating elements Using the wire rack Using gas burners Oven mode selector Cooking modes Cooking recommendations... -
Page 6: Important Warnings
IMPORTANT WARNINGS 1. Installation repair should always performed “AUTHORIZED SERVICE”. Manufacturer shall not be held responsible for operations performed by unauthorized persons. 2. Please read this operating instructions carefully. Only by this way you can use the appliance safely and in a correct manner. 3. - Page 7 12. Ensure that the oven door is completely closed after putting food inside the oven. 13. NEVER try to put out the fire with water. Only shut down the device circuit and then cover the flame with a cover or a fire blanket. 14.
- Page 8 21. Put curtains, tulles, paper or any flammable (ignitable) material away from the appliance before starting to use the appliance. Do not put ignitable or flammable materials on or in the appliance. 22. Keep the ventilation channels open. 23. The appliance is not suitable for use with an external timer or a separate remote control system.
- Page 9 30. After each use, check if the unit is turned off. 31. If the appliance is faulty or has a visible damage, do not operate the appliance. 32. Do not touch the plug with wet hands. Do not pull the cord to plug off, always hold the plug. 33.
- Page 10 39. When the door is open, do not place any heavy object on the door or allow children to sit on it. You may cause the oven to overturn or the door hinges to be damaged. 40. The packaging materials are dangerous for children.
- Page 11 48. Upper cover of the oven can be closed for a reason, than cookware can trip over. Step back to avoid the hot food coming on you. There is risk of burning. 49. Do not place heavy objects when oven door is open, risk of toppling.
- Page 12 58. Please don’t cook the food directly on the tray / grid. Please put the food into or on appropriate tools before putting them in the oven. 59. Hot surface, leave for cooling before closing the cover. Electrical Safety 1. Plug the appliance in a grounded socket protected by a fuse conforming to the values specified in the technical specifications chart.
- Page 13 7. WARNING: To avoid electric shock, ensure that the device circuit is open before changing the lamp. 8. WARNING: Cut off all supply circuit connections before accessing the terminals. 9. WARNING: If the surface is cracked, turn off the appliance to avoid risk of electric shock. 10.
- Page 14 16. Make sure the plug is inserted firmly into wall socket to avoid sparks. 17. Do not use steam cleaners for cleaning the appliance, otherwise electric shock may occur. 18. An omnipolar switch capable to disconnect power supply required installation. Disconnection from power supply shall be provided with a switch or an integrated fuse installed on fixed power supply according to...
- Page 15 Gas Safety 1. This appliance is not connected to burning products evacuation apparatus.This appliance must be connected and installed according to the installation regulations in force. Conditions regarding ventilation must be considered. 2. When a gas cooking appliance is used; humidity, heat and burning products are generated in the room.
- Page 16 6. The mechanism cannot be run for longer than 15 seconds. If the burner is not on after 15 seconds, stop the mechanism and wait for at least one minute before trying to ignite the burner again. 7. All kinds of operations to be performed on gas installation must be performed by authorized and competent people.
- Page 17 3. If the burn back occurs again, turn off the control knob to the affected burner, and consult the nearest Samsung service technician, who will advise you. What To Do When Gas Odour Is Detected 1. Do not use naked flame, and do not smoke.
- Page 18 Intended Use 1. This product is designed for home use. Commercial use of the appliance is not permitted. 2. This appliance may only be used for cooking purposes. It shall not be used for other purposes like heating a room. 3.
-
Page 19: Electrical Connection
ELECTRICAL CONNECTION 1. Your oven requires 16 or 32 Ampere fuse according to the appliance’s power. If necessary, installation by a qualified electrician is recommended. 2. Your oven is adjusted in compliance with 220-240 V 50/60 Hz. electric supply. If the mains are different from this specified value, contact your authorized service. -
Page 20: Gas Connection
GAS CONNECTION WARNING: This appliance requires an operating pressure of 2.8-3.0 kPa. A suitable LPG regulator that complies with the requirements of SANS 1237 must be used. WARNING: Flexible hose: Not supplied. Any hose that is used to connect the stove to the gas system shall comply with SANS 1156-2 or BS 3212. - Page 21 For LPG connection; For LPG (cylinder) connection, affix metal clamp on the hose coming from LPG cylinder. Affix an edge of the hose Main gas pipe on hose inlet connector behind the appliance by pushing to end through Gasket Hose inlet connector heating the hose in boiled water.
- Page 22 GAS HOSE PASSAGE WAY Connect the appliance to the gas piping tap in shortest possible route and in a way that ensure no gas leakage will occur. In order to carry on a tightness and sealing safety check ensure that the knobs on the control panel are closed and the gas cylindir is open.
- Page 23 NOZZLE CHANGE OPERATION 1. Please use driver with special head for removed and install nozzle as. (figure 3) 2. Please remove nozzle (figure 4) from burner with special nozzle driver and install new nozzle. (figure 5) Figure 3 Figure 5 Figure 4 VENTILATION OF ROOM The air needed for burning is received from room air and the...
- Page 24 REDUCED GAS FLOW RATE SETTING FOR HOB TAPS 1. Ignite the burner that is to be adjustment and turn the knob to the reduced position. 2. Remove the knob from the gas tap. 3. Use an appropriately sized screwdriver to adjust the flow rate adjustment screw.
-
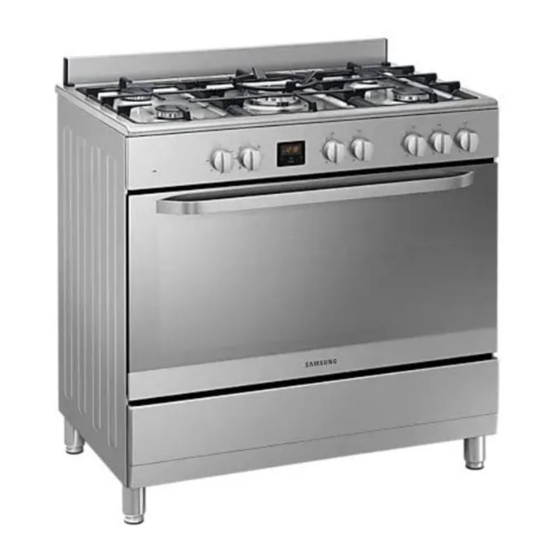
Page 25: Introduction Of The Appliance
INTRODUCTION OF THE APPLIANCE 1. Splash back 9. Telescopic leg 2. Oven control knobs 10. Lamp 3. Oven timer 11. Wire rack 4. Hob control knobs 12. Deep tray 5. Side rack 13. Rapid burner 6. Door 14. Semi-rapid burner 7. -
Page 26: Accessories
ACCESORIES Deep tray Used for pastries, deep fried foods and stew recipes. In case of frying directly on the grill for cakes, frozen foods and meat dishes, it can be used of oil pick-up tray. Wire rack Used for frying and/or placing the foods to be baked, fried and frozen foods on the desired rack. -
Page 27: Technical Features Of Your Oven
TECHNICAL FEATURES OF YOUR OVEN Specifications NY90T5010SS Outer width 898 mm Outer depth 575 mm Outer height 810 mm (905 with legs) Lamp power 15-25 W Bottom heating element 2000 W Top heating element 1500 W Low grill heating element... - Page 28 NG (G20) / 2.0 kPa LPG (G30) / 2.8-3.0 kPA Burner Specifications Gas Natural Injector 1,40 0,96 Triple Gas flow 0,362 m³/h Burner 3,80 3,50 Power Injector 1,15 0,85 Rapid Gas flow 0,276 m³/h Burner Power 2,90 2,90 0,97 0,65 Injector Semi-Rapid 0,162...
-
Page 29: Installation Of Your Oven
If installing the oven in a built-in cabinet, the cabinet must have its plastic surfaces and adhesive parts resistant to temperatures in accordance to EN 60335. Samsung is not responsible for dam- age to furniture from the oven’s heat emission. - Page 30 6.5 mm min. 6.5 mm min. WARNING: The kitchen furniture near the appliance must be heat resistant. WARNING: Do not use the door and/or handle to carry or move the appliance. WARNING: Do not install the appliance beside refrigerators or coolers.
-
Page 31: Installation Of The Oven Feet
INSTALLATION OF THE OVEN FEET In order to install the oven feet; 1. Foot attachment lath is installed on the oven from the bottom of the oven as shown in (figure 7).Nuts are centered on these lathes in order to screw feet. Complete the feet installation process by screwing the feet to the nuts (figure 8). -
Page 32: Control Panel
CONTROL PANEL 1. Value dial 5. Knob for rear left burner 2. Oven mode selector 6. Knob for center burner (triple burner) 3. Digital timer 7. Knob for rear right burner 4. Knob for front left burner 8. Knob for front right burner WARNING: The control panel above is only for illustration purposes. -
Page 33: Using Oven Heating Elements
USING OVEN HEATING ELEMENTS 1. When your oven is operated first time, an odor will be spread out which will be sourced from using the heating elements. In order to get rid of this, operate it at 240 °C for 45-60 minutes while it is empty. - Page 34 2. Do not continuously operate the igniter for more than 15 seconds. If the burner does not ignite, wait minimum one minute before try again. 3. In models with gas security system, when flame of the cooker is extinguished, control valve cuts off the gas automatically. For operate the burners with gas security system you must press the knob and turn counter-clock-wise.
-
Page 35: Oven Mode Selector
OVEN MODE SELECTOR Helps to set with which heaters the food placed in oven will be cooked. Cooking modes in this button and their functions are stated below. COOKING MODES Lower-upper heating element and fan Low grill and fan Upper heating element and fan Lower heating element and High grill Lower-upper heating element... -
Page 36: Cooking Recommendations
COOKING RECOMMENDATIONS WARNING: Oven must be preheated for 7-10 minutes before placing the food in it. WARNING: Kinds of meals, cooking times and thermostat positions are given in cooking table. The values given in the cooking table are characteristic values and were obtained as a result of the tests performed in our laboratory. -
Page 37: Cooking Time Table
Cooking Time Table Cooking Cooking Cooking Cooking Cooking Food function function symbol temperature (°C) rack time (min.) Cake Static Small cake Static Static Pastry Static+Fan 180-200 20-25 Cookie Static Apple pie Static 180-190 Sponge cake Static 45-50 Pizza Static Lasagne Static 180-200 50-60... -
Page 38: Use Of The Digital Touch Timer
USE OF THE DIGITAL TOUCH TIMER 1. Auto Cooking Symbol 2. Manual Cooking Symbol 3. Timer Display 4. Minute Minder Symbol 5. Timer Mode/ Key Lock (3sec) 6. Increase timer 7. Decrease timer 8. Key Lock symbol Time adjustment The time must be set before you start using the oven. Following the power connection, the symbol “A”... - Page 39 Audible warning time adjustment The audible warning time can be set to any time between “00:00” and “23:59” hours. The audible warning time is for warning purposes only. The oven will not be activated with this function. Press “TIMER MODE”. The symbol will begin to flash and “000”...
- Page 40 Select the desired cooking function and the temperature using the control knobs. Press “TIMER MODE” until you see “dur” symbol on the display screen. The symbol “A” will flash. Select the desired cooking time period using the “+” and “-” keys. The current time will reappear on the screen, and the symbols “A”, and will remain illuminated.
- Page 41 The current time will reappear on the screen, the symbols “A”, will remain illuminated. When the timer reaches zero, the oven will switch off and an audible warning will sound. The symbol “A” will flash. Turn both control knobs to the “0” position and press any key on the timer to stop the sound.
- Page 42 Add the cooking period to the current time of day. You can set a time of up to 23 hours and 59 minutes after this. The current time will reappear on the screen, and the symbols “A”, and will remain illuminated. The operating time will be calculated and the oven will automatically start so that cooking will finish at the set finishing time.
-
Page 43: Maintenance And Cleaning
MAINTENANCE AND CLEANING 1. Disconnect the plug supplying electricity for the oven from the socket. 2. While oven is operating or shortly after it starts operating, it is extremely hot. You must avoid touching from heating elements. 3. Never clean the interior part, panel, lid, trays and all other parts of the oven by the tools like hard brush, cleaning mesh or knife. -
Page 44: Installation Of The Oven Door
INSTALLATION OF THE OVEN DOOR Figure 15 Figure 16 Figure 15.1 Figure 15.2 Figure 16.1 Figure 16.2 Completely open Bring the hinge Afterwards, close To remove the the oven door lock to the the oven door as oven door, pull by pulling it to widest angle to lean on... -
Page 45: Rack Positions
RACK POSITIONS It is important to place the wire rack into the oven properly. Do not allow Rack 4 wire rack to touch rear wall of the Rack 3 oven. Rack positions are shown in the Rack 2 next figure. You may place a deep tray Rack 1 or a standard tray in the lower and upper side racks. -
Page 46: Changing The Oven Lamp
CHANGING THE OVEN LAMP WARNING: To avoid electric shock, ensure that the appliance circuit is open before changing the lamp. (having circuit open means power is off) First disconnect the power of appliance and ensure that appliance is cold. Remove the glass protection by turning as indicated in the figure on the left side. -
Page 47: Troubleshooting
TROUBLESHOOTING You may solve the problems you may encounter with your product by checking the following points before calling the technical service. Check Points In case you experience a problem about the oven, first check the table below and try out the suggestions. Problem Possible Cause What to Do... - Page 48 Problem Possible Cause What to Do Water dripping. Water or steam may generate under certain conditions Steam coming out from a Let the oven cool down and depending on the food being crack on oven door. than wipe dry with a dishcloth. cooked.
-
Page 49: Handling Rules
HANDLING RULES 1. Do not use the door and/or handle to carry or move the appliance. 2. Carry out the movement and transportation in the original packaging. 3. Pay maximum attention to the appliance while loading/ unloading and handling. 4. Make sure that the packaging is securely closed during handling and transportation. -
Page 50: Appendix
APPENDIX SAMSUNG SAMSUNG NY90T5010SS Model identification Energy Efficiency Index per cavity (EEI cavity) 110,5 Energy Efficiency Class per cavity Energy consumption required to heat a standardised load in a cavity of an electric heated oven during a cycle in conventional mode per cavity (electric final energy) 1.15 kWh/cycle... -
Page 51: Questions Or Comments
+966112974690 SAUDI ARABIA www.samsung.com/sa/support From outside Saudi Arabia (May Call Charges will be applied) (Arabic) PAKISTAN 0800-Samsung (72678) www.samsung.com/pk/support U.A.E 800-SAMSUNG (800 - 726 7864) OMAN 800-SAM CS (800-72627) www.samsung.com/ae/support KUWAIT 183-CALL (183-2255) (English) www.samsung.com/ae_ar/ BAHRAIN 8000-GSAM (8000-4726) support (Arabic)
Need help?
Do you have a question about the NY90T5010SS and is the answer not in the manual?
Questions and answers