
Subscribe to Our Youtube Channel
Related Manuals for AKCP SecurityProbe 5ES-X20

Summary of Contents for AKCP SecurityProbe 5ES-X20
- Page 1 SecurityProbe 5ES-X20/X60 User Manual Help Version updated till firmware 403H Copyright © 2011, AKCP Co., Ltd..
- Page 2 5ES securityProbe 5ES-X20 Manual Introduction What is securityProbe 5E Standard? How to use this manual 3. Package Contents Front and Rear Panels Installation Setting the IP address Testing the IP address Firmware upgrade 4. Multi User Groups and Management...
-
Page 3: How To Use This Manual
Linux Operating System. The design is based on our successful securityProbe 5E, but without the camera inputs. This gives you everything you need and nothing you don't! AKCP has prided itself on bringing a low cost, easy to use monitoring solution to market with the securityProbe-5ES. -
Page 4: Front And Rear Panels
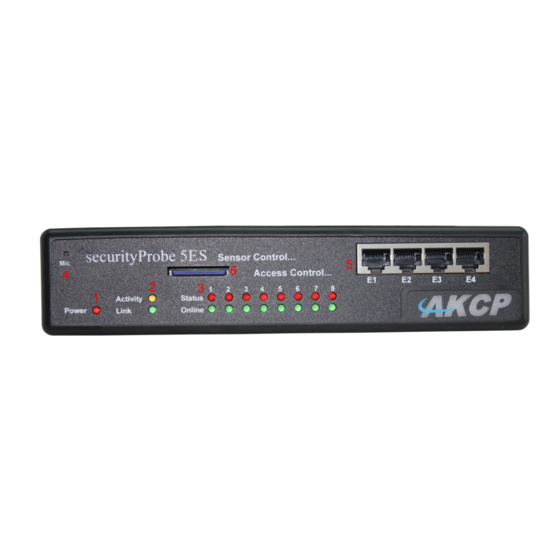
5ES securityProbe 5ES-X20 Manual Front and rear panels securityProbe 5ES Fig 1. Front panel The front panel has several LEDs which display the units status and notify you as to its activity. 1. Power LED When the unit is powered up the power LED will be lit continuously. If the power LED is flashing then it indicates a problem with the CPU. - Page 5 3. To reboot the unit into the firmware upgrade mode (hold down for 12 seconds) 2. Sensor ports There are 8 RJ45 ports numbered from 1 – 8. These are for connecting AKCP intelligent sensors to the unit. 3. USB port The unit is equipped with one USB 1.1 port.
- Page 6 5ES-X20 securityProbe 5ES-X20 20 Extra Dry Contact Inputs The 20 extra dry contact inputs on for example, the securityProbe 5ES-X20, (or securityProbe 5ES-X60) can be configured as inputs only up to 5 Volts in normal operation. In opto-isolation mode they can input up to 30 Volts DC. This will protect these inputs and the unit from high voltages and spikes.
- Page 7 5ES-X20 extra dry contact web interface setup First login to the securityProbe 5ES-X20 web interface, then navigate to the Sensors Page, then click on the Dry Contact Ports link in the left hand column. You can now click on the dry contact port to setup that port as shown in the screen shot above.
- Page 8 5ES securityProbe 5ES-X20 Manual In the Normal tab settings we can see that the sensor is currently Offline, so to enable the dry contact port we would click on the Offline button. Now we can see the dry contact input is now Critical and we can set how we require the Normal State to be in as shown above.
- Page 9 5ES securityProbe 5ES-X20 Manual Now we can see that the dry contact input now is in the normal state as shown in the screen shot above. If we click on the Advanced Tab, we can set the graphing to on, the sensor URL, set the Filter Status and enable the Calendar.
-
Page 10: Installation
5ES securityProbe 5ES-X20 Manual 2) Installation 1. Setting up the IP address Every unit is shipped with the default IP address of 192.168.0.100 First we will go through the process of changing this IP address to fit your own network configuration. - Page 11 5ES securityProbe 5ES-X20 Manual d) Next the home page will be displayed. It will look similar to this. e) Click on “Ethernet network” from the list on the left frame of the page. Updated until firmware 403H - 11 -...
- Page 12 5ES securityProbe 5ES-X20 Manual Note. The unit ships with DHCP disabled. If you wish to use a DHCP server to obtain the IP address then see the “Using DHCP” section of the FAQ> Updated until firmware 403H - 12 -...
-
Page 13: Testing The New Ip Address With The "Ping" Command
5ES securityProbe 5ES-X20 Manual 2. Testing the new IP address with the “ping” command Once you have assigned the new IP address use the “ping” command to test the unit. This can also be used as a diagnostic tool in order to check whether your unit is connected to the network. -
Page 14: Firmware Upgrade
5ES securityProbe 5ES-X20 Manual 3. Firmware upgrade Ensure you are running the latest firmware. You will also need to download the latest firmware from our website ( http://www.akcp.com/company/firmwareupdate.htm ). Log into our webpage using your MAC address, this is found on a sticker on the base of the unit. After the download navigate back to the web based interface (units IP address. - Page 15 5ES securityProbe 5ES-X20 Manual c) You will then be presented with this pop up :- Click OK. The unit will then reboot in safe mode. After reboot you will be redirected to the safe mode web interface. This can take some time, so please be patient. The page will display the following message while rebooting d) Once the unit has rebooted you will be viewing the following page.
- Page 16 5ES securityProbe 5ES-X20 Manual e) during the process you will see the following messages :- The unit will then reboot. The process is complete when the LED‟s are back to their “normal” status. Updated until firmware 403H - 16 -...
-
Page 17: Multi-Users And Groups Setup
5ES securityProbe 5ES-X20 Manual Multi-users and groups setup Login to the securityProbe or securityProbe 5E with the Administrator password, the default will be “public” if you have not changed this yet. Click on the Settings page, then System Administrator then User & Group Management as shown in the screen shot below: Note: The following screen shots may appear small and hard to read. - Page 18 5ES securityProbe 5ES-X20 Manual Enter your group name for example we have added a group named “System Guest” and entered our description. Now check the objects within the web interface that this group will be able to Modify and View.
- Page 19 5ES securityProbe 5ES-X20 Manual If you wish to modify your group settings, highlight the group you wish to modify by clicking on it, then click on the “Properties” button as shown in the screen shot above. Updated until firmware 403H...
-
Page 20: User Setup
5ES securityProbe 5ES-X20 Manual 2) User Setup Click on the Users tab then click the “Add” button to add the new Users to your groups as shown above. Now enter your User details as shown above. In our example we have entered Bob Smith as our Guest into our “System Guest”... - Page 21 5ES securityProbe 5ES-X20 Manual Now as you can see the new user has been entered into our list of Users. To modify a users setting, first highlight the user by clicking on it, then click the “Properties” button as shown in the screen shot above.
-
Page 22: Services And Security
5ES securityProbe 5ES-X20 Manual Services and Security Active Services Application (disabling) You can enable or disable the Nagios, Video Conferencing, Secure Shell and Telnet applications running on the unit thus making the unit more secure as shown in the screen capture above. -
Page 23: The Snmpv3 Ssl Security Feature
5ES securityProbe 5ES-X20 Manual One benefit is the traffic between client and the securityProbe is not cached along the various units as it moves across the „Net, and so can‟t be accessed by someone after the connection is terminated. -
Page 24: Active Security
5ES securityProbe 5ES-X20 Manual Active Security In the Active Security section you can allow Users who are logged into the units web interface to “Acknowledge” alarms, which is normally reserved only for the Administrator. When the unit boots up, it will announce the IP address that it has been configured with. As an added security feature this announcement can be disabled in the above screen shot, so that the IP address remains unknown. -
Page 25: Setting Up A Sensor
4. Setting up a sensor In this section we will now go through the basic set up of a sensor. We will focus on the AKCP temperature sensor; however this basic set up process is applicable to all of our sensors. If you require information on specific functions of a particular sensor then please download the manual for that sensor from our website, or locate it on your product CD. - Page 26 5ES securityProbe 5ES-X20 Manual The temperature sensor should be listed, along with its current reading and status. If this is not shown please see refer to the FAQ. This summary page allows you to quickly see which sensors are connected, their status, view the system log, and also view footage from any connected cameras.
- Page 27 5ES securityProbe 5ES-X20 Manual I) Notification thresholds From this page you can carry out various operations as indicated above. Also view the current status (normal, low critical, high critical etc). In the screen shot above you can see the sensor is indicating a temperature of 29 degrees F, and a status of Normal.
- Page 28 5ES securityProbe 5ES-X20 Manual Now your page will look something like below after taking the sensor offline. To bring a sensor back online, select your sensor type from the drop down menu and click “save”. Updated until firmware 403H...
- Page 29 5ES securityProbe 5ES-X20 Manual ii) Advanced sensor settings By clicking on the Advanced Settings tab you will then see the advanced settings for the sensor. Advanced mode functions Units: changes units from C to F or vice versa Updated until firmware 403H...
- Page 30 5ES securityProbe 5ES-X20 Manual Rearm: The Rearm parameter is useful for sensors whose values can vary such as the temperature and humidity sensors. It is used to prevent the sensor from flickering between two states. For example if the...
- Page 31 5ES securityProbe 5ES-X20 Manual Data Collection Type: This refers to the data collection from the sensor and how the data is then displayed on the graphs. There are three options for the collection of data. Average, Highest and Lowest. The default setting is “Average”.
- Page 32 5ES securityProbe 5ES-X20 Manual The When the Data Collection Type is set to the Highest setting then you will get the graphing output displaying the sensors highest reading. This is the same for the Lowest setting. Display Style You can keep the sensors “Display Style” in the web interface as the Basic Style which will be the slide bar type or you can change it to the “Gauge Style”...
- Page 33 5ES securityProbe 5ES-X20 Manual When switching to the Gauge Style type you will first be prompted with the pop up dialog box show above. Updated until firmware 403H - 33 -...
- Page 34 5ES securityProbe 5ES-X20 Manual You will now see the new display where you can set the sensors threshold levels as shown above. Updated until firmware 403H - 34 -...
- Page 35 5ES securityProbe 5ES-X20 Manual After clicking on the “Advanced Settings” tab, you can change the text and colors for each sensor threshold as shown in the screen shot above. Check rate of change Updated until firmware 403H - 35 -...
- Page 36 5ES securityProbe 5ES-X20 Manual When enabling the “check rate of change” feature for this sensor, you can set the rate in a percentage from 1% to 50% over a period of time from 1 to 20 minutes. You can set the direction to Up, Down, or Both and you can set the Status when the limit is exceeded to show either High Critical or Low Critical.
- Page 37 5ES securityProbe 5ES-X20 Manual Enable Calendar: If you select this option then the following will be displayed:- In our example we wish to monitor an office building between the hours of 7 PM – 9 AM Monday – Friday only. You can see in this picture we have selected the “Do Not Report”...
- Page 38 5ES securityProbe 5ES-X20 Manual 1. Using internal Mic as a sound detection sensor The internal microphone (or an external plugged into the line in jack) can be used as a sound detector. This tutorial provides you the information needed to setup the internal Mic as a sound detection sensor.
- Page 39 5ES securityProbe 5ES-X20 Manual Now lets look at what each of these settings does:- Recording Source: Here you can choose either internal or external microphone. Microphone boost (+20dB): Boosts the microphone by 20 dB Microphone Sensitivity: The level of sensitivity that can be set. For example, if you set the level to 80, then the microphone will detect more sound if the level was set a 20.
- Page 40 5ES securityProbe 5ES-X20 Manual Data Collection Type: There are 3 settings for this parameter: lowest, highest, and average. Data will be collected for the lowest, highest, or average sound reading accordingly. Display Style: Here you can choose the gauge style, or the classic bar style gauge.
-
Page 41: Expansion Ports
5ES securityProbe 5ES-X20 Manual 1. Expansion Ports Your AKCP Securityprobe-5ES is equipped with four expansion ports. This enables you connect up to four daisy chains of expansion modules. The available expansion modules are an eight port intelligent sensor board and an Opto-isolated sixteen dry contact expansion module. In this section we will go through the basic setup of the sensor. - Page 42 5ES securityProbe 5ES-X20 Manual d) This will bring you to the following page, the extended port sensors page:- e) Once you have clicked on the “Dual sensors” tab you will be directed to the familiar looking notification thresholds page. From this page you can carry out various operations as indicated in the sensor settings tutorials found on page 16.
- Page 43 5ES securityProbe 5ES-X20 Manual 3) Notifications If you setup a notification you can define the action to take when the sensor gives a reading beyond your previously set thresholds. This allows you to determine how you will be notified that a sensors reading has reached the specified parameters (high warning, critical etc) that we looked at in the previous section.
- Page 44 5ES securityProbe 5ES-X20 Manual We will now go through setting up a few different ways of notification step by step. To learn what the other types of notifications do refer to the separate notification manuals that can be found on your product CD.
- Page 45 5ES securityProbe 5ES-X20 Manual 2. SNMP trap First we will set up a notification via SNMP trap, so that when your sensor reaches a certain threshold it will send a notification to your SNMP server. This tutorial provides you the information needed to setup an SNMP trap.
- Page 46 5ES securityProbe 5ES-X20 Manual c) After clicking next you will be presented with the following screens:- On these screens you can select the parameters for when to send the SNMP trap notification. In our example we have selected to bind the SNMP trap to the temperature sensor we have connected on port 1.
- Page 47 5ES securityProbe 5ES-X20 Manual d) Once we have created the parameters for the SNMP trap, we need to make it active. To do this go back to the notifications tab and it should look like the following:- e) Select the sensor and SNMP trap parameters as before...
- Page 48 5ES securityProbe 5ES-X20 Manual Note: To remove this trap and make it inactive, highlight the notification and click remove. You can repeat this process to set up multiple SNMP traps for different sensors, or for multiple SNMP servers etc.
- Page 49 5ES securityProbe 5ES-X20 Manual 3. E-mail This tutorial provides you the information needed to setup an E-Mail Notification. To get to the starting point of this tutorial: Log in as administrator Select the “Notifications” tab Click “Notification Wizard”...
- Page 50 5ES securityProbe 5ES-X20 Manual After this click “Next” c) Now you need to input your SMTP server address for your e-mail account. Once this is correct, click next. d) Now, as with the SNMP trap you can select how many times to attempt to resend the e-mail, and the time elapsed between each attempt.
- Page 51 5ES securityProbe 5ES-X20 Manual Click on “Finish”. You will now be taken back to the main Notification tab. f) Click on create g) Create the notification link as before. Then click finish Updated until firmware 403H - 51 -...
-
Page 52: Sms Notification
5ES securityProbe 5ES-X20 Manual h) You will now be back at the main notification page. You should now see listed our two notifications, the SNMP trap and the e-mail. As you can see from this page, we now have an SNMP trap set up not give us notification of a “High Critical”, and an E-mail notification that will activate on a “High Warning”... - Page 53 5ES securityProbe 5ES-X20 Manual a) From the list of notification types select SMS and click next. You will then be presented with this :- b) You can now either add multiple numbers, or click next. In our case we will click next.
- Page 54 5ES securityProbe 5ES-X20 Manual Note: A macro is a script that returns specific data collected by the unit. In our example here the macro will tell the notification to contain the “description” (sensor name), the value (current sensor reading) and the status (high/low warning etc) these macros are common to all sensor notifications.
- Page 55 5ES securityProbe 5ES-X20 Manual f) You will now be able to select the number of times you wish the SMS to be resent and the interval between sending them. g) Again we now select the sensor to which to bind this notification too.
- Page 56 5ES securityProbe 5ES-X20 Manual As before, select the Temperature sensor on port 1. This time we will use this notification for a low critical. Then select the notification name we assigned, in this case we chose “SMS 1”. Click Finish to finalize this.
- Page 57 5ES securityProbe 5ES-X20 Manual j) You will now be back at the main notification page. Now the page should display three types of notifications, the SNMP trap, E-mail and SMS. For the purposes of this tutorial we will not cover the set up of every type of notification. However, with this information you should be able to follow the procedure for the other types of notifications easily, as they all follow a similar format.
-
Page 58: Adding A Map
5ES securityProbe 5ES-X20 Manual 5) Mapping The mapping feature allows for an instant visual feedback as to a sensors position, and status. It is a useful monitoring tool for a set up with several sensors in different positions. This tutorial provides you the information needed to setup the mapping feature. - Page 59 5ES securityProbe 5ES-X20 Manual b) Now you can browse to the file on your HDD you wish to use. c) In this tutorial we are going to use a 3D map of a town center we are monitoring. d) Choose to have the map as a top level map.
- Page 60 5ES securityProbe 5ES-X20 Manual f) You will now be taken to the map page where it will display your map. To continue adding the sensors click next. g) After clicking next you will be directed to click the “Unlock” button.
- Page 61 5ES securityProbe 5ES-X20 Manual i) After you have positioned the sensors in the correct location of your map click on “Unlock” Updated until firmware 403H - 61 -...
-
Page 62: Monitoring Via The Map Interface
5ES securityProbe 5ES-X20 Manual j) Finally you click on the “Finish: button to save your changes 2. Monitoring via the map interface Now we are going to look at how to monitor the sensor status and use the map interface. -
Page 63: Sensor Filters
5ES securityProbe 5ES-X20 Manual 6) Filters 1) Sensor filters The module now comes equipped with the option to filter your sensor information which is displayed within the summary page. To enter the filter menu, select “Sensor Filters” from the... - Page 64 5ES securityProbe 5ES-X20 Manual Altering your page reload interval can be achieved by using these options shown below:- Once you have selected your preferred filter options, your new settings will be displayed in the “Sensor Information” window found on the summary page:-...
-
Page 65: Syslog Filters
5ES securityProbe 5ES-X20 Manual Syslog filters Syslog filters enable you to customize your syslog window. To begin select the “Syslog filter” tab found on the summary page:- Once you have clicked the tab you will be able to select your filter results by altering various fields... - Page 66 5ES securityProbe 5ES-X20 Manual Altering your reaload interval can be achieved by using the options shown below:- Once you have selected your preferred filter options, your new settings will be displayed in the “System log Information” window found on the summary page:-...
- Page 67 5ES securityProbe 5ES-X20 Manual Updated until firmware 403H - 67 -...
- Page 68 5ES securityProbe 5ES-X20 Manual 7) Making my unit visible on the internet So far the manual has simply covered the basic set up. The setup we have just created will allow you to access your unit on a Local Area Network (LAN), monitor via the web based interface or with SNMP traps.
- Page 69 5ES securityProbe 5ES-X20 Manual I can not see the temperature sensor displayed on summary page I can not access my units web based interface What do my LED lights mean? I have forgotten my units IP address I have forgotten the password for my unit...
- Page 70 5ES securityProbe 5ES-X20 Manual Next click on apply filter. The temperature sensor should then be displayed in the list of connected sensors. b) I can not access my units web interface If you‟re having issues with network connectivity, first ensure that the link100 LED is lit on the front display of the unit.
- Page 71 5ES securityProbe 5ES-X20 Manual c) What do my LED lights mean? The following diagrams show what the various LED displays mean. LED patterns in Normal mode then Updated until firmware 403H...
- Page 72 5ES securityProbe 5ES-X20 Manual LED patterns in Safe mode then Updated until firmware 403H - 72 -...
- Page 73 5ES securityProbe 5ES-X20 Manual LED patterns in Recovery mode then LEDs run clockwise after the power is connected. From left to right each LED indicates 1st LED: U-Boot init 2nd LED: Kernel loaded with good CRC...
- Page 74 5ES securityProbe 5ES-X20 Manual d) I have forgotten my units IP address If you have forgotten the IP address of your unit then you can simply press the rest button on the back of the unit. This will then announce the IP address through the units internal speaker.
- Page 75 5ES securityProbe 5ES-X20 Manual h) How can I change my administrator password? If you wish to make your unit more secure and change the administrator password from the default (public) to your own choice follow these steps :- 1) Log into your unit using the default password.
- Page 76 5ES securityProbe 5ES-X20 Manual SNMP Trap: This form of notification sends out a signal to your SNMP server. E-Mail: This sends a notification via e-mail. SMS: This sends an SMS message to your mobile phone. MMS: This will send you a multimedia message to your mobile phone. This can include an image captured from one of the sensor probes cameras.
- Page 77 5ES securityProbe 5ES-X20 Manual j) Can I connect my unit via WiFi? Yes you can connect the unit via WiFi. Simply plug a USB dongle into the USB port on the rear of the unit. You then need to configure your connection type, and encryption key etc. You do this from the web based interface in the settings tab and the connectivity option.
- Page 78 5ES securityProbe 5ES-X20 Manual j) Can I use the camera for a video conferencing call? Ye sit is perfectly possible to use the camera and the integrated microphone to make a video conferencing calls. To do this you need the software called “OpenPhone” running on your computer.
- Page 79 5ES securityProbe 5ES-X20 Manual Updated until firmware 403H - 79 -...
Need help?
Do you have a question about the SecurityProbe 5ES-X20 and is the answer not in the manual?
Questions and answers