
Related Manuals for Vivant VLEAF GO


Summary of Contents for Vivant VLEAF GO
- Page 1 You Press, You Hit USER MANUAL Read carefully before using the device and save these instructions.
- Page 2 Disclaimer This appliance is intended for use by persons aged 18 years and above. Persons with reduced physical, sensory, mental capabilities, lack of experience/- knowledge will require supervision and instruction to use the appliance safely. Discontinue use and consult a physician if you experience misuses symptoms such as nausea, vomiting, dizziness, diarrhea, weakness and rapid heartbeat or hypertension.
-
Page 3: Table Of Contents
USER MANUAL Table of Contents.............Page 1. About the VLeaF GO..............2 2. List of Components..............4 3. Getting Started...............6 4. Selecting Temp ..............9 5. LED Display................11 6. Session Mode...............12 7. Attaching Waterpipe..............13 8. Cleaning................14 9. Warranty................16 10. Contact Information.............17... -
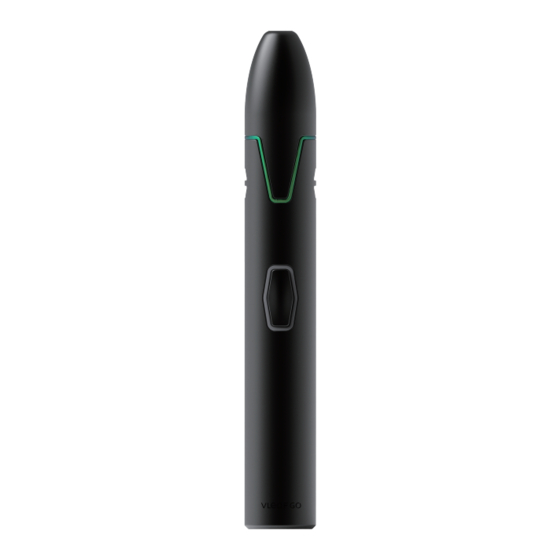
Page 4: About The Vleaf Go
3 temperature levels for choice and a replaceable ceramic heater for easy clean. The last but not the least, to vaporize through water, just insert the cap of VLeaF GO into the down stem of your water pipe without any connectors. - Page 5 About the VLeaF GO Mouthpiece Power Button Battery...
-
Page 6: List Of Components
List of Components The VLeaF GO kit comes with the following: 1 * VLeaF GO 1 * Quick Guide 1 * Cleaning Brush 1 * Packing Tool 1 * USB Cable... - Page 7 List of Components 1 * Silicone Mouthpiece Cover 1 * Air Cooloer 1 * O Ring 2 * O Rings (For Chamber) (For Scoop) 1 * Chamber 1 * Scoop Seal 1 * Mesh Ring 1 * Mesh...
-
Page 8: Getting Started
Getting Started 1. Pull out the top cap. 2. Grind your material. Material 3. Use the scoop to load your material. - Page 9 Getting Started 4. Use the cap to pack down your material. 5. Cap it.
- Page 10 Getting Started 6. Press the fire button 5 times to power on/off. 7. Instant Mode: Press and hold the fire button to vape. Doing several consecutive puffs leading to a longer inhalation when the device is cold may help extract vapor faster. Inhaling for 10-20 seconds (while holding the fire button) produces good extraction.
-
Page 11: Selecting Temp
Selecting Temp. Press the fire button 2 times to select between low (green), medium (yellow), and high (red) temperatures. - Page 12 LED Display The LED light indicates both your temperature levels and battery levels. Temperature Levels GREEN MEDIUM YELLOW HIGH...
-
Page 13: Led Display
LED Display Quickly press the fire button 1 time to check the battery level. Battery Levels Full: Constant green light GREEN Medium: Yellow light flashes slowly. YELLOW Low: Red light flashes quickly. -
Page 14: Session Mode
Session Mode Press the fire button 3 times to start session mode where the device stays on for 30 seconds without the need to hold down the button (quickly press the fire button 1 time to turn off session mode). -
Page 15: Attaching Waterpipe
Attaching Waterpipe To vaporize through water simply remove the silicone mouthpiece cover and insert the cap into the down stem of your waterpipe as shown below:... -
Page 16: Cleaning
Cleaning 1. Remove the rest vaporized flower using the extended section of the cap. If needed use the cleaning brush to remove any residue. 2. Remove the scoop assembly by twisting it counterclockwise. Disassemble the scoop by taking out the chamber and seals. Remove air cooler and mesh screen from the mouthpiece. - Page 17 Cleaning 3. Soak parts in 50% isopropyl alcohol for 10-20 minutes. 4. Rinse the scoop assembly with water and dry off. Install the scoop assembly by twisting it clockwise until it clicks into place.
-
Page 18: Warranty
Product failure or damage caused by using incompatible parts or wires (i.e. using the wrong power cable, etc.). Voiding the warranty is not limited to the conditions stated above. This warranty only covers authentic Vivant brand products and is valid for two years from the user’s date of purchase. -
Page 19: Contact Information
Contact Information Vivant Inc Email: service@vivant.store Web: www.vivant.com...
Need help?
Do you have a question about the VLEAF GO and is the answer not in the manual?
Questions and answers