Table of Contents
Advertisement
Advertisement
Table of Contents

Related Manuals for Grace GDI-VW00


Summary of Contents for Grace GDI-VW00
-
Page 2: Table Of Contents
IMPORTANT SAFETY INSTRUCTIONS ……………………………………………….. 3 PRECAUTIONS …………………………………………………………………………….. BEFORE USE ……………………………………………………………………………….. TURNTABLE PARTS ………………………………………………………………………. LISTENING TO A RECORD ………………………………………………………………. HOW to REPLACE the TURNTABLE STYLUS (NEEDLE) …………………………... RECORD YOUR VINYL to PC using WINDOWS SYSTEM …………………………… SOFTWARE INTRODUCTION ………………………………………………….. SOFTWARE INSTALLATION and USB CONNECTION ……………………… 6 RECORDING OPERATION STEPS ………………………………………………... -
Page 3: Important Safety Instructions
IMPORTANT SAFETY INSTRUCTIONS When using electrical products, basic precautions should always be followed. Please refer below: 1. Read Instructions - All safety and operating instructions should be read before operated. 2. Retain Instructions - Safety and operating instructions should be retained for future reference. 3. -
Page 4: Precautions
recommended by the manufacturer. 21. Heat-The product should be situated away from heat sources such as radiators, heat registers, stoves or other products (including amplifiers) that produce heat. PRECAUTIONS 1. In order to shut off the unit completely, unplug the power cord from the wall outlet, be sure to unplug the unit if you do not intend to use it for a long period of time. -
Page 5: Listening To A Record
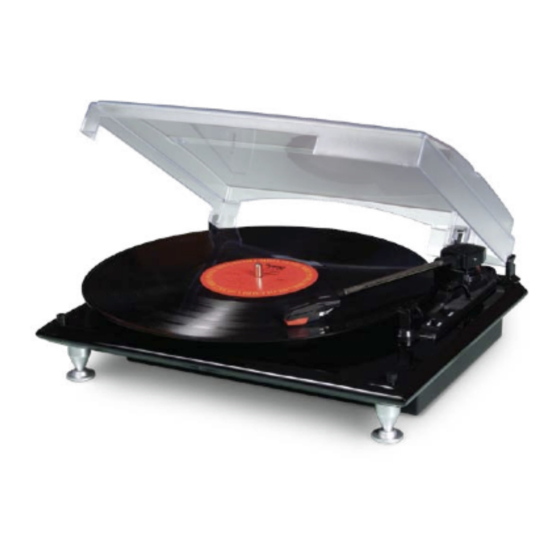
11. AC Power Cord 12. Turntable Feet 13. Style (Needle) Cartridge LISTENING to a RECORD 1. Raise the dust cover _ 2. Connect the AC power cord 3. Use a RCA cable to connect unit’s RCA output the red RCA and white cables are inserted in the red and white jacks accordingly. 4. -
Page 6: Software Installation And Usb Connection
formats. SOFTWARE INSTALLATION and USB CONNECTION To install the Audacity software in your computer, please follow the instructions below. 1. Insert the Audacity software (included) into your computer's disc tray. The Audacity Setup Wizard will appear. Click on "Next" to install the software. 2. - Page 7 3. Continue to click on the "Next" button until the software installation begins.
- Page 8 4. Click on the "Install" button to start the Audacity software installation.
- Page 9 5. Click on "Finish" to complete installation. 6. You can now open the Audacity software and start recording your files.
-
Page 10: Recording Operation Steps
RECORDING OPERATION STEPS 1. Connect the USB cable to your turntable and your computer. No extra driver is required to drive the USB. 2. Power and play your record by lifting the tone arm towards the platter. 3. Double click the Audacity program and you will see this interface screen on your computer. Adjust the output and input volume. - Page 11 5. Select the RECORD button to start recording. 6. Select the to skip to start. 7. Select the button to go to end. 8. Select the PAUSE button to pause the recording. 9. Select the STOP button to stop the recording. 10.
-
Page 12: Converting Recorded Files To .Wav And .Mp3 File Formats
11. Play the saved file. Put the saved file in the Audacity program and press the PLAY button to play the file. CONVERTING RECORDED FILES to .WAV and .MP3 FILE FORMATS Please make sure that you have properly connected the Vinylwriter USB to your computer and follow the instructions below to convert your files to “.wav and .mp3”... - Page 13 4. After copying the file, open the Audacity Software. Click on the "RECORD" Button to start the recording process. Make sure that a vinyl record is playing on the turntable and the USB cable is connected to the turntable and your computer. 5.
- Page 14 7. Click "Yes" button, then go to your Desktop and highlight the lame_enc.dll. Next, click on the "Open" button.
- Page 15 8. Click on the "OK" button and return to the default window of the Audacity Software.
- Page 16 9. Click on the "File" tab and the option will be given to export the recorded file as “.wav”, “.mp3” or “.ogg” file formats. 10. Once you have selected the desired file format to export your recorded music, enter the file name and location where you want to save the file on your computer.
-
Page 17: Record Your Vinyl To Pc Using A Mac System
12. Next, go to the location of the file you have converted. You can play the converted file on any application that supports .WAV or MP3 formats. NOTE: Converted files can be transferred (burned) to a CD. Please refer to the manufacturer's instructions provided with your CD burner or computer for additional details. - Page 18 4. Open “System Preferences” on your MAC: Applications > System Preferences 5. Under ‘Hardware’ click on ‘Sound’ (icon of speaker) 6. Select ‘Input’ and choose the AK5371 USB device. 7. Close the System Preferences window. 8. Ensure the Audacity Software has been downloaded and installed to your computer. Audacity can be downloaded here: http://audacity.sourceforge.net/download/mac 9.
-
Page 19: Tips For Better Turntable Performance
12. Press the RECORD button in the Audacity Software (NOTE: recordings will begin as soon as you release the RECORDING button). Position the needle on your vinyl record where you would like the recording to begin. 13. Press the STOP button when you would like the recording to end. 14. -
Page 20: Specifications
turntable or record’s edge 3. Clean the stylus tip frequently - use a soft brush in a ‘back-to-front’ motion only. 4. If you must use a stylus cleaning fluid, use very sparingly. 5. Wipe the dust cover and turntable housing gently with a soft cloth. Use only a small amount of mild detergent solution to clean the turntable and dust cover.
Need help?
Do you have a question about the GDI-VW00 and is the answer not in the manual?
Questions and answers