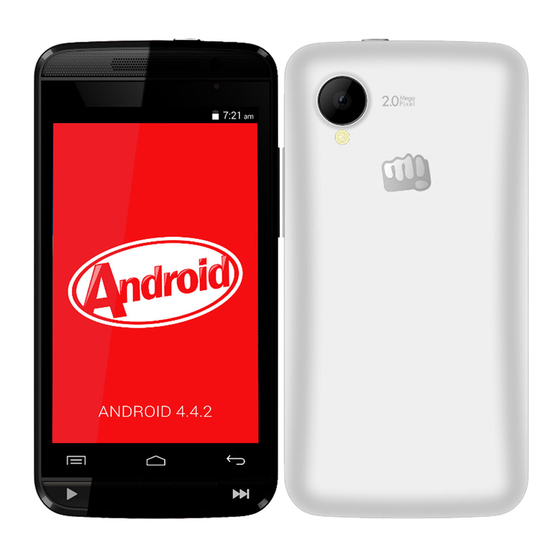
Micromax Bolt Manual
Hide thumbs Also See for Bolt:

Advertisement

Quick Links

Contents

.............................................................................. 1
............................................................................ 3
............................................................................ 17
.............................................................................. 18
-
......................................................... 3
....................................................................... 3
........................................................ 5
.................................................................... 5
........................................................... 5
.................................................................... 7
........................................................ 8
............................................................ 9
............................................................. 9
................................................................... 10
...................................................... 10
.................................................................. 11
............................................................... 12
....................................................... 16
...................................................... 17
.................................................................. 17
................................................................... 17
...................................................... 18
...................................................................... 18
........................................................ 20
..................................................... 6
............................................... 13
.......................................... 19
1

Advertisement

Table of Contents
loading

Summary of Contents for Micromax Bolt

  • Page 1: Table Of Contents

    Contents ................1 ONTENTS ............3 NDROID DVANTAGE ............... 3 IRST ................3 ISCLAIMER ............5 NDERSTAND HONE ..............5 ETTING TARTED SIM C ............5 NSERTION ............. 6 EMORY NSERTION ..............7 ANDSET ............8 HARGING THE ATTERY ............9 ASIC HONE EATURES...
  • Page 2 ............21 ALLING AND ESSAGING ..............21 AKE A ................ 21 ONTACTS ..............22 IRPLANE ..............23 ESSAGE ................. 24 ULTIMEDIA ................24 AMERA ................24 ALLERY ..............24 USIC LAYER FM R ................ 26 ADIO ..............27 IDEO LAYER ..................
  • Page 3: The Android Advantage

    The Android Advantage Micromax A082 comes with KitKat 4.4.2 that is capable of performing various functions just like your personal computer and can be personalized according to your own needs. For example, you can add and remove applications or upgrade existing applications to improve the functions.
  • Page 4 Micromax keeps the right to modify the content in this user guide without prior notice.  Upon first use of your device, your device will send information related to your mobile, IMEI numbers, location details and other software details through SMS* automatically.
  • Page 5: Understand Your Phone

    Understand Your Phone Getting Started SIM Card Insertion Your A082 is a dual SIM phone. Switch off your phone before SIM insertion/removal and insert the SIM card in the SIM slots correctly. 2. Remove battery. 3. Insert SIM 1. Remove back cover.
  • Page 6: Memory Card Insertion

    1. Remove back 2. Remove 3. Insert memory cover. battery. card. Use only compatible memory cards approved by Micromax with this device. Incompatible memory cards may damage the card or the device and corrupt the data stored in the card.
  • Page 7: Handset Keys

    Handset Keys Keys Functions  Long press to switch on or switch off the phone.  Press once to turn off the screen or to wake up the screen.  Press for 2 seconds to view quick options to turn off the phone, reboot the device, switch to airplane mode, or adjust the sound profiles.
  • Page 8: Charging The Battery

    PC with a USB cable. You can also use a compatible USB charger to charge your battery. Use only Micromax approved chargers and cables. Unapproved chargers or cables can cause battery to explode or damage your device.
  • Page 9: Basic Phone Features

    continuously for the first time. Basic Phone Features Google Account Your Google Account lets you take full advantage applications services offered by Google Android market. Configure your Google account on this handset to get access to your Google mails, Google Play Store, Google Maps, and much more.
  • Page 10: Home Screen

    Home Screen You can personalize your home screen with shortcuts, widgets, wallpapers and other items. To view quick options to change wallpaper, add widgets, or open settings section, tap the key. You can add extensions to the home screen by placing widgets or application shortcuts on the extended home screen.
  • Page 11: Notifications

    to view all inbuilt and installed applications. In the application menu, tap and hold any application to take it to the home screen; release the hold to place at any desired location on the home screen. Notifications Notification icons inform you of new messages and events as and when it appears in the device.
  • Page 12: Gravity Sensor

    Open the Toolkit Clear all Notifications When you receive a notification, its icon appears in the status bar, along with a brief summary. You may clear each notification separately by swiping it towards left or right. Toolkit provides you shortcuts to manage basic phone features, such as Airplane Mode, Wi-Fi, Display Brightness, and many more.
  • Page 13: Phone Locking Techniques

    You can enable/disable the auto-rotate feature from → → Display → Auto-rotate screen. Phone Locking Techniques You may need to provide PIN, password, draw a pattern, take your face in front of the phone screen, speak something for voice recognition, or simply slide to unlock your phone. Slide unlock will be the default unlocking method in the phone.
  • Page 14 Look at your phone to unlock it! Voice Recognition Allows you to provide your voice screen unlocking password. You need to speak something the phone to recognize your voice and unlock the screen. Speak your password to unlock! You may enter a PIN and set it as your screen unlocking...
  • Page 15 Set and draw your desired pattern! Password You may enter any desired password and set it as your screen unlocking password. Enter your password to unlock! Slide Just wake screen and slide the lock icon towards the unlock icon to unlock your phone.
  • Page 16: Use Google Tm Search

    You can disable all unlocking methods from your handset by selecting the None option. Use Google Search Search anything in your phone or in the outside world from Google Search. You can type your search keywords or can even speak it up as your search supports voice recognition also. Use voice commands to access various useful sections on your handset.
  • Page 17: Using The Touch Screen

    Using the Touch Screen Tap and Hold Tap and hold an item to view the list of actions based on the selected item and condition. Also, move an item from the Apps screen to the home screen using this method. Drag an Item Tap and hold an item and move your finger on the screen until you reach the target position.
  • Page 18: Swipe

    Swipe Place a finger on the screen and steadily slide your finger in the desired direction. For example, when you are viewing a picture, to view the next picture, swipe left. Using the Pinch Zoom You can open any image or web page and then use your thumb and index finger to zoom the display...
  • Page 19: Using The Onscreen Keyboard

    Using the Onscreen Keyboard Some applications display the keyboard by default. In others, you will be required to tap a text field, where you want to enter text, to open the keyboard. QWERTY touch Tap to change the sentence casing. Backspace to erase the entered text.
  • Page 20: Recent Applications

    Recent Applications Tap and hold the key on the home screen to view the list of recent applications. You can easily remove items from the list to free some memory and make your phone work faster. There are two ways to remove items from the list. Drag an item towards left or Tap and hold an item right.
  • Page 21: Calling And Messaging

    Calling and Messaging Make a Call To make a call: on the menu screen or the home screen to open the dial pad for making calls. By default, the dialer will display a list of contacts on which calls have been made very often and the contacts which have been marked as favorites.
  • Page 22: Airplane Mode

    Add a new contact in the contacts list by tapping You can synchronize your contacts list with any of your accounts configured on this device. To synchronize your contacts list: Tap the key from the contacts screen and then tap Accounts.
  • Page 23: Send Message

    AIRPLANE MODE. Send Message To send a message: on the menu screen or the home screen to go to the messaging section and then tap compose a message. Tap the icon to view the types of files that can be attached and select the desired type of multimedia file.
  • Page 24: Multimedia

    Multimedia Camera Go to → Manage camera flash Swap between light front and back camera Capture Capture modes Switch to Video Recording mode Settings Gallery Go to → You can use the Gallery to view pictures and share files. Tap an album to open and view its contents.
  • Page 25 Single Opens the speaker playlist SIM card mode Turn on/off Turn on/off repeat songs shuffle songs Play/Pause song Play previously Play next song in the played song playlist Press the phone’s volume up/down keys on the right side of the mobile phone to adjust the volume. You can use an SD card to enhance the storage capacity for your multimedia files such as music, photos, emails, and so on.
  • Page 26: Fm Radio

    FM Radio Go to → You can listen to your favorite FM channels using the inbuilt FM receiver of your phone. Before starting the FM, you need to plug- in the headset as it works as antenna for the FM radio. Use the intuitive buttons and icons on the phone in the radio interface to enjoy the features of your inbuilt FM radio.
  • Page 27: Video Player

    Video Player → Go to Stop/Loop the video Change the video Play/Pause video screen size Settings, Networks, and Applications Your phone can connect to a variety of networks and devices, including Internet, Wi-Fi, GPRS, BT, devices, such as headsets. You can also transfer files to/from your PC through the data cable.
  • Page 28: Connect To The

    Connect to the Internet To configure Internet: Go to → More → Mobile networks → → Access Point Names and select the SIM for which access point name is to be configured. Select the access point name if required. Go to →...
  • Page 29: Pair With Bt Devices

    cable. Select the USB tethering option. Select your phone network as the network connection in your PC/laptop and get access to the Internet. BT Tethering Pair your phone with the BT enabled PC/laptop via BT pairing option. Select the BT tethering option in your phone. On the paired PC/laptop, select the BT device (your phone) and choose to connect to the Internet.
  • Page 30: Configuring E-Mail

    If your phone stops scanning before you make the other device discoverable, tap SEARCH FOR DEVICES. Tap Micromax A082 at the top of the scanned device list to make your A082 visible on other devices.
  • Page 31: Google Tm Maps

    Maps. When you use the map, you use your Internet connection to transfer data to and from your phone. The Google Maps application may not be available in every street, country or region. Micromax does not guarantee the accuracy of any directional services.
  • Page 32: Manage Applications

    Manage Applications Your phone comes with a host of applications to make your life easier and more convenient. The Android phones offer users access to unlimited entertainment sources. You can download applications, games, movies, and books from the ever increasing Android market.
  • Page 33 The phone may cause interference in the vicinity of TV sets, radios and PCs. Only use Micromax specified batteries and charging devices. All batteries can cause property damage, injury or burns if a conductive material taps the exposed terminals. Exercise care...
  • Page 34: Taking Care Of Your Device

    Professional service: The phone must be installed or repaired by Micromax authorized personnel. You are likely to suffer a huge risk when you install or repair this phone by yourself, which also goes against the warranty rules.
  • Page 35: Battery Recommendations

    Replace the battery with a new battery of the same make and specification.  Use manufacturer approved batteries, chargers, accessories and supplies. Micromax will not be held responsible for user’s safety when using unapproved accessories or supplies.  Do not discard the battery with household trash. Please dispose of used battery according to your local environmental laws and guidelines.
  • Page 36: Copyright

    Note: Micromax will not bear any responsibility for any incompliance with the above mentioned guidelines or improper usage of the mobile phone. Copyright All rights reserved. Reproduction, transfer, distribution or storage of part or all of the contents in this document in any form without the prior written...

This manual is also suitable for:

A082

Table of Contents