Table of Contents
Advertisement
Quick Links
CAUTION: DO NOT EXCEED MAXIMUM LISTED WEIGHT CAPACITY. SERIOUS INJURY OR
PROPERTY DAMAGE MAY OCCUR!
200x200/300x300/400x200/
400x400/600x400/800x400/
800x600/800x800/1000x400/
1000x600/1000x800
Este manual esta disponible en español en la página de Tripp Lite: www.tripplite.com
Ce manuel est disponible en français sur le site Web de Tripp Lite : www.tripplite.com
Русскоязычная версия настоящего руководства представлена на веб-сайте компании
Dieses Handbuch ist in deutscher Sprache auf der Tripp Lite-Website verfügbar: www.tripplite.com
1111 W. 35th Street, Chicago, IL 60609 USA • www.tripplite.com/support
14-10-272-9333EF.indd 1
Owner's Manual
Tilt Flat Screen
Wall Mount
MODEL: DWT60100XX
Tripp Lite по адресу: www.tripplite.com
Copyright © 2014 Tripp Lite. All rights reserved.
100"
MAX
1
159 kg
(350 lbs)
MAX
11/24/2014 3:08:54 PM
Advertisement
Table of Contents

Related Manuals for Tripp Lite DWT60100XX


Summary of Contents for Tripp Lite DWT60100XX
- Page 1 1000x600/1000x800 Este manual esta disponible en español en la página de Tripp Lite: www.tripplite.com Ce manuel est disponible en français sur le site Web de Tripp Lite : www.tripplite.com Русскоязычная версия настоящего руководства представлена на веб-сайте компании Tripp Lite по адресу: www.tripplite.com Dieses Handbuch ist in deutscher Sprache auf der Tripp Lite-Website verfügbar: www.tripplite.com...
- Page 2 PRODUCT REGISTRATION Visit www.tripplite.com/warranty today to register your new Tripp Lite product. You’ll be automatically entered into a drawing for a chance to win a FREE Tripp Lite product!* * No purchase necessary.
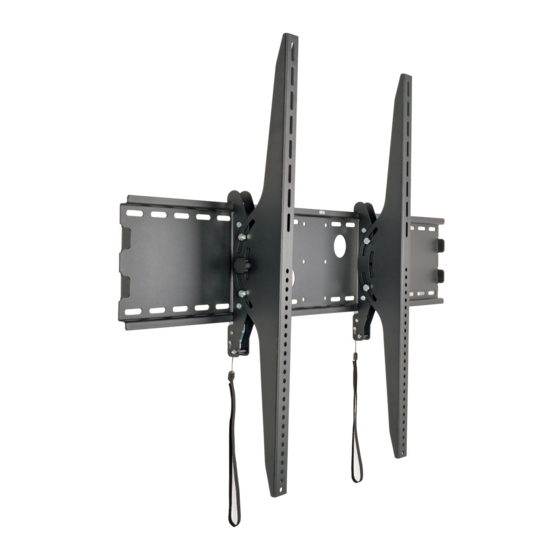
- Page 3 Component Checklist IMPORTANT: Ensure that you have received all parts according to the component checklist prior to installing. If any parts are missing or faulty, visit www.tripplite.com/support for service. Wall Plate (x1) Adapter Bracket (x2) Template (x1) Tilt Adjusting Knob (x2) Package M M5X14 (x4) M6X14 (x4)
- Page 4 1a. Mount on Wood Stud Wall Find and mark the exact location of mounting holes Template Drill pilot holes Wall Plate Screw the wall plate onto the wall Anchor Bolt D8 Washer WARNING • Make sure that mounting screws are anchored into the center of the studs. Use of a stud finder is highly recommended.
- Page 5 1b. Mount on Solid Brick and Concrete Block Mark the exact location of mounting holes Template Drill pilot holes Wall Plate Concrete Anchor Screw the wall plate onto the wall D8 Washer Anchor Bolt WARNING • When installing wall mounts onto a concrete masonry unit (also known as a CMU or “cinder block”), verify that the actual concrete thickness is at least 35mm (1-3/8”) in order to hold the concrete anchors.
- Page 6 2. Install Adapter Brackets 2-1 Prepare Adapter Brackets Tilt Adjusting Knob 2-2 For Flat Back Screen M5X14 M6X14 M8X20 Washer 14-10-272-9333EF.indd 6 11/24/2014 3:08:57 PM...
- Page 7 2. Install Adapter Brackets 2-3 For Recessed Back Screen or to Access A/V Inputs M8X20 M6X30 M8X20 M8X30 Washer Washer Small Small Spacer Spacer Small Spacer M6X30 M6X30 M8X30 M8X30 Washer Washer Small Spacer Spacer Spacer Note: Choose appropriate screws, washers and spacers (if necessary) according to the type of screen. •...
- Page 8 4. Adjustment Tilt Adjusting Knobs +15° -15° To adjust the tilt angle, loosen the Tilt Adjusting Knobs located on the sides of the adapter brackets. Once the display is at the desired angle, retighten the knobs to hold. Maintenance • Check that the bracket is secure and safe to use at regular intervals (at least every three months). •...
Need help?
Do you have a question about the DWT60100XX and is the answer not in the manual?
Questions and answers