Table of Contents
Advertisement
Available languages
Available languages
1007359253
SKU #
1007359252
Model #HVO170W/
HVO170B
USE AND CARE GUIDE
OVER THE RANGE MICROWAVE
Questions, problems, missing parts? Before returning to the store,
Call Vissani Customer Service
Monday - Friday 8 a.m. to 8 p.m., Saturday 8 a.m. to 6 p.m.
1-855-847-7264
HOMEDEPOT.COM
THANK YOU
We appreciate the trust and confidence you have placed in Vissani through the purchase of this wine cooler. We strive to continually create
quality products designed to enhance your home. Visit us online to see our full line of products available for your home improvement needs.
Thank you for choosing Vissani!
Advertisement
Chapters
Table of Contents

Related Manuals for Vissani HVO170W


Summary of Contents for Vissani HVO170W
- Page 1 THANK YOU We appreciate the trust and confidence you have placed in Vissani through the purchase of this wine cooler. We strive to continually create quality products designed to enhance your home. Visit us online to see our full line of products available for your home improvement needs.
-
Page 2: Table Of Contents
Table of Contents Table of Contents ........2 UTENSILS . - Page 3 Safety Information (continued) 6. Use this appliance only for its intended use as described in the manual. Do not use corrosive chemicals or vapors in this appliance. This type of oven is specifically designed to heat, cook or dry food. It is not designed for industrial or laboratory use. 7.
-
Page 4: Grounding Instructions
Safety Information (continued) GROUNDING INSTRUCTIONS This appliance must be grounded. In the event of an electrical short circuit, grounding reduces the risk of electric shock by providing an escape wire for the electric current. This appliance is equipped with a cord having a grounding wire with a grounding plug. The plug must be plugged into an outlet that is properly installed and grounded. -
Page 5: Utensils
Safety Information (continued) Utensil Test: 1. Fill a microwave-safe container with 1 cup of cold water (250ml) along with the utensil in question. 2. Cook on maximum power for 1 minute. 3. Carefully feel the utensil. If the empty utensil is warm, do not use it for microwave cooking. 4. -
Page 6: Pre-Operation
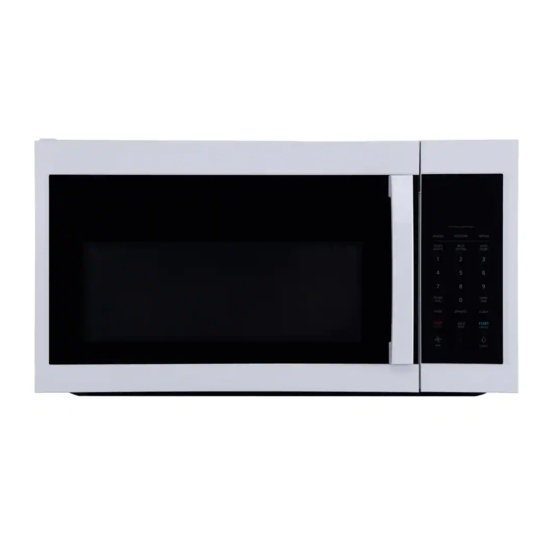
Pre-Operation PART NAMES 1. Microwave oven door with see-through window 2. Door hinges 3. Waveguide cover: DO NOT REMOVE. 4. Turntable motor shaft 5. Microwave oven light It will light when microwave oven is operating or door is open. 6. Safety door latches The microwave oven will not operate unless the door is securely closed. - Page 7 CONTROL PANEL The 7-digit Interactive Display spells out operating steps and shows cooking hints. 1. DISPLAY 2. VEGGIES 3. POPCORN 4. SNACK MENUS 5. MELT/SOFTEN 6. Numeric pads (0 thru 9) 7. POWER LEVEL 8. TIMER 9. DEFROST 10. STOP/CLEAR 11.
-
Page 8: Operation
Operation(continued) □ Before operating your new oven make sure you read and SETTING THE TIMER understand this Use and Care Guide completely. □ The clock can be disabled when the microwave is first Your microwave oven can be used as a kitchen timer. You can set plugged in and the STOP key is selected. - Page 9 Operation(continued) WEIGHT DEFROST TIME DEFROST TOUCH DISPLAY SHOWS : TOUCH DISPLAY SHOWS : 1. Defrost X1 1. Defrost X2 3. Start+30sec. Time counting down 3. Start+30sec. Time counting down NOTE: The buzzer will sound to remind you of turning over the food when half of the time has passed on.
- Page 10 Operation(continued) VEGGIES POPCORN Press “Popcorn” key and LED displays 3.3 oz. Press “Popcorn” TOUCH DISPLAY SHOWS : repeatedly to choose the desired weight. Veggies X1 □ Suppose you want to cook 3.3 oz. popcorn. TOUCH DISPLAY SHOWS : Veggies X2 1.
- Page 11 Operation(continued) AUTO COOK MELT/SOFTEN There are 5 options(Bacon,Dinner Plate,Rice,Frozen The oven uses low power to melt and soften items. See the breakfast,Frozen Pizza)under the auto cook. following table. □ Suppose you want to melt 2 sticks of Butter. TOUCH DISPLAY SHOWS : TOUCH DISPLAY SHOWS :...
- Page 12 Operation(continued) VENT FAN LIGHT The pad controls the 2-speed vent fan. If the vent fan is OFF, the The pad controls the 2-states light. If the light is OFF the first touch first touch of the Vent pad will turn the fan on HIGH, second touch of the light pad will turn the light on ON , second touch OFF LOW and third touch OFF.
- Page 13 Operation(continued) DEMO SETTING In waiting state TOUCH DISPLAY SHOWS : 1. USER PREF x4 2. Start+30sec. 3. Start+30sec. Time counting down HOMEDEPOT.COM Please contact 1-8 - 7- 55 84 7264 for further assistance.
-
Page 14: Troubleshooting
Troubleshooting MAINTENANCE Check your problem by using the chart below and try the solutions for each problem. If the microwave oven still does not work properly, contact the nearest authorized service center. TROUBLE POSSIBLE CAUSE POSSIBLE REMEDY Electrical cord for oven is not plugged in. Plug into the outlet. - Page 16 Questions, problems, missing parts? Before returning to the store, Call Vissani Customer Service Monday - Friday 8 a.m. to 8 p.m., Saturday 8 a.m. to 6 p.m. 1-855-847-7264 HOMEDEPOT.COM Retain this manual for future use.
- Page 17 GRACIAS Agradecemos la confianza que ha depositado en Vissani con la compra de este microondas. Nos esforzamos por crear continuamente productos de calidad diseñados para mejorar su hogar. Visítenos en línea para ver nuestra línea completa de productos disponibles para...
- Page 18 Tabla de contenido Tabla de contenido ........2 MATERIALES QUE PUEDE UTILIZAR EN EL HORNO Información de seguridad .
-
Page 19: Información De Seguridad
Información de seguridad (continuación) 3. Este aparato debe estar conectado a tierra. Conéctelo solo a un tomacorriente debidamente conectado a tierra. Consulte las “INSTRUCCIONES DE CONEXIÓN A TIERRA” que se encuentran en la página 4. 4. Instale o ubique este aparato solo de acuerdo con las instrucciones de instalación provistas. 5. -
Page 20: Instrucciones De Conexión A Tierra
Información de seguridad (continuación) 21. No coloque nada directamente sobre la superficie del aparato cuando el aparato esté en funcionamiento. 22. Limpie las campanas de ventilación con frecuencia: no se debe permitir que la grasa se acumule en la campana o el filtro. 23. -
Page 21: Materiales Que Puede Utilizar En El Horno Microondas
Información de seguridad (continuación) UTENSILIOS PRECAUCIÓN - Riesgo de lesiones personales Los utensilios bien cerrados podrían explotar. Los recipientes cerrados deben abrirse y las bolsas de plástico deben perforarse antes de cocinar. Consulte las instrucciones en “Materiales que puede utilizar en el horno microondas o que deben evitarse en el horno microondas”. Puede haber ciertos utensilios no metálicos que no son seguros para usar en el microondas. -
Page 22: Materiales Que Se Deben Evitar En El Horno Microondas
MATERIALES QUE SE DEBEN EVITAR EN EL HORNO MICROONDAS UTENSILIOS OBSERVACIONES Bandeja de aluminio Puede causar arcos eléctricos. Transfiera la comida a un plato apto para microondas. Cartón de comida con asa de Puede causar arcos eléctricos. Transfiera la comida a un plato apto para microondas. metal Utensilios de metal o con bordes El metal protege los alimentos de la energía de microondas. -
Page 23: Previo A La Operación
Previo a la operación NOMBRES DE LAS PIEZAS 1. Puerta del horno microondas con ventana transparente 2. Bisagras de puerta 3. Cubierta de la guía de ondas: NO RETIRAR. 4. Eje del motor del plato giratorio 5. Luz del horno microondas 6. - Page 24 PANEL DE CONTROL La pantalla interactiva de 7 dígitos detalla los pasos operativos y muestra sugerencias de cocción. 1. Visualización: 2. VERDURAS 3. PALOMITAS DE MAÍZ 4. MENÚ DE SNACK 5. DERRETIR/ABLANDAR 6. Teclas numéricas (0 a 9) 7. NIVEL DE POTENCIA 8.
- Page 25 OPERACIÓN(continuación) □ Antes de operar su nuevo horno, asegúrese de leer y AJUSTE DEL TEMPORIZADOR comprender completamente esta Guía de uso y cuidado. □ El reloj puede desactivarse cuando el microondas se Su horno microondas se puede utilizar como temporizador de conecta por primera vez y se selecciona cocina.
-
Page 26: Cocción Rápida
OPERACIÓN(continuación) DESCONGELACIÓN POR PESO DESCONGELACIÓN POR TIEMPO VISOR TÁCTIL MUESTRA: VISOR TÁCTIL MUESTRA: 1. Defrost X1 1. Defrost X2 3. Start+30sec. Tiempo contando 3. Start+30sec. Tiempo contando NOTA: El timbre sonará para recordarle que debe dar vuelta la comida cuando haya pasado la mitad del tiempo. USO DE LAS TECLAS NUMÉRICAS COCCIÓN RÁPIDA PARA “1-6”... - Page 27 OPERACIÓN(continuación) VERDURAS PALOMITAS DE MAÍZ Presione la tecla “Palomitas de maíz” y el LED mostrará 3.3 oz. VISOR TÁCTIL MUESTRA: Presione “Palomitas de maíz” repetidamente para elegir el peso Veggies X1 deseado. □ Suponga que quiere cocinar 3.3 oz. de palomitas de maíz. Veggies X2 VISOR TÁCTIL MUESTRA: 1.
- Page 28 OPERACIÓN(continuación) MENÚS DE BOCADILLOS COCCIÓN AUTOMÁTICA Hay 4 opciones (perritos calientes, comida congelada para niños en Hay 5 opciones (tocino, plato de cena, arroz, desayuno congelado, una taza, sopa) en el menú de bocadillos. pizza congelada) en la función de cocción automática. □...
- Page 29 OPERACIÓN(continuación) DERRETIR/ABLANDAR BLOQUEO PARA NIÑOS El horno usa poca potencia para derretir y ablandar los alimentos. VISOR TÁCTIL MUESTRA: Consulte la siguiente tabla. BLOQUEAR o STOP/CANCEL □ Suponga que quiere derretir 2 barras de mantequilla. (durante 3 segundos) VISOR TÁCTIL MUESTRA: (si el reloj está...
- Page 30 OPERACIÓN(continuación) PREFERENCIA DE USUARIO El teclado controla la luz de 2 estados. Si la luz está APAGADA, TECLA CONFIGURACIÓN cuando toque el teclado por primera vez, se encenderá la luz; al USER PREF x1 Volumen alto/medio/bajo/apagado tocarlo por segunda vez, se APAGARÁ □...
-
Page 31: Solución De Problemas
Solución de problemas MANTENIMIENTO Verifique su problema usando el cuadro a continuación y pruebe las soluciones para cada problema. Si el horno microondas aún no funciona correctamente, comuníquese con el centro de servicio autorizado más cercano. PROBLEMA CAUSA POSIBLE POSIBLE SOLUCIÓN Enchufe en el tomacorriente. - Page 32 ¿Preguntas, problemas, piezas faltantes? Antes de regresar a la tienda, llame al Servicio de atención al cliente de VISSANI. De lunes a viernes de 8 a. m. a 8 p. m. EST, sábados de 8 a. m. a 6 p. m. EST 1-855-847-7264 HOMEDEPOT.COM...
Need help?
Do you have a question about the HVO170W and is the answer not in the manual?
Questions and answers
How do I defrost in model # HVO1170W
To defrost in the Vissani HVO170W model, use the automatic-defrost program. This feature is designed to defrost one pound of frozen ground chuck evenly. Specific steps for activating the defrost function are not provided in the context. Refer to the microwave’s control panel and user manual for detailed instructions.
This answer is automatically generated
what are the presets
The Vissani HVO170W has the following user preference presets:
1. Volume: High / Medium / Low / Off
2. Weight units: lb (pounds) / kg (kilograms)
3. Clock display: On / Off
4. Demo mode: On / Off
This answer is automatically generated
How can I get a replacement microwave turntable that broke? I have the Vissani HV0170W.
To obtain a replacement turntable for the Vissani HVO170W microwave, contact Vissani Customer Service at 1-855-847-7264. They are available Monday to Friday from 8 a.m. to 8 p.m. and Saturday from 8 a.m. to 6 p.m.
This answer is automatically generated
How do you fix the door handle if it comes off from the door, how do you get to the screw.