Table of Contents
Advertisement
Quick Links
Advertisement
Table of Contents

Subscribe to Our Youtube Channel
Related Manuals for AEG HDB95520K


Summary of Contents for AEG HDB95520K
- Page 1 HDB95520K User Manual USER MANUAL...
-
Page 2: Table Of Contents
10. ENERGY EFFICIENCY..................26 FOR PERFECT RESULTS Thank you for choosing this AEG product. We have created it to give you impeccable performance for many years, with innovative technologies that help make life simpler – features you might not find on ordinary appliances. Please spend a few minutes reading to get the very best from it. - Page 3 ENGLISH instructions in a safe and accessible location for future reference. 1.1 Children and vulnerable people safety This appliance can be used by children aged from 8 • years and above and persons with reduced physical, sensory or mental capabilities or lack of experience and knowledge if they have been given supervision or instruction concerning the use of the appliance in a safe way and understand the hazards involved.
- Page 4 WARNING: The appliance must not be supplied • through an external switching device, such as a timer, or connected to a circuit that is regularly switched on and off by a utility. CAUTION: The cooking process has to be supervised.
-
Page 5: Safety Instructions
ENGLISH When you route the mains cable, make sure that the • cable doesn't come into direct contact (for example using insulating sleeving) with parts that can reach temperatures of more than 50°C above room temperature. WARNING: Use only hob guards designed by the •... - Page 6 • Do not let the electricity mains cable • This appliance is not connected to a tangle. device, which evacuates the products • Make sure that a shock protection is of combustion. Make sure to connect installed. the appliance according to current •...
- Page 7 ENGLISH temperature than oil used for the first other purposes, for example room time. heating. • Do not put flammable products or • Do not let acid liquids, for example items that are wet with flammable vinegar, lemon juice or limescale products in, near or on the appliance.
-
Page 8: Installation
• Contact your municipal authority for • Cut off the mains electrical cable information on how to discard the close to the appliance and dispose of appliance correctly. • Disconnect the appliance from the • Flat the external gas pipes. - Page 9 ENGLISH The manufacturer will not accept liability, CAUTION! should the above instructions or any of Make sure that the gas the other safety instructions incorporated supply pressure of the in this instruction booklet be ignored. appliance obeys the On the end of the shaft, which includes recommended values.
- Page 10 Electrical Requirements 3.6 Adjustment of minimum Permanent electrical installation must agree with the latest I.E.E. Regulations level and local Electricity Board regulations.
- Page 11 ENGLISH 3.10 Assembly WARNING! A cut off plug inserted into a 13 amp socket is a serious shock hazard. Ensure that the cut off plug is disposed of safely. min. 650mm min. 3.8 Replacement of the 450mm connection cable The replacement of electric min.
- Page 12 CAUTION! Install the appliance only on a worktop with a flat surface. 3.11 Possibilities for insertion R 5 mm 600 mm Kitchen unit with oven The electrical connection of the hob and 490 mm 830 mm the oven must be installed separately for min.
-
Page 13: Product Description
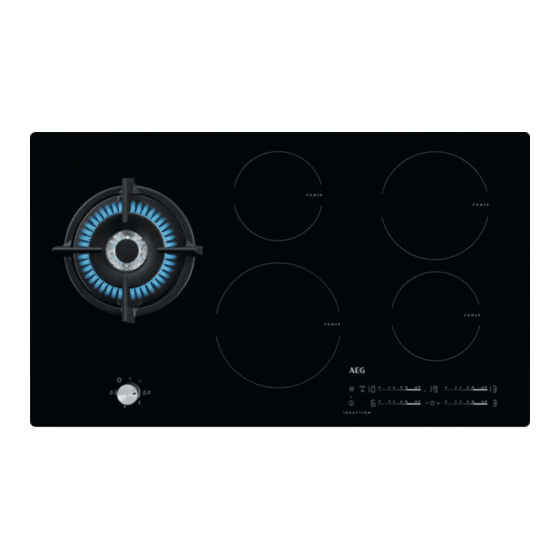
ENGLISH 4. PRODUCT DESCRIPTION 4.1 Cooking surface layout Dual burner Induction cooking zones 145 mm 180 mm Control panel Control knob 145 mm 210 mm 4.2 Control knob Symbol Description Symbol Description minimum gas supply no gas supply / off posi‐ internal crown tion ignition position / maxi‐... - Page 14 Sensor Function Comment field STOP+GO To activate and deactivate the function. Heat setting display To show the heat setting. Timer indicators of cook‐ To show for which zone you set the time. ing zones Timer display To show the time in minutes.
-
Page 15: Daily Use
ENGLISH The induction cooking zones produce the The glass ceramic is heated by the heat heat necessary for the cooking process of the cookware. directly in the bottom of the cookware. 5. DAILY USE lets the thermocouple warm up. If WARNING! not, the gas supply is interrupted. - Page 16 • the hob gets too hot (e.g. when a WARNING! saucepan boils dry). Let the cooking Always turn the flame down zone cool down before you use the or switch it off before you hob again. remove the pans from the •...
- Page 17 ENGLISH To activate the function for a cooking When the countdown ends, zone: touch comes on). an acoustic signal sounds Immediately touch a desired heat setting. and 00 flashes. The cooking zone deactivates. After 3 seconds comes on. To deactivate the function: change the To stop the sound: touch heat setting.
-
Page 18: Hints And Tips
To activate the function: touch comes on. Touch of the timer to comes on. choose one of the following: • - the sounds are off To deactivate the function: touch • - the sounds are on The previous heat setting comes on. - Page 19 ENGLISH For induction cooking zones CAUTION! a strong electro-magnetic Do not use cast iron pans, field creates the heat in the clay or earthenware pots, cookware very quickly. grilling accessories or toaster plates. Use the induction cooking zones with suitable cookware. Gas: •...
- Page 20 6.4 The noises during 6.5 Examples of cooking operation (for induction applications (for induction cooking zones) cooking zones) If you can hear: The relation between the heat setting and the cooking zone consumption of • crack noise: cookware is made of power is not linear.
-
Page 21: Care And Cleaning
ENGLISH 7. CARE AND CLEANING 4. For the burner to operate correctly, WARNING! make sure that the arms of the pan Refer to Safety chapters. supports are aligned with the centre of the burner inserted in the recesses 7.1 General information of the enamelled plates. -
Page 22: Troubleshooting
8. TROUBLESHOOTING WARNING! Refer to Safety chapters. 8.1 What to do if... Problem Possible cause Remedy You cannot activate or oper‐ The hob is not connected to Check if the hob is correctly ate the hob. an electrical supply or it is connected to the electrical connected incorrectly. - Page 23 ENGLISH Problem Possible cause Remedy The sensor fields become The cookware is too large or Put large cookware on the hot. you put it too near to the rear zones if possible. controls. There is no signal when you The signals are deactivated. Activate the signals.
-
Page 24: Technical Data
Problem Possible cause Remedy The flame ring is uneven. Burner crown is blocked with Make sure that the injector is food residues. not blocked and the burner crown is clean. 8.2 If you cannot find a during the warranty period. The instructions about the Service Centre solution... - Page 25 ENGLISH 9.2 Cooking zones specification Cooking zone Nominal power PowerBoost PowerBoost Cookware di‐ (maximum maximum dura‐ ameter [mm] heat setting) tion [min] Middle front 2200 3600 180 - 210 Middle rear 1400 2500 125 - 145 Right front 1400 2500 125 - 145 Right rear 1800...
-
Page 26: Energy Efficiency
Dual 46D + 2x72D 334 Dual (inter‐ nal crown) 10. ENERGY EFFICIENCY 10.1 Product information according to EU 66/2014 Model identification HDB95520K Type of hob Built-in hob Number of electric cooking zones Heating technology per electric cook‐ Induction ing zone... - Page 27 ENGLISH 10.2 Energy saving • Before use, make sure that the burners and pan supports are assembled correctly. • Use cookware with diameters applicable to the size of burners. • Center the pot on the burner. • When you heat up water, use only the amount you need. •...
- Page 28 www.aeg.com/shop...
Need help?
Do you have a question about the HDB95520K and is the answer not in the manual?
Questions and answers