
Subscribe to Our Youtube Channel
Related Manuals for EuroLite LED Z-1000


Summary of Contents for EuroLite LED Z-1000
- Page 1 BEDIENUNGSANLEITUNG USER MANUAL LED Z-1000 Beam Effect Für weiteren Gebrauch aufbewahren! © Copyright Keep this manual for future needs! Nachdruck verboten! Reproduction prohibited!
- Page 2 2/24 00086340, Version 1.1...
-
Page 3: Table Of Contents
Diese Bedienungsanleitung gilt für die Artikelnummer: / This user manual is valid for the article number: 51918221 Das neueste Update dieser Bedienungsanleitung finden Sie im Internet unter: You can find the latest update of this user manual in the Internet under: www.eurolite.de 3/24 00086340, Version 1.1... -
Page 4: Einführung
- sich die letzte Version der Anleitung im Internet herunter laden EINFÜHRUNG Wir freuen uns, dass Sie sich für einen EUROLITE LED Z-1000 Strahleneffekt entschieden haben. Wenn Sie nachfolgende Hinweise beachten, sind wir sicher, dass Sie lange Zeit Freude an Ihrem Kauf haben werden. - Page 5 Bitte überprüfen Sie vor der ersten Inbetriebnahme, ob kein offensichtlicher Transportschaden vorliegt. Sollten Sie Schäden an der Netzleitung oder am Gehäuse entdecken, nehmen Sie das Gerät nicht in Betrieb und setzen sich bitte mit Ihrem Fachhändler in Verbindung. Der Aufbau entspricht der Schutzklasse I. Der Netzstecker darf nur an eine Schutzkontakt-Steckdose angeschlossen werden, deren Spannung und Frequenz mit dem Typenschild des Gerätes genau übereinstimmt.
-
Page 6: Bestimmungsgemäße Verwendung
BESTIMMUNGSGEMÄßE VERWENDUNG Bei diesem Gerät handelt es sich um einen Effektstrahler, mit dem sich dekorative Lichteffekte erzeugen lassen. Dieses Produkt ist für den Anschluss an 100 - 240 V, 50/60 Hz Wechselspannung zugelassen und wurde ausschließlich zur Verwendung in Innenräumen konzipiert. Dieses Gerät ist für professionelle Anwendungen, z. -
Page 7: Gerätebeschreibung
Wird das Gerät anders verwendet als in dieser Bedienungsanleitung beschrieben, kann dies zu Schäden am Produkt führen und der Garantieanspruch erlischt. Außerdem ist jede andere Verwendung mit Gefahren, wie z. B. Kurzschluss, Brand, elektrischem Schlag, Abstürzen etc. verbunden. WEEE-Richtlinie Bitte übergeben Sie das Gerät bzw. die Geräte am Ende der Nutzungsdauer zur umweltgerechten Entsorgung einem örtlichen Recyclingbetrieb. -
Page 8: Installation
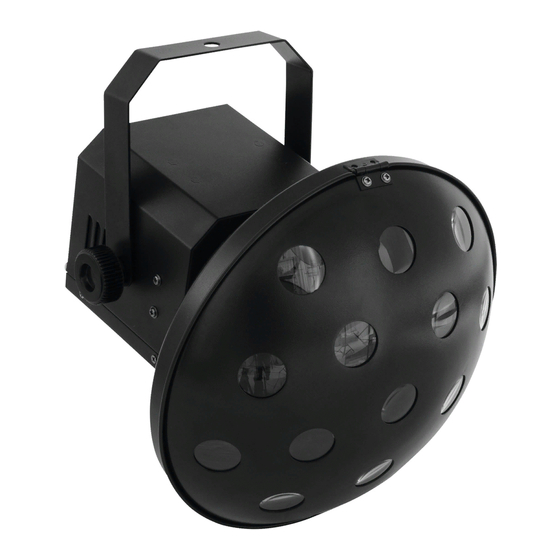
Hinten LED Z-1000 Beam Effect No. 51918221, 4026397534184 0-240V 50/60Hz ~ 23W F1A,250V (5) Empfindlichkeitsregler T =45°C T =50°C 0.1m Safety rope Steinigke Showtechnic GmbH Andreas-Bauer-Str. 5 97297 Waldbuttelbrunn Germany www.steinigke.de (6) LED-Anzeige mit Bedientasten (7) Mikrofon (8) Fangsicherung Sensitivity... - Page 9 Vorgehensweise: Das Gerät sollte idealerweise außerhalb des Aufenthaltsbereiches von Personen installiert werden. WICHTIG! ÜBERKOPFMONTAGE ERFORDERT EIN HOHES MASS AN ERFAHRUNG. Dies beinhaltet (aber beschränkt sich nicht allein auf) Berechnungen zur Definition der Tragfähigkeit, verwendetes Installationsmaterial und regelmäßige Sicherheitsinspektionen des verwendeten Materials und des Gerätes. Versuchen Sie niemals, die Installation selbst vorzunehmen, wenn Sie nicht über eine solche Qualifikation verfügen, sondern beauftragen Sie einen professionellen Installateur.
-
Page 10: Dmx512-Ansteuerung
DMX512-Ansteuerung Achten Sie darauf, dass die Adern der Datenleitung an keiner Stelle miteinander in Kontakt treten. Die Geräte werden ansonsten nicht bzw. nicht korrekt funktionieren. Beachten Sie, dass die Startadresse abhängig vom verwendeten Controller ist. Unbedingt Bedienungsanleitung des verwendeten Controllers beachten. Die Verbindung zwischen Controller und Gerät sowie zwischen den einzelnen Geräten sollte mit einem DMX-Kabel erfolgen. -
Page 11: Anschluss Ans Netz
Anschluss ans Netz Schließen Sie das Gerät über die beiliegende Netzanschlussleitung ans Netz an. Die Belegung der Anschlussleitungen ist wie folgt: Leitung International Braun Außenleiter Blau Neutralleiter Gelb/Grün Schutzleiter Der Schutzleiter muss unbedingt angeschlossen werden! Wenn das Gerät direkt an das örtliche Stromnetz angeschlossen wird, muss eine Trennvorrichtung mit mindestens 3 mm Kontaktöffnung an jedem Pol in die festverlegte elektrische Installation eingebaut werden. -
Page 12: Standalone-Modus
Standalone-Modus Das Gerät lässt sich im Standalone-Betrieb ohne Controller einsetzen. Das Gerät verfügt über eine Memory Funktion. Das mit ENTER bestätigte Programm wird wieder abgespielt sobald das Gerät erneut in Betrieb genommen wird. Auto Modus Im Auto Modus werden die internen Programme in einer Schleife abgespielt. Drücken Sie die MODE-Taste bis das LED Display A 1 anzeigt. -
Page 13: Dmx-Protokoll
Ansteuerung: Nachdem Sie die Startadresse definiert haben, können Sie das Gerät über Ihren Controller ansteuern. DMX-Protokoll Kanal Wert Funktion 000 - 255 Rot (0 – 100 %) 000 - 255 Grün (0 – 100 %) 000 - 255 Blau (0 – 100 %) 000 - 255 Weiß... -
Page 14: Technische Daten
Best.-Nr. 70064575 EUROLITE TPC-10 Klammer, silber Best.-Nr. 59006856 EUROLITE TPC-10 Klammer, schwarz Best.-Nr. 59006858 EUROLITE Sicherungsseil A 4x1000mm bis 15kg silber Best.-Nr. 58010320 EUROLITE Sicherungsseil A 4x1000mm bis 15kg schwarz Best.-Nr. 58010344 EUROLITE DMX Kabel XLR 3pol 3m schwarz Best.-Nr. 3022785H PSSO DMX Kabel XLR 3pol 3m schwarz Neutrik Best.-Nr. -
Page 15: Introduction
- download the latest version of the user manual from the Internet INTRODUCTION Thank you for having chosen an LED Z-1000 Beam Effect. If you follow the instructions given in this manual, we are sure that you will enjoy this device for a long period of time. -
Page 16: Operating Determinations
Always plug in the power plug last. The power plug must always be inserted without force. Make sure that the plug is tightly connected with the outlet. Never let the power-cord come into contact with other cables! Handle the power-cord and all connections with the mains with particular caution! Never touch them with wet hands, as this could lead to mortal electrical shock. -
Page 17: Description Of The Device
The ambient temperature must always be between -5° C and +45° C. Keep away from direct insulation (particularly in cars) and heaters. The relative humidity must not exceed 50 % with an ambient temperature of 45° C. This device must only be operated in an altitude between -20 and 2000 m over NN. Never use the device during thunderstorms. -
Page 18: Overview
Overview Front (1) Mounting bracket and hole for mounting clamp (2) Housing (3) Fixation screws (4) Lenses Rear LED Z-1000 Beam Effect No. 51918221, 4026397534184 0-240V 50/60Hz ~ 23W F1A,250V (5) Sensitivity rotary dial T =45°C T =50°C 0.1m Safety rope Steinigke Showtechnic GmbH Andreas-Bauer-Str. -
Page 19: Installation
INSTALLATION Overhead rigging DANGER TO LIFE! Please consider the EN 60598-2-17and the respective national standards during the installation! The installation must only be carried out by an authorized dealer! The installation of the device has to be built and constructed in a way that it can hold 10 times the weight for 1 hour without any harming deformation. -
Page 20: Dmx512 Control
Pull the safety bond through the attachment eyelet and over the trussing system or a safe fixation spot. Insert the end in the quick link and tighten the safety screw. The maximum drop distance must never exceed 20 cm. A safety bond which already held the strain of a crash or which is defective must not be used again. Adjust the desired inclination-angle via the mounting-bracket and tighten the fixation screws. -
Page 21: Connection With The Mains
Connection with the mains Connect the device to the mains with the enclosed power supply cable. The occupation of the connection-cables is as follows: Cable International Brown Live Blue Neutral Yellow/Green Earth The earth has to be connected! If the device will be directly connected with the local power supply network, a disconnection switch with a minimum opening of 3 mm at every pole has to be included in the permanent electrical installation. -
Page 22: Stand-Alone Mode
Stand-alone Mode In the Stand Alone mode, the device can be used without a controller. The device features a memory function. The last program confirmed via the ENTER button will begin anew when the device is restarted. Auto Mode In Auto Mode the internal programs are called up automatically in a continuous loop. Press the MODE button until the LED display shows A 1. -
Page 23: Dmx Protocol
DMX Protocol Channel Value Function 000 - 255 Red (0 – 100 %) 000 - 255 Green (0 – 100 %) 000 - 255 Blue (0 – 100 %) 000 - 255 White (0 – 100 %) 000 - 255 Amber (0 –... -
Page 24: Technical Specifications
SOMMER CABLE DMX cable XLR 3pin 3m black Neutrik No. 3030746Z EUROLITE SB-10 Soft Bag No. 30130500 All information is subject to change without prior notice. © 13.09.2018 EUROLITE is a brand of Steinigke Showtechnic GmbH Andreas-Bauer-Str. 5 97297 Waldbüttelbrunn Germany 24/24 00086340, Version 1.1...
Need help?
Do you have a question about the LED Z-1000 and is the answer not in the manual?
Questions and answers