Table of Contents
Advertisement
Available languages
Available languages
Quick Links
Advertisement
Table of Contents

Related Manuals for Denon DJ-VL12


Summary of Contents for Denon DJ-VL12
- Page 1 User Guide English ( 2 – 6 ) Guía del usuario Español ( 7 – 11 ) Guide d’utilisation Français ( 12 – 16 ) Guida per l’uso Italiano ( 17 – 21 ) Benutzerhandbuch Deutsch ( 22 – 26 ) Appendix English ( 27 )
-
Page 2: Connection Diagram
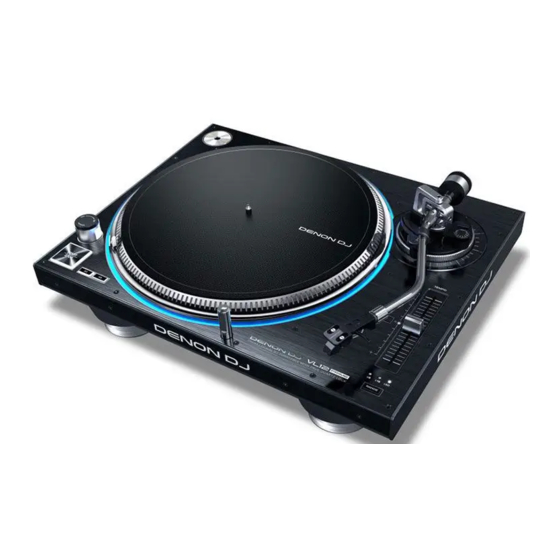
User Guide (English) Introduction Box Contents VL12 Prime 45 RPM Adapter Power Cable Headshell Counterweight & Scale Ring User Guide Felt Slipmat Additional Counterweight Safety & Warranty Manual Target Light RCA Stereo Cable Support For the latest information about this product (documentation, technical specifications, system requirements, compatibility information, etc.) and product registration, visit denondj.com. - Page 3 Features Top Panel 1. Power Switch & Strobe Light: Turn this dial at the top of the strobe light to power VL12 Prime on or off. The strobe light illuminates the edge of the platter, which indicates whether or not the phase of the platter’s rotation is constant.
- Page 4 7. Pitch Fader: Move this fader to increase or decrease speed of the platter (and therefore the pitch of the track). In the center position, the pitch is at 0%. Use the Pitch Range button to set the full range of the pitch fader. 8.
- Page 5 Side Panels Left Side 1 2 3 1. Torque: Use this switch to set the torque of the platter. At the Hi setting, the platter will have a heavier, stronger feel. At the Lo setting, the platter will feel lighter and more graceful. 2.
- Page 6 Setup Platter Place the platter onto the motor by aligning the pins in the bottom of the platter with the holes in the motor. Press it down firmly. Check to make sure that it rotates uniformly and does not wobble excessively, and then place the slipmat onto the platter.
-
Page 7: Diagrama De Conexión
Guía del usuario (Español) Introducción Contenido de la caja VL12 Prime Adaptador para 45 rpm Cable de corriente Portacápsulas Contrapeso y anillo de escala Guía del usuario Almohadillas antideslizantes de fieltro Contrapeso adicional Manual sobre la seguridad y garantía Luz de iluminación de cabezal Cable RCA estéreo Soporte Para obtener la información más reciente acerca de este producto (documentación,... - Page 8 Características Panel superior 1. Interruptor de encendido y luz estroboscópica: Gire este cuadrante en la parte superior de la luz estroboscópica para encender o apagar el VL12 Prime. La luz estroboscópica ilumina el borde del plato, el cual indica si la fase de la rotación del plato es o no constante.
- Page 9 7. Fader de pitch (tono): Mueva este fader para aumentar o disminuir la velocidad del plato (y por lo tanto el pitch de la pista). En la posición central, el pitch está al 0%. Use el botón Pitch Range (rango de pitch) para ajustar el rango completo del fader de pitch. 8.
- Page 10 Paneles laterales Lado izquierdo 1 2 3 1. Torque: Use este interruptor para ajustar el torque del plato. En el ajuste Hi, el plato se sentirá más pesado y fuerte. En el ajuste Lo, el plato se sentirá más liviano y ágil. 2.
-
Page 11: Instalación
Instalación Plato Coloque el plato en el motor alineando los pernos de la parte inferior del plato con los orificios del motor. Presiónelo firmemente. Asegúrese de que gire de manera uniforme y sin tambalear en exceso y coloque la almohadilla antideslizante sobre el plato. -
Page 12: Schéma De Connexion
Guide d’utilisation (Français) Présentation Contenu de la boîte VL12 Prime Adaptateur pour 45 t/min Câble d’alimentation Coquille Contrepoids et molette de réglage Guide d’utilisation Tapis en feutrine Contrepoids supplémentaire Consignes de sécurité et informations concernant la garantie Lumière de plateau Câble RCA audio Assistance Pour les toutes dernières informations concernant la documentation, les spécifications techniques,... -
Page 13: Caractéristiques
Caractéristiques Panneau supérieur 1. Interrupteur d’alimentation et lumière stroboscopique : Le bouton au-dessus de la lumière stroboscopique permet la mise sous et hors tension de la platine VL12 Prime. Ce témoin illumine le rebord du plateau, indiquant si la phase de la rotation du plateau est constante. - Page 14 6. Lumière de plateau : La lumière de plateau (inclus) illumine les sillons du disque afin que vous puissiez suivre l’emplacement de la pointe de lecture dans les environnements plus sombres. Pour l’activer, fixez-la à ce connecteur. Pour l’arrêter, retirez-la de ce connecteur. Remarque : Pour éviter tout dommage durant le transport de la VL12 Prime, nous vous recommandons de retirer la lumière de plateau.
- Page 15 Panneaux latéraux Panneau gauche 1 2 3 1. Couple : Ce commutateur permet d’ajuster le niveau de couple du plateau. Un réglage plus élevé (Hi) donne l’impression que le plateau est plus lourd. Un réglage plus bas (Lo) donne l’impression que le plateau est plus léger et plus gracieux. 2.
-
Page 16: Installation
Installation Plateau Placez le plateau sur le moteur en alignant les broches du fond du plateau avec les trous du moteur. Appuyez fermement. Vérifiez qu’il tourne uniformément et qu’il ne vacille pas excessivement, puis placez le tapis sur le plateau. Important : •... -
Page 17: Schema Dei Collegamenti
Guida per l’uso (Italiano) Introduzione Contenuti della confezione VL12 Prime Adattatore 45 giri Cavo di alimentazione Fonorilevatore Contrappeso e l’anello graduato Guida per l’uso Tappetino in feltro Contrappeso supplementare Istruzioni di sicurezza e garanzia Luce target Cavo RCA stereo Assistenza Per le ultime informazioni in merito a questo prodotto (documentazione, specifiche tecniche, requisiti di sistema, informazioni sulla compatibilità, ecc.) e per effettuarne la registrazione, recarsi alla pagina denondj.com. - Page 18 Caratteristiche Pannello superiore 1. Interruttore di alimentazione e luce stroboscopica: girare questa manopola posta sulla luce stroboscopica per accendere o spegnere il VL12 Prime. La luce stroboscopica illumina il bordo del piatto, cosa che indica se la fase della rotazione del piatto è...
- Page 19 7. Fader del pitch: muovere questo fader per aumentare o ridurre la velocità del piatto (e di conseguenza il pitch della traccia). In posizione centrale, il pitch è di 0%. Servirsi del tasto Pitch Range per impostare l’intervallo completo del fader del pitch. 8.
- Page 20 Pannelli laterali Lato sinistro 1 2 3 1. Coppia: servirsi di questo interruttore per regolare la coppia del piatto. All’impostazione massima Hi, il piatto darà una sensazione più forte e pesante. All’impostazione minima Lo, il piatto sembrerà più leggero e aggraziato. 2.
- Page 21 Configurazione Piatto Collocare il piatto sul motore allineando i perni a livello della parte inferiore del piatto con i fori nel motore. Premerlo verso il basso con decisione. Assicurarsi che ruoti uniformemente e non oscilli eccessivamente, quindi collocare il tappetino sul piatto. Importante: •...
- Page 22 Benutzerhandbuch (Deutsch) Einführung Lieferumfang VL12 Prime 45-RPM-Adapter Stromkabel Tonabnehmerkopf Gegengewicht und Skalenring Benutzerhandbuch Filz-Slipmat Zusätzliche Gegengewicht Sicherheitshinweise und Garantieinformationen Plattenlicht Stereo-Cinch-Kabel Kundendienst Für die neuesten Informationen zu diesem Produkt (Dokumentation, technische Daten, Systemanforderungen, Informationen zur Kompatibilität etc.) und zur Produktregistrierung besuchen Sie bitte: denondj.com.
- Page 23 Funktionen Oberseite 1. Netzschalter und Stroboskoplicht: Drehen Sie diesen Regler am oberen Teil des Stroboskoplichts, um das VL12 Prime ein- oder auszuschalten. Das Stroboskoplicht beleuchtet die Plattentellerkante, an der zu erkennen ist, ob die Rotationsgeschwindigkeit des Plattentellers konstant ist. Beobachten Sie die vertikalen Linien an der Kante unter dem Stroboskoplicht, wenn sich der Plattenteller dreht.
- Page 24 7. Pitch-Fader: Bewegen Sie diesen Regler, um die Geschwindigkeit des Plattentellers (und damit die Tonhöhe des Tracks) zu erhöhen oder zu verringern. In der Mittelposition liegt die Tonhöhe bei 0%. Verwenden Sie die Taste Pitch-Range, um den vollen Bereich des Pitch-Faders einzustellen.
- Page 25 Seitenteile Linke Seite 1 2 3 1. Drehmoment: Mit diesem Schalter wird das Drehmoment des Plattentellers eingestellt. In der Einstellung Hi fühlt sich der Plattenteller schwerer und stärker an. In der Einstellung Lo fühlt sich der Plattenteller leichter an. 2. Plattentellerfarbe: Mit diesem Regler stellen Sie die Farbe des Lichts rund um den Plattenteller ein.
- Page 26 Setup Plattenteller Legen Sie die Plattenteller auf den Motor, indem Sie die Stifte an der Unterseite des Plattentellers mit den Löchern im Motor ausrichten. Drücken Sie den Teller fest nach unten. Stellen Sie sicher, dass er sich gleichmäßig dreht und nicht zu stark wackelt. Legen Sie dann die Slipmat auf den Plattenteller. Wichtig: •...
-
Page 27: Technical Specifications
Specifications are subject to change without notice. Trademarks & Licenses Denon is a trademark of D&M Holdings Inc., registered in the U.S. and other countries. Denon DJ products are produced by inMusic Brands, Inc., Cumberland, RI 02864, USA. All other product or company names are trademarks or registered trademarks of their respective owners. - Page 28 Manual Version 1.3...
Need help?
Do you have a question about the DJ-VL12 and is the answer not in the manual?
Questions and answers