Table of Contents
Advertisement
Advertisement
Table of Contents

Related Manuals for MicroNet PR10000SATA


Summary of Contents for MicroNet PR10000SATA
-
Page 1: Raid
PlatinumRAID PRO+eSATA Owner’s Guide May 2008 www.MicroNet.com... -
Page 2: Fcc Compliance Statement
FCC Compliance Statement Federal Communications Commission Radio Frequency Interference Statement This equipment has been tested and found to comply with the limits for a Class B digital device, pursuant to part 15 of the FCC Rules. These limits are designed to provide reasonable protection against harmful interference in a residential installation. -
Page 3: Warranty Information
Warranty Limitations of Warranty and Liability MicroNet Technology has tested the hardware described in this manual and reviewed its contents. In no event will MicroNet or its resellers be liable for direct, indirect, incidental, or consequential damage resulting from any defect in the hardware or manual, even if they have been advised of the possibility of such damages. -
Page 4: Welcome Note
Welcome From MicroNet Technology We are pleased that you have chosen the PlatinumRAID. Our systems are designed for speed, reliability, compatibility, and performance. We think you will find the system easy to install, and a productive addition to your computer system. -
Page 5: Table Of Contents
Table of Contents FCC Compliance Statement Warranty Information Welcome Note Table of Contents Chapter 1 -- Getting Started Features and Benefits System Requirements and Compatibility Unpacking the PlatinumRAID What’s Included Choosing a place for your PlatinumRAID The PlatinumRAID Interface Components Communications and Control Hot Plug Drive Replacement Connecting the PlatinumRAID... - Page 6 3. Volume Set Functions (C) 4. Physical Drive Functions (D) 5. RAID System Functions (E) 6. Additional System Functions (F) Chapter 6 - Built in Web-Based Administration Introduction Preparation Login Procedure The Main Menu Configuration Tree 1. Quick Volume/RAID Setup 2.
-
Page 7: Chapter 1 - Getting Started
Chapter 1 - Getting Started Thank you for purchasing The MicroNet PlatinumRAID storage solution. With speed, high capacity, ease of use, and support for numerous applications, PlatinumRAID is the ideal solution for all of your data storage needs. Please take advantage of the information contained within this manual to ensure easy setup and configuration. -
Page 8: What's Included
What’s Included Your PlatinumRAID comes with the following items: 1 PlatinumRAID Pro unit 5 Disk Drive Modules 1 PlatinumRAID CD containing this manual in PDF format, warranty information, registration and marketing materials 1 Ethernet cord 1 DB9-DB9 serial cord 1 power cord 1 external SATA cable 1 PCI to external SATA host bus adapter (Pro Model) 1 9 pin-9 pin FireWire 800 cable (Pro Model) -
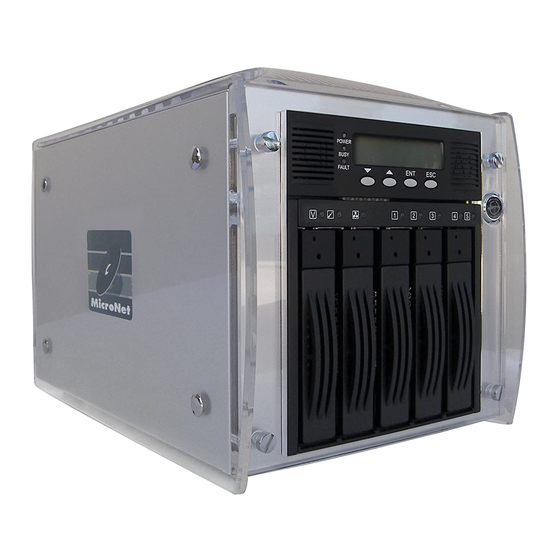
Page 9: The Platinumraid Interface Components
The PlatinumRAID interface components The following figures illustrate the connector locations for the RAID subsystems. FRONT VIEW REAR VIEW PlatinumRAID Pro Owner’s Manual 1-Getting Started Voltage, Temperature, and Fan Indicator lights System Power, Activity, and Fault Indicator lights Front Panel Display Front Panel Interface buttons Power Button Disk Drive Present/Fault Indicator Lights... -
Page 10: Communications And Control
Communication and Control RAID functions including creation, modification, and monitoring can be accomplished through the front panel, the web based administration user interface, or an RS232 link through a VT- 100 terminal session to access the text-based Setup Menu. The LCD status panel informs you of the Disk Array’s current operating status at a glance, as shown here: Normal Status Power LED... -
Page 11: Connecting The Platinumraid
Connecting the PlatinumRAID Connecting the PlatinumRAID requires an available power socket, and a host with one of the following interfaces: • A FireWire 800 port • A FireWire 400 port • A USB 2.0/1.1 port • An external SATA host bus connector (an external SATA PCI host bus adapter is included with pro models) To use the optional management and configuration interfaces, the following may also be required: • Using the built in Ethernet remote management requires an available Ethernet jack to a hub or switch on your network. -
Page 12: Chapter 2- Understanding Raid
Chapter 2 - Understanding RAID The PlatinumRAID controller subsystem is a high-performance SATA2 drive bus disk array controller. When properly configured, the RAID subsystem can provide non-stop service with a high degree of fault tolerance through the use of RAID technology and advanced array management features. - Page 13 Pros: Fastest read/write performance of any of the Hybrid RAID levels High data reliability as all the data is redundant Cons: Requires double the raw data storage capacity PlatinumRAID Pro Owner’s Manual 2-Understanding RAID...
-
Page 14: Raid Set
RAID 3 RAID 3 provides disk striping and complete data fault tolerance though a dedicated parity drive. RAID 3 breaks up data into smaller blocks, calculates parity on the blocks, and then writes the blocks to all but one drive in the array. -
Page 15: Volume Set
Volume Set A Volume Set is seen by the host system as a single logical device. It is organized in a RAID level with one or more physical disks. RAID level refers to the level of data performance and protection of a Volume Set. A Volume Set capacity can consume all or a portion of the disk capacity available in a RAID Set. -
Page 16: Hot Swappable Disk Support
2-Understanding RAID Hot Swappable Disk support Your PlatinumRAID has a built in protection circuit to support replacement of disk drives without having to shut down or reboot the RAID. In case of drive failure, the failed drive can be removed from the PlatinumRAID and replaced with a new drive without disrupting dataflow to the host computer. -
Page 17: Chapter 3- Configuration Methods
Chapter 3 - Configuration Methods 1. Overview Following the hardware installation, the RAID subsystem must be configured and the volume set units initialized before they are ready to use. This can be accomplished by one of the following methods: • Front panel touch-control keypad •... -
Page 18: Vt-100 Terminal (Using The Controller's Serial Port)
3. VT-100 user interface Your PlatinumRAID may be controlled by establishing an terminal session via an RS232 serial connection to a VT100 compatible terminal or emulation software, or via a Telnet session. All RAID subsystem monitoring, configuration and administration functions are available through terminal control. -
Page 19: Chapter 4- Getting A Fast Start
Chapter 4 - Getting a Fast Start 1. Overview The LCD front panel is your primary method for control and monitoring of your PlatinumRAID. Utilizing the LCD, you can: • Create RAID set, • Expand RAID set, • Define volume set, • Add physical drive • Modify volume set • Modify RAID level/stripe size, • Define pass-through disk drives, • Modify system function and • Designate drives as hot spares. -
Page 20: Designating Drives As Hot Spares
4. Designating Drives as Hot Spares To designate drives as hot spares, press ENT to enter the Main menu. Select the RAID Set Functions option and then press ENT. All RAID set functions will be displayed. Select the Create Hot Spare Disk option and then press ENT. The first unused physical device connected to the current controller appears: Scroll to the unused physical devices and select the target disk to assign and press ENT to designate it as a hot spare. -
Page 21: Creating A Raid Set Using Quick Volume And Raid Setup Configuration
6. Creating a RAID set using Quick Volume And RAID Setup Configuration Step Action Choose Quick Volume And RAID Setup from the main menu. The available RAID levels and associated Hot Spare for the current volume set drive are displayed. RAID Level Try to use drives of the same capacity in a specific array. -
Page 22: Using Raid Set And Volume Set Functions
7. Using RAID Set and Volume Set Functions Creating a usable volume requires both a RAID set and an associated Volume set. The RAID and Volume set functions allow you to control those parameters, as well as creating Hot Spares. Select this method to configure new RAID sets and volume sets. This configuration option allows you to associate volume set with partial and full RAID set. -
Page 23: Chapter 5- Navigating The Raid Controls
Chapter 5 - LCD and Terminal RAID Controls This Chapter describes the menu and control structure for your PlatinumRAID using the front panel, serial port, or via Telnet. The RAID subsystem configuration utility is firmware-based and its operation is independent of host computer type or operating system. Conventions In this chapter, menu navigation is described through scrolling through options, making selections (ENT) or rejections (ESC). -
Page 24: Quick Volume/Raid Setup (A)
5. RAID System Controls (E) 6. Additional System Functions (F) CONSIDERATIONS FOR RAID VOLUME CREATION Your PlatinumRAID is capable of creating large logical volumes (LUNS) in excess of 2 Terabytes, with the following caveats: 1. Large LUNS (>2TB) can only be accessible via eSATA. Attempting to access a large LUN over a FireWire or USB port can result in data loss! 2. - Page 25 2. RAID Set Functions (B) Select the RAID Set Function to manually configure the RAID set for the first time or delete/reconfigure existing RAID sets. The RAID Set function allows more complete control over the RAID creation process, but requires more interaction then the Quick Volume/RAID Setup option.
-
Page 26: Volume Set Functions (C)
2.4 Activate RAID set Following a drive failure, the affected RAIDset will operate in degraded mode, and will continue to function until the unit is reset. Following a reset, in order for a degraded RAIDset to be available to the host it must be activated. Select “Activate RAID Set” option. Scroll to select the RAID set number to be activated and then press ENT. - Page 27 CONSIDERATIONS FOR RAID VOLUME CREATION Your PlatinumRAID is capable of creating large logical volumes (LUNS) in excess of 2 Terabytes, with the following caveats: 1. Large LUNS (>2TB) can only be accessible via eSATA. Do not map a large LUN to channel 0. Attempting to access a large LUN over a FireWire or USB port can result in data loss! 2.
- Page 28 PlatinumRAID supports Write-Through and Write-Back Caching algorithms. In the Write- Back caching method, modifications to data in the cache aren’t copied to the cache source until absolutely necessary, whereas Write-Through cache data is written to the storage and the cache memory simultaneously. Write-back caching yields better performance than write- through caching because it reduces the number of write operations to disk, but is also more prone to data loss due to service interruptions.
- Page 29 3.3 Modify Volume Set Use this option to modify an existing volume set attributes as described in the above section. To modify volume set attributes scroll to choose the “Modify Volume Set Attribute option” from the “RAID set system” function. Select the RAID set number to modify and press ENT. Select the volume set number that user want to modify and press ENT.
-
Page 30: Physical Drive Functions (D)
4. Physical Drive Functions (D) Choose this option from the Main Menu to select a physical disk and to perform the operations listed below. To enter a Physical Drive Functions, press ENT to enter the main menu. Scroll to select the Physical Drive Functions option and then press ENT to enter further submenus. -
Page 31: Raid System Functions (E)
4.4 Delete Pass-Through Disk To delete pass-through drive from the pass-through drive pool, scroll to choose the “Delete Pass-Through Drive option”, and then press ENT. The Select Drive Function menu will show all Pass-Through Drive number items. Select the Pass-Through Disk that user want to delete and press ENT. - Page 32 5.4 JBOD/RAID Configuration The PlatinumRAID controller can be used in JBOD ( Just a Bunch Of Drives) mode, which allows each drive to be presented separately to the host. To use this mode, make sure to erase any existing RAID sets. 5.5 RAID Rebuild Priority The RAID Rebuild Priority is a relative indication of how much time the controller devotes to a rebuild operation.
-
Page 33: Additional System Functions (F)
5.12 Reset Controller To reset the RAID subsystem, select “Reset Controller” and then press ENT. Press ENT at the confirmation screen to reset the controller. 6. Additional System Functions (F) 6.1 Ethernet Configuration The PlatinumRAID’s Ethernet port is preconfigured for DHCP operation. This menu option allows the user to reconfigure IP functionality for static IP address or custom MAC address. - Page 34 6.2 Show System Events To view the RAID subsystem events, select the “Show System Events” option and press ENT. The system events logged will be displayed. System events are logged chronologically, and may be scrolled through. 6.3 Clear all Event Buffers To clear all events in the system log, scroll to select the “Clear all Event Buffers”...
-
Page 35: Chapter 6 - Built In Web-Based Administration
Chapter 6 - RAID Controls-Web Interface Introduction The PlatinumRAID controller firmware includes a complete HTML-based weblet application that allows all configuration and monitoring to be performed across any IP based network, and utilizes standard web browsers for interfacing. This Chapter describes the menu and control structure for your PlatinumRAID using the web interface. -
Page 36: The Main Menu Configuration Tree
The Main Menu Configuration Tree 1. Quick Volume/RAID Setup 2. RAID Set Functions 3. Volume Set Functions 4. Physical Drives 5. RAID System Controls 6. System Information PlatinumRAID Pro Owner’s Manual 6-RAID Controls-Web Interface 2.1 Create RAID Set 2.2 Delete RAID Set 2.3 Expand RAID Set 2.4 Activate RAID Set 2.5 Create Hot Spare... -
Page 37: Quick Volume/Raid Setup
1. Quick Volume/RAID Setup CONSIDERATIONS FOR RAID VOLUME CREATION Your PlatinumRAID is capable of creating large logical volumes (LUNS) in excess of 2 Terabytes, with the following caveats: 1. Large LUNS (>2TB) can only be accessible via eSATA. Do not map a large LUN to channel 0. Attempting to access a large LUN over a FireWire or USB port can result in data loss! 2. -
Page 38: Raid Set Functions
When RAID migration is in progress, migration status is displayed in the RAID and volume status areas of the RAID Set information. IMPORTANT: Once the Expand RAID Set process has started it cannot be stopped. The process must complete before any other RAID functions will be available. 2.4 Activate RAID set Following a drive failure, the affected RAIDset will operate in degraded mode, and will continue to function until the unit is reset. -
Page 39: Volume Set Functions
3. Volume Set Function (C) A volume set is seen by the host system as a single logical device, and is organized in a RAID level with one or more physical disks. RAID level refers to the level of data performance and protection of a Volume Set. - Page 40 Write-Through cache performs all write operations in parallel -- data is written to the storage and the cache memory simultaneously. Write-back caching yields somewhat better performance than write-through caching because it reduces the number of write operations to disk, but is also more prone to data loss due to service interruptions.
- Page 41 3.1.9 Host Channel Selection PlatinumRAID Pro supports two host channels. Host Channel 0 is the host SATA interface, and Channel 1 is accessed by the either host FireWire or the USB ports- If both FireWire and USB ports are connected, only the FireWire ports will be active. SIMULTANEOUS HOST CHANNEL VOLUME MAPPING The PlatinumRAID Pro can map a Volumeset to both host channels simultaneously for clustering environment.
-
Page 42: Physical Drive Functions
Back caching method, modifications to data in the cache aren’t copied to the cache source until absolutely necessary, whereas a Write-Through cache performs all write operations in parallel -- data is written to the storage and the cache memory simultaneously. Write-back caching yields somewhat better performance than write-through caching because it reduces the number of write operations to disk, but is also more prone to data loss due to service interruptions. - Page 43 4.1.2 Tagged Command Queuing The Command Tag (Drive Channel) function controls the command tag queuing support for the drive channels. Tagged Command Queuing is useful for enhancing overall system performance under multi-tasking operating systems. This function should normally remain enabled unless instructed otherwise by MicroNet support. 4.1.3 IDE Transfer Mode The RAID subsystem supports up to 150MB/S host data transfer rate.
-
Page 44: System Controls
6-RAID Controls-Web Interface 5. System Controls 5.1 System Configuration Functions This menu contains various feature and environmental options of the PlatinumRAID. The following subsections discuss each attribute’s descriptions. When all desired options are entered, check the box labelled “Confirm the operation” and click the “Submit”... - Page 45 5.1.8 HDD SMART Status Polling The PlatinumRAID reads and reports the SMART (Self-Monitoring, Analysis, and Reporting Technology) status of each disk drive mechanism. This option is enabled by default, and should not be disabled unless instructed by MicroNet’s Technical Support. 5.1.9 Disk Capacity Truncation Mode Disk Truncation is used to decrease disk usable space for compatibility purposes.
- Page 46 5.2.4 Subnet Mask If a static IP address is assigned, enter your network subnet mask in this field. If you don’t know your network’s subnet mask, consult your network administrator. 5.2.5 HTTP Port Number The HTTP port number is the TCP Port used for the web user interface.
- Page 47 5.3.3 Recipients The PlatinumRAID can send notifications to up to 4 recipients. Enter the respective names and email addresses in this section. 5.3.4 Event Notification Configuration This table allows the administrator to specify the level of notification provided by the PlatinumRAID.
- Page 48 6-RAID Controls-Web Interface 5.5 NTP (Network Time Protocol) Configuration The PlatinumRAID can synchronize its internal clock to an outside Network Time (NTP) server. This option allows for configuration of the NTP service. To obtain an NTP server, check with your network administrator or for a list of public servers refer to the NTP Public Services Project at http://ntp.isc.org. When all desired options are entered, check the box labelled “Confirm the operation”...
-
Page 49: System Information
6. Information Functions 6.1 RAIDSet Hierarchy This option will display the current physical and logical configuration of the RAID subsystem. The RAIDset(s), IDE Channels, and Volume Set(s) are each clickable, and will pull up the respective information about each object. 6.2 System Information Choose this option to display various components of the PlatinumRAID, as illustrated in this table: Component Controller Name Firmware Version... - Page 50 of environmental failure. The warning messages will indicate through the LCD, LED and alarm buzzer, as well as remote notification as defined in section 5.4 in this chapter. The following is a table of monitoring threshold values: Monitored Item Controller Board Temperature > 60° Celsius Power Supply +12V Power Supply +5V Power Supply +3.3V...
-
Page 51: Chapter 7- Host Computer Setup
Chapter 7 - Host Computer Setup This chapter is an overview of setting up storage volumes on Macintosh and Windows based computers. To ensure complete installation and ease of use, take a few minutes to read this chapter before installation. -
Page 52: Volume Setup On Microsoft Windows
2. Volume Setup on Microsoft Windows 2000/XP/2003 Installation on a Windows system requires a Windows Installation with a properly installed and configured SCSI host bus. Please verify that your assigned SCSI ID is unique among the host SCSI chain, and verify that the terminator is attached and lit at the end of the chain. 2.1 Open the disk management console. -
Page 53: Chapter 8- Troubleshooting
Chapter 8 - Troubleshooting Daily Use Tips • Read this User’s Guide carefully. Follow the correct procedure when setting up the device. • Additional application software may have been included with your drive. Please review the documentation included with this software for information on the operation and support of this software. The documentation can usually be found in an electronic format on the installation CD. • Always operate your drive on a steady, level surface. Do not move the unit while it’s turned on. -
Page 54: Frequently Asked Questions
Frequently Asked Questions General FAQ Q: My computer will not recognize the drive A: Make sure the software for your drive is installed, following the instructions in this manual. Disconnect the drive and power the unit off. Wait 15 seconds, then power your drive back on. Wait 5 more seconds, then reconnect the drive to your computer system. - Page 55 Macintosh related FAQ Q: Disk Utility does not display my drives (Mac) A: If the options in Disk Utility are dimmed, you are not logged in as administrator. If you know the name and password for an administrator, click the lock icon (see Chapter 7) and enter the information.
- Page 56 A: Windows 2000 and XP already include all the necessary drivers! No additional drivers are necessary. Q: Does the Drive work with Norton Ghost? A: Yes. Norton Ghost 2003 or newer support USB drives. Fantom Drives does not provide any additional drivers. Q: Do you have “DOS Driver” for the Drive? A: No.
-
Page 57: Appendix A- Getting Help
A-Getting Help Appendix A: Getting Help If you experience problems with your PlatinumRAID, please contact your Authorized MicroNet Reseller for assistance. If the reseller is unable to resolve your issue, please contact MicroNet’s Help Desk for assistance. Please have the model, serial number, date of purchase, and reseller’s name available before making contact. -
Page 58: Appendix B- Raid Level Comparison Table
Appendix B: RAID Level Comparison Table RAID Description Min. Level Drives Also known as striping Data distributed across multiple drives in the array. There is no data protection Also known as mirroring All data replicated on N Separated disks. N is almost always 2. This is a high availability Solution, but due to the 100% duplica- tion, it is also a costly solution. -
Page 59: Appendix C- Terminal Session Setup
C-Terminal Session Setup Appendix C: VT-100 Terminal Session Setup By connecting a VT100 compatible terminal, or a PC operating in an equivalent terminal emulation mode, all RAID subsystem monitoring, configuration and administration functions can be exercised from the VT100 terminal. There are a wide variety of Terminal Emulation packages, but for the most part they should be very similar. - Page 60 Step 5: Configure the port parameter settings. Bits per second: “115200”, Data bits: “8”, Parity: “None”, Stop bits: “1”, Flow control: “None”. Click OK Step 6: Open the File menu, and then open Properties. Step 7: Open the Settings Tab. PlatinumRAID Pro Owner’s Manual C-Terminal Session Setup...
- Page 61 C-Terminal Session Setup Step 8. Open the Settings Tab. Function, arrow and ctrl keys act as: Terminal Keys, Backspace key sends: Crtl+H, Emulation: VT100, Telnet terminal: VT100, and Click OK. The VT-100 session is now configured. Press “X” key to display the disk array Monitor Utility screen on your VT100 Terminal.
-
Page 62: Appendix D- Glossary Of Raid Terms
Digital’s IDE disk interface was standardized by ANSI to form the ATA specification using a 16-bit ISA bus. Cache cache is a fast-access memory bank that serves as an intermediate storage for data that is read from or written to secondary storage. Typically, high-speed caches are implemented in RAM, though they can also be implemented on disk when speed is not a critical requirement. - Page 63 Hot Spare One or more disks in a RAID array may fail at any given time. In fact, all RAID types with the exception of RAID 0 provide methods to reconstruct the array in the event of such an occurrence.
- Page 64 D-Glossary Logical Unit (LUN) a SCSI protocol entity which may be addressed by the actual input/ output (I/O) operations of a Logical Drive. Each SCSI-type target provides one or more logical units. Native Command Queuing (NCQ) a technology designed to increase performance of SATA hard disks by allowing the disk firmware to internally optimise the order in which read and write commands are executed.
- Page 65 It provides the best data protection but can’t improve system performance. And storage space for the same data capacity should be double than in general cases. Hence storage cost doubles. The capacity of RAID 1 will be the size of the smaller HDD, so we suggest you connect HDDs of the same sizes to save HDD space.
- Page 66 D-Glossary on the parity disk and the remaining functioning disks. Consequently read operations can be time-consuming when the array is operating in degraded mode. If the parity disk itself fails, then the RAID array is not affected in terms of I/O throughput but it no longer has protection from additional disk failures.
- Page 67 Read Through Using this methodology, a read operation not only reads data from secondary storage into system memory but also places the data into the cache such that future need for the same data can be addressed expeditiously by directing a read operation for that data into the cache only.
- Page 68 Essentially write completion does not occur until the data is written to secondary storage. Thus the contents of the cache and the secondary storage are always consistent. The advantage is that the possibility of data corruption is greatly reduced.
-
Page 69: Appendix E- Product Specifications
Appendix E: Product Specifications System Architecture Intel 80219 400MHz XScale I/O processor 64bit, 133MHz PCI-X Interconnect 128MB on-board DDR200 SDRAM with ECC protection Marvell SATA ll drive channel controller NVRAM for RAID configuration & transaction log Write-through or write-back cache support Firmware in Flash ROM for easy upgrades Disk Bus Interface 5 hot swappable, SATA2-NCQ, 7200 RPM Disk Drives... - Page 70 Weight: 22 lbs with drives. Power Consumption: Normal operation: 2.3 AC Amps @ 115 Volts Spin up (peak): 3.70 AC Amps @ 115 Volts Power Requirements: Internal Auto-sensing power supply (90-240vac) (47-62Hz) Environmental Specifications: Temperature 5ºC - 55ºC (41ºF - 131ºF) Humidity 10% - 90% RH (Non-condensing) PlatinumRAID Pro Owner’s Manual E-Product Specifications...
- Page 71 5-1-2008 Rev 3 (PRPROM3) The material in this document is for information only and is subject to change without notice. While reasonable efforts have been made in the preparation of this document to assure its accuracy, MicroNet Technology assumes no liability resulting from errors or omissions in this document, or from the use of the information contained herein.
Need help?
Do you have a question about the PR10000SATA and is the answer not in the manual?
Questions and answers