Table of Contents
Advertisement
Quick Links
Advertisement
Table of Contents

Related Manuals for MicroNet SCB-1000GB4


Summary of Contents for MicroNet SCB-1000GB4
- Page 1 Don’t just store it. SHARE it. SANCube800™ Owner’s Guide www.MicroNet.com...
-
Page 2: Fcc Compliance Statement
FCC Compliance Statement Federal Communications Commission Radio Frequency Interference Statement This equipment has been tested and found to comply with the limits for a Class B digital device, pursuant to part 15 of the FCC Rules. These limits are designed to provide reasonable protection against harmful interference in a residential installation.This equipment generates, uses and can radiate radio frequency energy and, if not installed and used in accordance with the instructions, may cause harmful interference to radio or television reception, which can be determined by turning the equipment off and on.The user is encouraged to try to correct the interference by one... -
Page 3: Warranty Information
Warranty Limitations of Warranty and Liability MicroNet Technology has tested the hardware described in this manual and reviewed its contents. In no event will MicroNet or its resellers be liable for direct, indirect, incidental, or consequential damage resulting from any defect in the hardware, software, or manual, even if they have been advised of the possibility of such damages. -
Page 4: Microsan™ End User License Agreement
End User License Agreement MicroSAN™ End-User License Agreement 1. License. The software and documentation accompanying this License, known as MicroSAN™ (Software), whether on disk, in read-only memory, or contained on any other media and the related documentation are licensed to you by Intech Software Corporation (Intech) and it’s Licensor(s). You own the disk on which the Software is recorded, but Intech retains title to the Software and related documentation. -
Page 5: Raid
End User License Agreement 5. Limited Warranty Regarding Media. Intech warrants that the diskette(s) on which the Software are recorded shall be free from defects in materials and workmanship under normal use for a period of ninety (90) days from the date of your purchase of the Software, as established by your receipt. -
Page 6: Welcome Note
Welcome From MicroNet Technology We are pleased that you have chosen the SANCube800™. Our systems are designed for speed, reliability, compatibility, and performance. We think you will find the system easy to install, and a productive addition to your computer system. This manual presumes that you are familiar with standard computer operations;... -
Page 7: Table Of Contents
Table of Contents FCC Compliance Statement Warranty Information Technical Support and Return Policy MicroSAN™ End User License Agreement Welcome Note Table of Contents Introduction to SAN What is SAN? What is MicroSAN™ for SANCube800™? How MicroSAN™ for SANCube works Chapter 1- Preinstallation Checklist Features and Benefits System Requirements and Compatibility What’s Included... - Page 8 4. Designating Drives as Hot Spares 5. Using Quick Volume and RAID Set Setup 6. Creating a RAID Set using Quick Volume and RAID Setup Configuration 7. Using RAID Set and Volume Set Functions Chapter 6- Navigating the RAID Controls Conventions Login Procedure The Main Menu Configuration Tree...
-
Page 9: Introduction To San
Storage Area Network (“SAN”) is a framework that allows connecting multiple host computers to a shared single or multiple storage devices over a storage bus such as Fibre Channel or FireWire.The benefit of SAN to a workgroup is twofold- by requiring no “server”... -
Page 10: Chapter 1- Preinstallation Checklist
If at any time you require technical assistance, MicroNet’s Help Desk is available at 310-320-0772 or email us at Support@MicroNet.com Features and Benefits SANCube800™ is a versatile and low cost storage solution, allowing it to be utilized in several different configurations: • As a high speed FireWire Storage Area Network for multiple workstations •... -
Page 11: Unpacking The Sancube800
Unpacking the SANCube800™ Please unpack your SANCube800™ in a static free environment, carefully making sure not to damage or discard any of the packing material. If the RAID subsystem appears damaged, or if any items of the contents listed below are missing or damaged, please contact your dealer or distributor immediately. -
Page 12: The Sancube800™ Interface Components
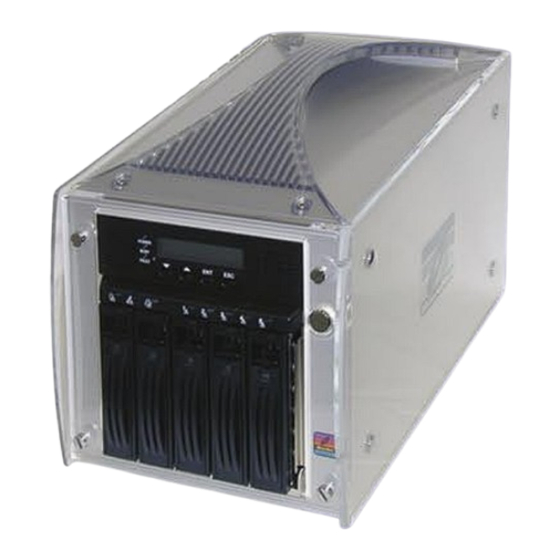
The SANCube800™ interface components The following figures illustrate the connector locations for the RAID subsystems. FRONT VIEW REAR VIEW SANCube800™ Owner’s Manual 1-Preinstallation Checklist Voltage, Temperature, and Fan Indicator lights System Power,Activity, and Fault Indicator lights Front Panel Display Front Panel Interface buttons Power Button Disk Drive Activity/Fault Indicator Lights Disk Drive Tray Locking Mechanism (1 per tray) -
Page 13: Communications And Control
Communication and Control RAID functions including creation, modification, and monitoring can be accomplished through the front panel or via an RS232 link through a VT-100 terminal session to access the text-based Setup Menu.The LED status lights informs you of the Disk Array’s current operating status at a glance, as shown here: Normal State Power LED... -
Page 14: Chapter 2- Getting A Fast Start
Chapter 2 - Getting A Fast Start STOP! Before proceeding, please review the following guidelines: • Ensure that all Macintosh Systems in the FireWire SAN have a unique name, settable through Mac OS X System Preferences-Sharing control panel. Please see the Chapter 6:”Installing and Using MicroSAN™”... -
Page 15: Creating/Changing Volumes
Creating/Changing Volumes The SANCube800™ offers tremendous flexibility in performance and data integrity options. Some thought must go into how you wish to setup the SANCube800™ for your workflow. Although write privileges of each volume may be reassigned to other users, partitions cannot be added or changed without data loss. -
Page 16: Chapter 3- Understanding Raid
Chapter 3 - Understanding RAID The SANCube800™ controller subsystem is a high-performance IDE drive bus disk array Controller. When properly configured, the RAID subsystem can provide non-stop service with a high degree of fault tolerance through the use of RAID technology and advanced array management features. The RAID subsystem controller connects to the host systems through an IEEE1394B FireWire 800 interface. - Page 17 Pros: Fastest read/write performance of any of the Hybrid RAID levels High data reliability as all the data is redundant Cons: Requires double the raw data storage capacity SANCube800™ Owner’s Manual 3-Understanding RAID...
-
Page 18: Raid 3
RAID 3 RAID 3 provides disk striping and complete data fault tolerance though a dedicated parity drive. RAID 3 breaks up data into smaller blocks, calculates parity on the blocks, and then writes the blocks to all but one drive in the array. The parity data created is then written to the last drive in the array. -
Page 19: Online Capacity Expansion
Volume Set A Volume Set is seen by the host system as a single logical device. It is organized in a RAID level with one or more physical disks. RAID level refers to the level of data performance and protection of a Volume Set. -
Page 20: Instant Availability/Background Initialization
3-Understanding RAID Instant Availability/Background Initialization RAID 0 and RAID 1 volume set can be used immediately after the creation, whereas RAID 3 and 5 volume sets must be initialized to generate parity information. SANCube800™ features both foreground and background initialization modes for RAID 3 and RAID 5 volumes- In background mode, the initialization proceeds as a background task and the volume set is fully accessible for system reads and writes without requiring a reboot or initialization completion. -
Page 21: Chapter 4- Raid Configuration Methods
Chapter 4 - RAID Configuration Methods 1. Overview Following the hardware installation, the RAID subsystem must be configured and the volume set units initialized before they are ready to use. This can be accomplished by one of the following methods: •... -
Page 22: Confirming Changes
3. VT-100 terminal (Using the controller’s serial port) Your SANCube800™ includes a standard RS232 serial port. By establishing an RS232 serial connection to a VT100 compatible terminal or emulation software. All RAID subsystem monitoring, configuration and administration functions are available through serial control. By Default, SANCube800’s serial port is set to 115,200 Baud, 8 data bits, N Parity, 1 stop.There are a wide variety of Terminal Emulation packages, but for the most part they should be very similar;... -
Page 23: Chapter 5- Quick Raid Setup
Chapter 5 - Quick RAID Setup 1. Overview The LCD front panel is your primary method for control and monitoring of your SANCube800™. Utilizing the LCD, you can: • Create RAID set, • Expand RAID set, • Define volume set, •... -
Page 24: Designating Drives As Hot Spares
4. Designating Drives as Hot Spares To designate drives as hot spares, press ENT to enter the Main menu. Select the RAID Set Functions option and then press ENT. All RAID set functions will be displayed. Select the Create Hot Spare Disk option and then press ENT. The first unused physical device connected to the current controller appears: Scroll to the unused physical devices and select the target disk to assign and press ENT to designate it as a hot spare. -
Page 25: Creating A Raid Set Using Quick Volume And Raid Setup Configuration
6. Creating a RAID set using Quick Volume And RAID Setup Configuration Step Action Choose Quick Volume And RAID Setup from the main menu. The available RAID levels and associated Hot Spare for the current volume set drive are displayed. RAID Level Try to use drives of the same capacity in a specific array. -
Page 26: Using Raid Set And Volume Set Functions
7. Using RAID Set and Volume Set Functions Creating a usable volume requires both a RAID set and an associated Volume set. The RAID and Volume set functions allow you to control those parameters, as well as creating Hot Spares. Select this method to configure new RAID sets and volume sets.This configuration option allows you to associate volume set with partial and full RAID set. -
Page 27: Chapter 6- Navigating The Raid Controls
Chapter 6 - Navigating the RAID Controls This Chapter describes The menu and control structure for your SANCube800™. The RAID subsystem configuration utility is firmware-based and its operation is independent of host computer type or operating system. Conventions In this chapter, menu navigation is described through scrolling through options, making selections (ENT) or rejections (ESC). -
Page 28: Quick Volume/Raid Setup (A)
5. RAID System Function (E) 6. Show System Events 7. Clear All Event Buffers 8. Hardware Monitor 9. System Information 1. Quick Volume/RAID Setup (A) Quick Volume And RAID Setup is the fastest way to prepare a RAID set and volume set, and needs few keystrokes to complete. - Page 29 2.3 Expand Existing RAID Set Instead of deleting a RAID set and recreating it with additional disk drives, the Expand existing RAID Set function allows the user to add disk drives to the RAID set that already exists. To expand an existing RAID set, scroll to choose the “Expand Existed RAID Set”...
-
Page 30: Volume Set Functions (C)
3. Volume Set Function (C) A volume set is seen by the host system as a single logical device. It is organized in a RAID level with one or more physical disks. RAID level refers to the level of data performance and protection of a Volume Set. - Page 31 Write-Through cache performs all write operations in parallel-- data is written to the storage and the cache memory simultaneously. Write-back caching yields somewhat better performance than write-through caching because it reduces the number of write operations to disk, but is also more prone to data loss due to service interruptions.
-
Page 32: Physical Drive Functions (D)
3.3 Modify Volume Set Use this option to modify an existing volume set attributes as described in the above section. To modify volume set attributes scroll to choose the “Modify Volume Set Attribute option” from the “RAID set system” function.Select the RAID set number to modify and press ENT.Select the volume set number that user want to modify and press ENT.The volume set attributes screen shows the volume set setting configuration attributes that was currently being configured. -
Page 33: Raid System Functions (E)
4.2 Create a Pass-Through Disk A Pass-through disk can be defined to dedicate a single disk as not controlled by the RAID subsystem firmware and thus cannot be a part of a RAID set. Instead, the disk is available to the operating system as an individual disk.To create a Pass-Through disk, select the Create Pass-Through Disk option and press ENT. - Page 34 5.1 Mute The Alert Beeper Select the “Mute The Alert Beeper” function to mute the RAID subsystem alert buzzer.Press ENT in the dialog box to turn the beeper off temporarily.The buzzer will still activate on any subsequent fault. 5.2 Alert Beeper Setting The Alert Beeper setting function item is used to enable or disable the RAID subsystem controller alarm tone generator.
-
Page 35: Show System Events
Configuration” selection and press ENT.The baud rate/stop bits setting screen will appear. Set the new desired values, and press ENT.After completing the modification, the confirmation screen will be displayed and then press ENT to accept the function. The following are the acceptable values for each respective field: Baud Rate setting values are 1200, 2400, 4800, 9600, 19200, 38400, 57600, and 115200. -
Page 36: System Information
fan) and voltage of the internal RAID subsystem. The temperature items list the current states of the controller board and backplane. 8.1 Hardware Monitor Alarm Triggers The Platinum RAID has an audiovisual alert system to inform the user of environmental failure.The warning messages will indicate through the LCD, LED and alarm buzzer. -
Page 37: Chapter 7- Using Microsan
Chapter 7 - Using MicroSAN™ MicroSAN™ is designed to be as unobtrusive as possible.While all functions are available from the main application window, the application can be run without a window with permission modes changable from the MicroSAN™ dock icon. 1. - Page 38 Launch the“Disk Utility” application located in the Applications/Utilities folder. Highlight your new drive (XXXX GB MicroNet) and select the “Erase” tab. Select the desired file systems format, and click the “Erase” button. The partitioning will take effect immediately, and will be accessible to all members of the SAN as soon as Single User Mode is switched to Shared Mode.
-
Page 39: The Microsan™ Interface
4. The MicroSAN™ Interface Once the MicroSAN™ application is running, there are three methods to control SAN functions: • Through the Application User Interface • Through context sensitive menu of the dock icon • Through a universal context sensitive menu 4.1 MicroSAN™... -
Page 40: Mounting Volumes
4.2 Context Menu 4.2 Context Menu The MicroSAN™ dock icon and universal context menus allows permission control of each SAN The MicroSAN™ dock icon and universal context menus allows permission control of each SAN volume. 5. Mounting Volumes By default, all SAN volumes will mount for Read Only access when the computer first boots up. In order to mount a volume for write access, the MicroSAN™... -
Page 41: Refreshing And Synchronizing Volumes
The owner can either accept or reject the write access request. The owner can also reply with a comment to explain the rejection. In order for a permission change to occur successfully, the owner must have no open files when pressing the “Release Write” button. If there are open files, the following dialog box will appear on the owners computer: Once all open files are closed the permission change process can complete. -
Page 42: Shared And Single User Modes
The MicroSAN™ application will only be required to switch back to Shared Access mode. 3. All other users in the shared storage configuration must be powered down and/or disconnected from the SAN until the Single Mode login has been reverted to Shared Access Mode. -
Page 43: Chapter 8- Troubleshooting
Chapter 8- Troubleshooting Daily Use Tips • Read this User’s Guide carefully. Follow the correct procedure when setting up the device. • Additional application software may have been included with your drive. Please review the documentation included with this software for information on the operation and support of this software. -
Page 44: Frequently Asked Questions
Frequently Asked Questions Q: My computer does not see any volumes A: There are a number of possibilities that can prevent volumes mounting on your computer: • Make sure MicroSAN™ is installed, following the instructions in this manual. • Another user may be logged in to the SANCube in single user mode. You may not connect to the SANCube until your colleague reverts to Shared Mode. -
Page 45: Appendix A- Getting Help
A-Getting Help Appendix A: Getting Help If you experience problems with your SANCube800™, please contact your Authorized MicroNet Reseller for assistance. If the reseller is unable to resolve your issue, please contact MicroNet’s Help Desk for assistance. Please have the model, serial number, date of purchase, and reseller’s name available before making contact. -
Page 46: Appendix B- Raid Level Comparison Table
Appendix B: RAID Level Comparison Table RAID Description Min. Level Drives Also known as striping Data distributed across multiple drives in the array.There is no data protection Also known as mirroring All data replicated on N Separated disks. N is almost always 2. This is a high availability Solution, but due to the 100% duplication, it is also a costly solution. -
Page 47: Appendix C- Terminal Session Setup
IDE disk interface was standardized by ANSI to form the ATA specification using a 16-bit ISA bus. Cache cache is a fast-access memory bank that serves as an intermediate storage for data that is read from or written to secondary storage.Typically, high-speed caches are implemented in RAM, though they can also be implemented on disk when speed is not a critical requirement. - Page 48 Hot Spare One or more disks in a RAID array may fail at any given time. In fact, all RAID types with the exception of RAID 0 provide methods to reconstruct the array in the event of such an occurrence.A commonly used tactic is to earmark a hard disk that is not being used by any RAID...
- Page 49 Physical Drive A single tangible drive is referred to as a physical drive. Primary Storage Main memory i.e., RAM is frequently referred to as primary storage. RAID Abbreviation of Redundant array of independent disks. It is a set of disk array architectures that provides fault-tolerance and improved performance.
- Page 50 Hence storage cost doubles.The capacity of RAID 1 will be the size of the smaller HDD, so we suggest you connect HDDs of the same sizes Advantage: to save HDD space.
- Page 51 C-Glossary RAID 5 A RAID 5 array is similar to a RAID 4 array in that, it utilizes a striped set of three or more disks with parity of the strips (or chunks) comprising a stripe being assigned to the disks in the set in a round robin fashion.The figure below illustrates an example of a RAID 5 array comprised of three disks –...
- Page 52 Read Ahead Motivated by the principle of “spatial locality”, many RAID controllers read blocks of data from secondary storage ahead of time, i.e., before an application actually requests those blocks. The number of data blocks that are read ahead of time is typically governed by some heuristic that observes the pattern of requests.The read-ahead technique is particularly efficient when the spatial...
- Page 53 IP is the protocol that defines and governs addressing, fragmentation, reassembly and time-to-live parameters for packets. Volume Set A volume set is a concatenation of storage elements that may be RAID arrays, JBODs, or simply areas of disks that are not part of RAID arrays.
-
Page 54: Appendix D- Glossary Of Raid Terms
Appendix D: Product Specifications System Architecture Toshiba TMPR4927ATB 200MHz 64-bit RISC processor 64MB on-board cache memory with ECC protection 5 channel IDE controller with enhanced H/W XOR engine NVRAM for RAID configuration & transaction log Write-through or write-back cache support Firmware in Flash ROM for easy upgrades RAID Features RAID level 0, 1 (0+1), 3, 5 with single disk passthrough... - Page 55 Power Consumption: Normal operation: 2.3 AC Amps @ 115 Volts Spin up (peak): 3.70 AC Amps @ 115 Volts Power Requirements: Internal Auto-sensing power supply (90-240vac) (47-62Hz) Environmental Specifications: Temperature 5ºC - 55ºC (41ºF - 131ºF) Humidity 10% - 90% RH (Non-condensing) SANCube800™...
- Page 56 MicroNet Techology 19260 Van Ness Ave Torrance, CA 90501 www.MicroNet.com 6-23-2004 Rev 1.0 The material in this document is for information only and is subject to change without notice. While reasonable efforts have been made in the preparation of this document to assure its accuracy, MicroNet Technology assumes no liability resulting from errors or omissions in this document, or from the use of the information contained herein.
Need help?
Do you have a question about the SCB-1000GB4 and is the answer not in the manual?
Questions and answers