Table of Contents
Advertisement
Quick Links
Model Numbers / Nos. de Modelos: FF28L / FF29BL
(MANUAL DE INSTRUCCIONES)
BEFORE USE, PLEASE READ AND FOLLOW ALL SAFETY RULES
La sección en español empieza en la página 9.
Write Serial Number (on back of unit) here:
_______________________________
REFRIGERATOR
(REFRIGERADOR)
INSTRUCTION MANUAL
AND OPERATING INSTRUCTIONS.
Felix Storch, Inc
Summit Appliance Division
770 Garrison Avenue
Bronx, New York 10474
www.summitappliance.com
Advertisement
Table of Contents

Related Manuals for Summit FF29BL


Summary of Contents for Summit FF29BL
- Page 1 REFRIGERATOR (REFRIGERADOR) Model Numbers / Nos. de Modelos: FF28L / FF29BL INSTRUCTION MANUAL (MANUAL DE INSTRUCCIONES) BEFORE USE, PLEASE READ AND FOLLOW ALL SAFETY RULES AND OPERATING INSTRUCTIONS. La sección en español empieza en la página 9. Felix Storch, Inc...
-
Page 2: Important Safeguards
IMPORTANT SAFEGUARDS Before the refrigerator is used, it must be properly positioned and installed described in this manual, so read the manual carefully. To reduce the risk of fire, electrical shock or injury when using the refrigerator, follow basic precautions, including the following: ... - Page 3 The refrigerator should not be located next to ovens, grills or other sources of high heat. The refrigerator must be installed with all electrical, water and drain connections in accordance with state and local codes. A standard electrical supply (115 V AC only, 60 Hz), properly grounded in accordance with the National Electrical Code and local codes and ordinances is required.
-
Page 4: Location Of Parts
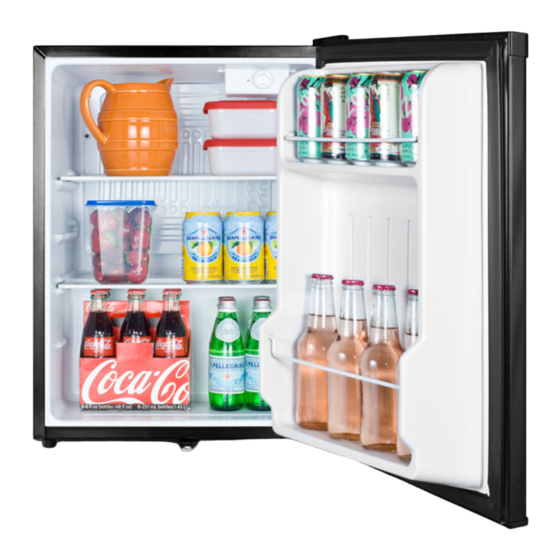
LOCATION OF PARTS 1. Temperature control (thermostat) 2. Evaporator 3. Upper storage shelf 4. Lower storage shelf 5. Front leg 6. Leveling leg 7. Upper door bin 8. Bottle storage bin Model Number Color Shelves FF28L White Wire FF29BL Black Glass... -
Page 5: Installation Instructions
INSTALLATION INSTRUCTIONS Before Using Your Refrigerator Remove the exterior and interior packing. Check to be sure you have all of the following parts: Instruction manual 2 refrigerator shelves Before connecting the refrigerator to the power source, let it stand upright for approximately 2 hours. -
Page 6: Operating Your Refrigerator
This refrigerator should be properly grounded for your safety. The power cord of this refrigerator is equipped with a three-prong plug that mates with standard three-prong wall outlets to minimize the possibility of electrical shock. This refrigerator requires a standard 115/120-volt, 60Hz electrical outlet with three-prong ground. ... -
Page 7: Care And Maintenance
CARE AND MAINTENANCE About Defrosting This appliance requires no manual defrosting. During the operation of the compressor, ice will build up along the cold rear wall (the evaporator plate is behind the wall). During the compressor’s off- cycle, the ice will melt, drip down, and collect in a tray above the compressor, where the compressor’s heat evaporates the water. -
Page 8: Wiring Diagram
refrigerator forces the compressor to run longer. Be sure to wrap foods properly, and wipe containers dry before placing them in the refrigerator. This cuts down on frost build-up inside the refrigerator. Refrigerator shelves should not be lined with aluminum foil, wax paper, or paper toweling. Liners interfere with cold air circulation, making the refrigerator less efficient. -
Page 9: Problems With Your Refrigerator
PROBLEMS WITH YOUR REFRIGERATOR? You can solve many common refrigerator problems easily, saving you the cost of a possible service call. Try the suggestions below to see if you can solve the problem before calling a service technician. TROUBLESHOOTING GUIDE Problem Possible Cause Refrigerator does not operate. -
Page 10: Instrucciones En Español
INSTRUCCIONES EN ESPAÑOL INSTALACION Retire los accesorios de empaque (plásticos protectores, cartón y tiras engomadas). Limpie el exterior con un trapo suave y seco, y el interior con un trapo húmedo y tibio. UBICACIÓN Este aparato no está diseñado para funcionar en espacios cerrados. Cuando coloque la unidad, asegúrese de dejar al menos 4 "... -
Page 11: Cuidados En Los Periodos De Ausencia
Al conectar y encender su unidad, asegúrese de rotar el control de temperatura hacia la posición de “5”. Este control de temperatura puede variar desde “0” hasta la posición “5”, después de haberse mantenido en la posición “5” por 24 o 48 horas aproximadamente, regrese el control de temperatura para ajustarlo a la posición que más se ajuste a sus necesidades, por ejemplo la posición “3”... -
Page 12: One-Year Limited Warranty
LIMITED WARRANTY ONE YEAR LIMITED WARRANTY Within the 48 contiguous United States, for one year from the date of purchase, when this appliance is operated and maintained according to instructions attached to or furnished with the product, warrantor will pay for factory-specified parts and repair labor to correct defects in materials or workmanship. Service must be provided by a designated service company.
Need help?
Do you have a question about the FF29BL and is the answer not in the manual?
Questions and answers