Table of Contents
Advertisement
Quick Links
Advertisement
Table of Contents

Related Manuals for Pelgrim GVW810L


Summary of Contents for Pelgrim GVW810L
- Page 1 Operating Instructions Dishwasher GVW810L...
-
Page 2: Table Of Contents
Contents Front panel ....................Safety instructions ..................Before washing for the first time ............... Loading the dishwasher ................Using the dishwasher ................Settings ..................... Care and cleaning ..................Troubleshooting ..................Installation ....................Service ...................... Information for test institute ............... Technical information ................Front panel Main power switch SpeedWash... -
Page 3: Safety Instructions
Safety instructions General Installation • Read the operating instructions and See the section Installation. keep them in a safe place! Child safety • Never use the dishwasher for any • Always start the dishwasher purpose other than that specified in immediately after adding detergent. -
Page 4: Before Washing For The First Time
Before washing for the first time • Corrugated cardboard made from up The water softener to 100% recycled material. In order to achieve good dishwashing • Expanded polystyrene (EPS) with no results, the dishwasher needs soft water added chlorine or fluorine. (water with low mineral content). - Page 5 2 Place the funnel supplied with the 4 Close the lid firmly. dishwasher in the salt compartment Press to open top-up hole. First, pour in about 1 l of water. 3 Then add salt, a maximum of 1.5 kg, until the compartment is full. 4 Wipe up any excess salt so that the lid can be screwed on firmly.
-
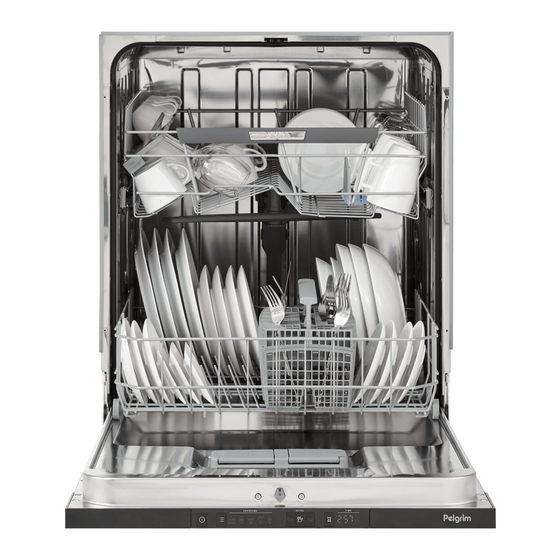
Page 6: Loading The Dishwasher
Loading the dishwasher Energy-efficient dishwashing the wine glass shelf and knives are placed in the knife stand on the right (if fitted). • Do not start the dishwasher until it is fully loaded to save energy. • Do not rinse under running water. Simply scrape off large food particles before loading the dishwasher. - Page 7 Lower basket Points to consider • All dirty surfaces should face inwards Place plates, side plates, serving dishes, pots and cutlery (in the cutlery basket) in and downwards! the lower basket. • Dishes should not be placed in or on each other.
-
Page 8: Using The Dishwasher
Using the dishwasher Add detergent detergent will not be released properly if the lid is tight and will not open correctly. Press to open NOTE! Dishwasher tablets are not recommended for short programmes (less than 75 minutes). Use powder or liquid dishwasher detergent instead. - Page 9 When newly installed, the programme needs to be run five times before it is fully Rinse adapted and can provide the best results. Used to rinse dishes while you wait for the dishwasher to become fully loaded. Auto wash SpeedWash + EXTRA - Selecting Options To select an option, press one of the Auto open...
- Page 10 times – or hold it in – to set the desired NOTE! number of hours. During drying, the programme is 2 Close the door and the dishwasher interrupted if the power is cut or the door counts down 1 hour at a time and starts is open for more than 2 minutes.
-
Page 12: Settings
Settings Open the settings menu: First, open the door. Turn off the machine. Press and hold the main power switch until the display lights up. Within 10 seconds: - press the Programme selector and the option button for SpeedWash. The display shows the settings menu (current setting and its currently set value). - Page 13 Settings Options Adjusting the water softener. Read off Water hardness 2:00 - 2:09 the appropriate setting from the water hardness table below. °dH °fH °dH °fH 20-24 35-43 10-14 25-29 44-52 9-11 15-20 30-39 53-70 12-14 21-25 40-49 71-88 15-19 26-34 Do not forget to put salt in the salt compartment after you have set the...
-
Page 14: Care And Cleaning
Care and cleaning Coarse filter NOTE! The coarse filter traps larger food The dishwasher must not be used particles, which cannot get past the without the filters in place! drainage pump. Empty the coarse filter as Dishwashing results may be affected if necessary. - Page 15 Spray arms The door and the door seal Holes and bearings can sometimes Regularly clean the sides of the door and become blocked. Remove any debris the door seal. Use a slightly damp cloth using a pin or the like. The spray arms (with a little cleaner if necessary).
- Page 16 4 In order to inspect the drainage pump, Unblocking the inlet hose filter remove the coloured stop on the right If the water supply contains small in the bottom drain. particles, the outer filter on the inlet hose 5 Turn the pump wheel located behind may become blocked, which results in the drainage pump stop by hand.
-
Page 17: Troubleshooting
Troubleshooting Type of fault on the Action display Overfilling Clear the drainage pump. See the section Care and cleaning. If the problem persists, call the service department. Water outlet fault See “Water remains in the dishwasher” in the table “Problem” below. If the problem persists, call the service department. - Page 18 Problem Possible causes Action Cannot close door. The baskets are not Check that the baskets are correctly positioned. correctly positioned horizontally. Check that the dishes are not blocking the baskets from sliding properly into place. The door lock does not click Check the door lock.
- Page 19 Problem Possible causes Action The dishwasher does not The door is not properly Check. start. closed. You have opened the Close the door and wait. dishwasher to add more After a while, the dishes while a programme dishwasher continues the is in progress.
- Page 20 Problem Possible causes Action The dishes are not clean. The spray arms do not Remove the arms and clean rotate. them. Check that the dishes are not blocking the spray arms. Old detergent. Detergent is Avoid large packages. a perishable product. Incorrect detergent dosage.
- Page 21 Problem Possible causes Action Spots or films on the dishes. The water softener is Check that the salt leaking salt. compartment lid is properly tightened. Otherwise call the service department. Incorrect water softener See the section Settings. setting. Incorrect rinse aid dosage See the section Settings.
- Page 22 Problem Possible causes Action Water remains in the The filters are blocked. Clean the coarse and fine dishwasher. filters. Debris in the drainage Clean the drainage pump. pump. See the section Care and cleaning. Kink in drainage hose. Check that the hose is free from kinks and sharp bends.
-
Page 23: Installation
Installation [mm] 1194 Door length Nominal dimensions. Actual measurements may vary. It is important that you read through and Check also that none of the follow the instructions and directions connections leak. below. Conduct installation and WARNING! connection in accordance with the Turn off the water supply when installing separate installation instructions. - Page 24 • Make sure the area on which the No part of the drainage hose may be more dishwasher is to be installed is firm. than 950 mm above the bottom of the Adjust the adjustable feet so that the dishwasher. dishwasher is level.
-
Page 25: Service
Service Read the chapter Troubleshooting before Electrical connection contacting the service department. Information about the electrical connection Provide the details on the serial number can be found on the serial number plate. plate in all contact. Include the article This specification must match the number (1) and the serial number (2). -
Page 26: Information For Test Institute
Information for test institute Request test institute information via e-mail ART. NO. dishwashers@appliance-development.com. SERIAL NO. The request should include the details on the serial number plate. Include the article number (1) and the serial number (2). - Page 27 Your notes...
-
Page 28: Technical Information
Information on energy labelling Information sheet, in compliance with Commission Delegated Regulation (EU) No. 1059/2010 Pelgrim Model designation: GVW810L Number of standard place settings: Energy efficiency class: Annual energy consumption(AE 262 kWh per year Energy consumption of the standard cleaning cycle(E 0.92 kWh...
Need help?
Do you have a question about the GVW810L and is the answer not in the manual?
Questions and answers