Table of Contents
Advertisement
Quick Links
Advertisement
Table of Contents

Related Manuals for ADJ DS4


Summary of Contents for ADJ DS4
- Page 1 Design Series DS4 User Guide ...
- Page 2 ©2018 ADJ Products, LLC all rights reserved. Information, specifications, diagrams, images, and instructions herein are subject to change without notice. ADJ Products, LLC logo, and identifying product names and numbers herein are trademarks of ADJ Products, LLC. Copyright protection claimed includes all forms and ...
-
Page 3: Table Of Contents
Panel Overview 9 Handling and Transportation 11 Installation 14 Technical Specifications 41 Optional Components & Accessories 43 ADJ Products, LLC • Los Angeles, Ca USA • Kerkrade, Netherlands 3 ... -
Page 4: General Information
GENERAL INFORMATION The DS4 LED Video Panels and connectors are composed of lightweight nanocomposite materials (nanotechnology polymer), and feature multiple rigging points to connect panels in conventional, offset, or staggered (3D) configurations. This innovative system can easily be linked, rigged, and ... -
Page 5: Limited Warranty (Usa Only)
LLC factory. All shipping charges must be prepaid. If the requested repairs or service (including parts replacement) are within the terms of this warranty, ADJ Products, LLC will pay return shipping charges only to a designated point within the United States. If the entire instrument is sent, it must be shipped in its original package and packaging ... -
Page 6: Safety Guidelines
This panel is a sophisticated piece of electronic equipment. To guarantee a smooth operation, it is important to follow all instructions and guidelines in this manual. ADJ is not responsible for injury and/or damages resulting from the misuse of this panel due to the disregard of the information printed ... - Page 7 CAUTION: Test panel for 2-hours per week, if not used regularly or for an extended period of time. CAUTION: Cases used to transport panel must me properly waterproofed for transportation. ADJ Products, LLC • Los Angeles, Ca USA • Kerkrade, Netherlands 7 ...
-
Page 8: Maintenance Guidelines
4. Check each DS4 LED Video Panel for loose screws and other fasteners. 5. If the DS4 LED Video Panel installation is fixed or displayed for a lengthy time, regularly inspect all rigging and installation equipment, and replace or repair it as necessary, and during long ... -
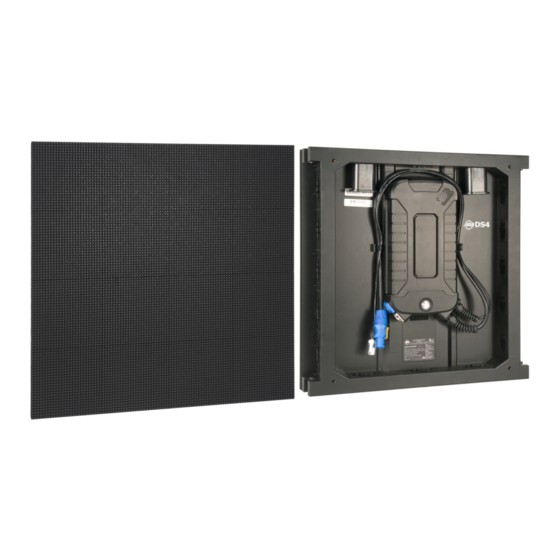
Page 9: Panel Overview
PANEL OVERVIEW The DS4 LED Video Panel includes a power supply, modules, and receiver card. The cover of the power supply box can be secured to protect all internal accessories and components. Instead of traditional die cast aluminum alloy or steel, the Panel of the Designer Series LED Video Panels are ... - Page 10 Horizontal Pattern 6 Vertical Pattern 7 Slash Pattern 8 256 Gray Gradient 9 Aging (Lifespan) 10 ADJ Products, LLC • Los Angeles, Ca USA • Kerkrade, Netherlands ...
-
Page 11: Handling And Transportation
HANDLING AND TRANSPORTATION The 4 front corners of the DS4 LED Video Panel are susceptible to damage during handling and transportation. When removing DS4 LED Video Panels from their respective Flight Cases, and before they are installed, take care to avoid damaging any of the 4 corners. ... - Page 12 Ground any structural/mechanical parts touching or connected to any of these ESD Grounding holes. ESD Grounding Holes ESD Grounding Holes 12 ADJ Products, LLC • Los Angeles, Ca USA • Kerkrade, Netherlands ...
- Page 13 Generally, unused DS4 LED Video Panels will remain in their flight cases. However, if that is not practical, take care to stack them horizontally, with ESD shielding material placed between unit layers, limiting the stack to 10 units or fewer. The units are unstable if placed vertically, and if placed ...
-
Page 14: Installation
material and the fixture. If you lack these qualifications, do not attempt the installation yourself. Improper installation can result in bodily injury and property damage. 14 ADJ Products, LLC • Los Angeles, Ca USA • Kerkrade, Netherlands ... - Page 15 DS4HC—Horizontal Connector DS4CC—Convex/Concave Panel Connector Horizontal Panel Connector (Small) DS4—Vertical Panel Connector ADJ Products, LLC • Los Angeles, Ca USA • Kerkrade, Netherlands 15 ...
- Page 16 ?—Vertical Panel Connector w/Gap Cinching Mechanism DS4MFC—Multi-Function Clamp DS4OB—Offset Bracket DS4 Connectors, Clamps, & Accessories 16 ADJ Products, LLC • Los Angeles, Ca USA • Kerkrade, Netherlands ...
- Page 17 to the alignment of the connectors. Direction of Connector Direction of Force (Pounds-force) Connector Load Bearing Capacity ADJ Products, LLC • Los Angeles, Ca USA • Kerkrade, Netherlands 17 ...
- Page 18 INSTALLATION – PANEL CONNECTORS AND SOCKETS There are 3 mounting sockets and 2 half mounting sockets on the top and bottom frames of the DS4 LED Video Panel, and five mounting sockets on both vertical sides. ...
- Page 19 45° because it is blocked by the raised central rail panel under the Power Supply DS4VC Installation & Power Supply ADJ Products, LLC • Los Angeles, Ca USA • Kerkrade, Netherlands 19 ...
- Page 20 INSTALLATION – PANEL CONNECTORS AND SOCKETS To remove the (2x) DS4VC Vertical Connectors from the top frame of the DS4 LED Video Panel, it may be necessary to remove the radiused Connector Flange Clips from the DS4VC Vertical ...
- Page 21 With the DS4VC Horizontal Connectors installed in both panels, twist their locking mechanism knobs 90° to lock them in place. ADJ Products, LLC • Los Angeles, Ca USA • Kerkrade, Netherlands 21 ...
- Page 22 sleeve between them. With the DS4HC Horizontal Connectors installed in both panels, twist their locking mechanism knobs 90° to lock them in place. 22 ADJ Products, LLC • Los Angeles, Ca USA • Kerkrade, Netherlands ...
- Page 23 For safety, and to ensure surface flatness and integrity between panels, install Connecting Plates when the height of stacked DS4 LED Video Panels exceeds 4 meters (~8 stacked DS4 LED Video Panels). The Connecting Plates can also be used for fixed wall installations. ...
- Page 24 To connect two stacked DS4 LED Video Panels on the left side, use an etherCON to etherCON cable. To connect two stacked DS4 LED Video Panels on the right, you can use an RJ45 signal adaptor (not included) to connect the two etherCON In/Out cables. ...
- Page 25 A curvilinear screen installation requires the use of DS4CC Curved Connectors to assemble the DS4 LED Video Panels to achieve convex, concave, or complex curve screen shapes. Once connected, the DS4CC Curved Connectors allow adjoining DS4 LED Video Panels to be positioned plus or minus 15° and locked in place. ...
- Page 26 INSTALLATION – CONVEX, CONCAVE, OR COMPLEX CURVED PANELS Convex Curve Concave Curve Complex Curve (S-Shape) Top View of Curved Installation Options 26 ADJ Products, LLC • Los Angeles, Ca USA • Kerkrade, Netherlands ...
- Page 27 1. Insert the DS4CC Curve Connectors into one 2. Twist their locking mechanism knobs 90° to panel. lock them in place. ADJ Products, LLC • Los Angeles, Ca USA • Kerkrade, Netherlands 27 ...
- Page 28 them in place. 2. Position panels to the desired angle. 3. Twist the angle lock to secure the desired panel angle position 28 ADJ Products, LLC • Los Angeles, Ca USA • Kerkrade, Netherlands ...
- Page 29 INSTALLATION – OFFSET & STAGGERED (3D) PANELS The DS4 LED Video Panels are designed for myriad staggered and offset mounting options, allowing greater display design flexibility. Our DS4 LED Video Panels come with two preinstalled DS4VC ...
- Page 30 2. With the DS4VC Vertical Connectors installed in both offset panels, twist their locking mechanism knobs to 90° to lock them in place. 30 ADJ Products, LLC • Los Angeles, Ca USA • Kerkrade, Netherlands ...
- Page 31 3. With the DS4HC Horizontal Connectors installed in both offset panels, twist their locking mechanism knobs 90° to lock them in place. ADJ Products, LLC • Los Angeles, Ca USA • Kerkrade, Netherlands 31 ...
- Page 32 INSTALLATION – OFFSET & STAGGERED (3D) PANELS 1. Secure the DS4OB Offset Bar to the panel with a DS4VC Vertical Connector. 32 ADJ Products, LLC • Los Angeles, Ca USA • Kerkrade, Netherlands ...
- Page 33 3. With the DS4OB Offset Bars in position, and the second set of DS4HC Horizontal Connectors installed, twist their locking mechanism knobs 90° to lock them in place. ADJ Products, LLC • Los Angeles, Ca USA • Kerkrade, Netherlands 33 ...
- Page 34 5. Pull and twist the knurled spring-loaded locking pin to an open position on the DS4OB Offset Bar, extend the panel, then re-engage the locking pin. 34 ADJ Products, LLC • Los Angeles, Ca USA • Kerkrade, Netherlands ...
- Page 35 INSTALLATION – RIGGING When flying the DS4 LED Video Panels using a truss lifting frame, lintel, or overhead beam, the center of gravity of the DS4 LED Video Panel is near the LED screen, counterbalanced by the ...
- Page 36 DS4 LED Video Panel, then insert the center installed DS4VC Vertical Connector of the DS4RB1 Rigging Bar into the center installation socket of the DS4 LED Video Panel, and twist the knob of the locking assembly 90° to lock it. Insert two DS4VC Vertical Connectors from the bottom of the top ...
- Page 37 Although not always possible, the second and recommended method for larger installations, is to straddle two DS4 LED Video Panels with the DS4RB1 Rigging Bar, the end of each Rigging Bar bisecting the top frame of two adjacent DS4 LED Video Panels, like stacking bricks. This second ...
- Page 38 95°), ensure each vertical suspension or rigging cable is taught, and for extra support when stacking more than 8 DS4 LED Video Panels, add an extra DS4VC Vertical Connector with each hole that is formed between adjoined DS4RB1 Rigging Bars. ...
- Page 39 The DS4RB1 can also be installed at the bottom of your screen as a ground support beam, especially if the ground is particularly uneven. Rigging Bar used with Ground Support Installation, Front and Back Views ADJ Products, LLC • Los Angeles, Ca USA • Kerkrade, Netherlands 39 ...
- Page 40 INSTALLATION – RIGGING: FIXED For fixed or semi-permanent installations, the DS4 LED Video Panels can be attached to a wall or steel poll using the DS4MFC Multi-Function Clamp. In addition, use a minimum of three DS4HC ...
-
Page 41: Technical Specifications
Minimum Circle Diameter (m) 3.8 Listings CE, FCC, & ETL Specifications subject to change without any prior written notice. 501032 ADJ Products, LLC • Los Angeles, Ca USA • Kerkrade, Netherlands 41 ... - Page 42 Connect t he d evice t o a n e lectrical o utlet o n a c ircuit d ifferent f rom w hich t he r adio r eceiver i s c onnected. Consult the dealer or an experienced radio/TV technician for help. 42 ADJ Products, LLC • Los Angeles, Ca USA • Kerkrade, Netherlands ...
-
Page 43: Optional Components & Accessories
DS4751 DS4RACA;; Right Angle Hardware Adapter MCT300 ADJ MCT RL300 Video Wall Processor MED592 Media Master Express—Video Control Software ADJ Products, LLC • Los Angeles, Ca USA • Kerkrade, Netherlands 43 ... - Page 44 1/2" Shackle TBD etherCON to etherCON Coupler for Data TBD powerCON to powerCON Coupler for Power TBD Connecting Plate 44 ADJ Products, LLC • Los Angeles, Ca USA • Kerkrade, Netherlands ...
- Page 45 (THIS PAGE IS INTENTIONALLY LEFT BLANK) ADJ Products, LLC • Los Angeles, Ca USA • Kerkrade, Netherlands 45 ...
- Page 46 ...
Need help?
Do you have a question about the DS4 and is the answer not in the manual?
Questions and answers