Table of Contents
Advertisement
Quick Links
OPERATING INSTRUCTIONS
ROOM AIR CONDITIONER
RC-HZ70Y/RC-HZ90Y
This symbol shows that this equipment uses a flammable refrigerant.
If the refrigerant is leaked, together with an external ignition source,there is a possibility of ignition.
This symbol shows that the Operating Instructions should be read carefully.
This symbol shows that service personnel should be handling this equipment with reference to the
Technical Manual.
This symbol shows that there is information included in the Operating Instructions and/or
Installation Instructions.
Before operating the unit, read these operating instructions thoroughly and keep them for future reference.
1
SAFETY PRECAUTIONS
Please observe these following safety precautions when using your air conditioner.
Failure or negligence in observing these safety precautions could cause fire, electrical shock or personal injury.
This sign warns of risk of
death or serious injury.
This sign warns of risk of
injury or damage to property.
INSTALLATION PRECAUTION
Do not install, remove and reinstall the unit yourself.
Improper installation may cause leakeage, electric shock or fire. Please engage an authorized dealer
or specialist for the installation work.
Do not add or replace refrigerant other than the specified type.
It may cause product damage, burst and injury. If the supply cord is damaged, it must be replaced by
the manufacturer, its service agent or similar qualified persons in order to avoid hazard.
The appliance shall be stored in a room without continuously operating ignition sources
(for example: open flames, an operating gas appliance or an operating electric heater)
In cases that require mechanical ventilation, ventilation openings shall be kept clear of obstruction.
Ventilate any enclosed areas when installing or testing the refrigeration system.
Escaped refrigerant gas, on contact with fire or heat, can produce dangerously toxic gas.
Confirm after installation that no refrigerant gas is leaking. If the gas comes in contact with a burning
stove, gas water heater, electric room heater or other heat source, it can cause the generation of toxic gas.
The room air conditioner must be earthed.
Improper grounding could cause electric shock.
Do not install the unit in a place where there are explosive gas leaks.
Gas leaks near the unit could cause fire.
Ensure that the drainage piping is connected properly.
Otherwise water will leak out.
OPERATION PRECAUTION
This sign warns of risk of
death or serious injury.
Do not modify the length of power cord or use an extension cord.
Do not touch or operate with wet hands.
Do not modify or damage the cord.
Do not turn on the unit by inserting the power plug.
Do not switch off the unit by pulling out the power plug.
Avoid an extended period of direct airflow.
Do not inser your fingers or other objects into the unit, rotating
parts may cause injury.
Do not try to repair the unit yourself.
Plug in properly before operating and use a specified power cord.
If abnormal conditions (burnt smell, etc.) occur, switch off and
remove the power plug.
Confirm to authorized dealer or specialist on usage of specified
refrigerant type. Using of refrigerant other than the specified
may cause product damage, burst and injury etc.
This appliance is not inteded for use by persons (including children)
with reduced physical, sensory or mental capabilities, or lack of
experience and knowledge, unless they have been given super-
vision or instruction concerning use of the appliance by a person
responsible for their safety. Children should be supervised to
ensure that they do not play with the appliance.
2
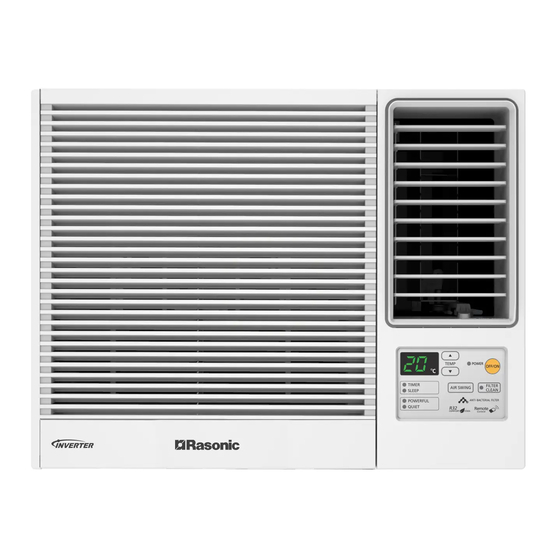
PARTS IDENTIFICATION
MAIN UNIT
Air Filter
(behind the front intake grille)
Front Intake Grille
Vertical airflow direction vane
(Airflow direction adjustment up-down).
The vertical airflow direction vane is
controlled by positioning the vent to
discharge the air upwards, downwards,
or straight out.
Touch Control Panel
Display Panel
•
Powerful Mode
•
Quiet Mode
•
Timer Set
•
Filter Cleaning
•
TYPES OF SIGNAL SOUND - One long "BEEP" and one short "BEEP" . (Sound from the main unit.)
ACCESSORIES
Signal Transmitter
Be sure to observe the following:
Aim remote control at control panel
ON/OFF OPERATION Button
on air conditioner when operating.
MODE Selection Button
Do not drop or throw the remote control.
Do not place the remote control in a
AIR SWING Button
location that is exposed to direct
REMOTE CONTROL
RESET Button
sunlight or next to a heating unit or
CHECK-UP Button
other heat souces.
Function Sign
3
PREPARATION BEFORE OPERATING
Ensure that the power plug
is securely inserted.
A loose plug may cause a fire
or an electric shock.
HOW TO INSERT BATTERIES
Open the cover.
Insert the two batteries.
ENGLISH
ACXF55-26510
This symbol (with a white background) denotes an action that is
PROHIBITED.
These symbols (with a green background) denote actions
that are COMPULSORY.
R32
This sign warns of risk of injury
or damage to property.
Do not use the unit for other purposes, than its intended use.
Do not remove the power plug by pulling the cord.
Do not block the air intake and outlet vanes.
Do not splash or direct water at the unit.
Do not expose the unit to direct sunlight during operation.
Do not operate the unit without the air filter installed
or when the front intake grille has been removed.
Do not place any objects on the unit.
Do not operate any combustion equipment near the unit's
air flow area.
Do not sit or step on the unit, you may fall down accidentally.
Do not touch the sharp aluminium fin, sharp parts may
cause injury.
Do not use means to accelerate the defrosting process or to
clean, other than those recommended by manufacturer.
Switch off the breaker and unplug the unit from the socket
if the unit will not be operated for a long period.
Pay attention to any damages on the unit caused by
extensive usage.
Ventilate the room occasionally where the unit is installed.
Unplug the power cord when cleaning the unit.
Cabinet
Front Grille
Touch Control Panel
Ventilation Lever
The ventilation lever must be in CLOSE
position in order to maintain the best
cooling conditions.When fresh air is
necessary in the room, set the
ventilation lever to the Open position.
The damper is opened and room air is drawn out.
● When the filter cleaning light flashes or
OPERATION
•
brighten, it is recommended to clean the filter
ON/OFF Pad
after dismantle.Filter cleaning light will flashes
about 20 second,
if didn't press the "MAIN UNIT RESET", it will
keep brighten after flashes about 20 second.
● Please tap the "MAIN UNIT RESET" button
after the air filter is cleaned, unit will make a
"BEEP" sound. (Filter cleaning light extinguish)
TEMPERATURE/TIMER
Display panel
FAN
Setting Button
SWING
HOUR
OFFON
FAN SPEED Selection Button
OFF / ON
TEMP.
POWERFUL Button
FAN
TIMER SET
QUIET Button
ON TIMER button
MODE
QUIET
POWERFUL
OFF TIMER button
AUTO
TIMER-OFF
TIMER-ON
TIMER SET button
SWING
TIMER
TIMER CANCEL SET button
SET
CANCEL
SET
RESET
CHECK
AC RESET
MAIN UNIT RESET button
Auto
Cool
Dry
Heat
NOTES:
If the unit is not going to be used for an extended period
of time, remove the power plug. Otherwise, approximately
2.5W of electricity will be used even if the unit has been
turned off using the remote control.
If operation is stopped, and to be restarted immediately,
the unit will resume operation only after 3 minutes.
Do not use rechargeable (Ni-Cd) batteries
because such batteries differ from the
standard dry cell batteries in shape,
dimensions and performance.
Close the cover.
ABOUT THE BATTERIES
The batteries can be used for approximately one year.
Be sure to replace the batteries with two new identical batteries.
Remove the batteries if the air conditioner will not be used for an extended period of time.
OPERATION CONDITIONS
Use the air conditioner
under the following
conditions:
Operating temperature range.
Continuous operation at over 90% high humidity
may create condensation and result in
Thank you for
buying Panasonic
waterdrops on the intake and outlet vanes.
Air Conditioner
4
AIR CONDITIONER INSTALLATION
CHOOSING THE INSTALLATION LOCATION
When installing, use the nearest power outlet. Make sure the power outlet is easy to
reach so you can quickly disconnect your air conditioner in case of emergency.
Ensure that the air conditioner is well supported, securely fastened, easily reachable
and not obstructed.
Aviod location with: salty or sulphurous air, draughts, dampness and flammable gas.
If you install the drainage system, be sure to channel the concensed water to a suitable location.
Covers, obstructions and unsteady support may cause excessive operating noise and vibration.
The rear end of the air conditioner is splash proof. You don't need to shield or cover it.
Installation and maintenance should be done by competent person.
PREPARATIONS BEFORE INSTALLATION
Dimension
There should not be any obstacles surrounding the unit.
Prepare and installation hole slightly bigger than the cabinet size.
Left and right side of the unit should be at least 15 cm
away from the wall.
The minimum installation height is 75cm.
(Based on IEC 60335-2-40, there is no restriction for the minimum installation floor area
since the refrigerant charges is less than 1.224kg.
CAUTION POINT DURING INSTALLATION
When installing air conditioner at glass window or thin partition,
fix the vertical and side supporting bar to the concrete wall in order to
support the weight of the air-conditioner and reduce the vibration that
is being transferred to the glass window or thin partition.
This can minimize the noise problem caused by improper installation.
Proposed to use 1/8" x 1-11/4" "angle-aluminium for
installation frame and side supporting bar.
INSTALLATION PROCEDURES
Risk of fire /
Remove the rear cabinet screws and chassis locking
Flammable
1
bracket from the cabinet. Save for later use.
materials
2
Slide the chassis out from the cabinet
Counter clockwise
Chassis locking bracket.
3
Place the cabinet into the installation hole.
4
Slide the chassis into the cabinet.
Lock the chassis to the cabinet reusing the
5
chassis locking bracket.
REMOVAL OF FRONT GRILLE
Open the Intake Grille until over 90°,
1
front grille fulcrum can remove from Grille force arm.
Front Grille Fulcrum
Body Support
Grille Force arm
Remove the air filter.
2
Tilt up and pull out the air filter by the holder.
air filter
ELECTRIC WORK
Always use at the rated voltage and with a specific air conditioning circuit.
This equipment must be earthed and strongly recommended to be installed with Earth Leakage Circuit Breaker
(ELCB) or Residual Current Device (RCD). Otherwise, it may cause electric shock or fire in case of malfunction.
A 16 Ampere time delay fuse or circuit breaker is required.
Nominal cross sectional area of power supply wire must be 3 core x 1.5 mm
The power supply must be from an independent circuit.
All electrical installations must be made in accordance with local wiring and safety regulation wherever applicable.
There must be a double pole switch with a minimum of 3.5 mm contact gap in the fixed installation circuit.
Please engage and authorized dealer or specialist for the installation work.
CONDENSED WATER DRAINAGE
This air conditioner are "INVERTER" model, in order to prevent the water overflows from the machine, please make sure provide an
outside drainage by using the following the procedure .
1
Remove the chassis locking bracket
from the cabinet. Then slides the chassis
out from the cabinet.
Counter
Clockwise
Chassis locking
bracket
2
Install the drain pan
Install the drain pan at the
right corner of the cabinet
using 2 screws.
Screws
Drain pan
INTERNAL VIEW
Avoid installation in the following locations.
(unit in °C)
Indoor side
Outdoor side
Mechanical processing plants and other places with a lot of mechanical oil.
D.B.T.
W.B.T.
D.B.T.
W.B.T.
High humidity areas such as laundry room and bathroom.
Max. Temperature
32
23
43
26
Air conditioner COOLING/HEATING normal operating temperature.
Min. Temperature
16
11
16
11
In side maximum temperature 30(30) ℃, lowest temperature 16(16)℃
NOTE:
D.B.T.: Dry Bulb Temperature
Humidity may exceed 90%
W.B.T.: Wet Bulb Temperature
Out side maximum temperature 43(24) ℃, lowest temperature 16(0)℃
NOTICE:
When the air conditioner is used at room temperature of 21 degrees or less,
the temperature may be too low, and the air conditioner may be easily
frosted. After frosting, it may be difficult to drain and may flow into the room.
Depending upon the location of AC outlet,
6
route the AC cord to either left or right side
before instaling the front grille.
This figure shows the AC cord routed to the left side.
Attach the front grille to the cabinet
7
and fasten it with a screw.
Attach air filter to the front
8
grille. (see anti-bacterial
filter installation
instructions included
in this package)
Control panel keep it horizontal, the panel arm both sides inwardly
9
adapted to match the panel pivot point with the body support portion at
the same time.
10
Press down control panel and close the cover
Front Grille Fulcrum
Body Support
Grille Force arm
d)
Remove the front grille.
3
a
Remove the screw on the front grille.
At the bottom right side of the front grille,
b
press inward on the cabinet near the power
cord, and pull the grille outward to the right
until right tab releases.
At the bottom left side, push inward on the
c
cabinet and pull the grille outward to the left
to release the left tab. Do not pull the bottom
edge towards to you for more than 3 inches to
prevent the two top tabs from damage.
Slide the front grille upwards to loosen the two
d
top tabs from slots at the top of the cabinet.
or above.
2
3
Connect a drain hose. Fit the drain hose to the drain pan.
Underside view with drain
pan and hole in place.
NOTE:
Drain hose or tubing can be purchased
locally to satisfy your particular needs.
4
Slide the chassis back into the cabinet. Lock the chassis to
the cabinet reusing the chassis locking bracket.
Then reinstall the cabinet to the chassis.
Clockwise
CEILING
Over 15cm
WALL
37.5cm
60.6cm
Fence
or likewise
Less than 20cm
Insert front grille tabs
into the cabinet slots
Advertisement
Table of Contents

Related Manuals for Rasonic RC-HZ70Y


Summary of Contents for Rasonic RC-HZ70Y
- Page 1 W.B.T.: Wet Bulb Temperature Out side maximum temperature 43(24) ℃, lowest temperature 16(0)℃ Operating temperature range. NOTICE: RC-HZ70Y/RC-HZ90Y Continuous operation at over 90% high humidity ACXF55-26510 When the air conditioner is used at room temperature of 21 degrees or less,...
- Page 2 Clean the cabinet, front grille with mild soap or detergent and lukewarm water. NOISE CONSIDERATION The front intake grille can be easily removed for cleaning purposes (refer to Remove the front intake Select an installation location that can support the weight of the air grille procedures).
Need help?
Do you have a question about the RC-HZ70Y and is the answer not in the manual?
Questions and answers