Table of Contents
Advertisement
Quick Links
Advertisement
Table of Contents

Related Manuals for Thermo Scientific invitrogen PowerEase Touch


Summary of Contents for Thermo Scientific invitrogen PowerEase Touch
- Page 1 ™ PowerEase Touch 600W Power Supply USER GUIDE Catalog Number PS0600 (115 VAC), PS0601 (230 VAC), PS0602 (230 VAC Australia), and PS0603 (230 VAC China) Publication Number MAN0025330 Revision A.0 For Research Use Only. Not for use in diagnostic procedures.
- Page 2 Shanghai Life Technologies Biotechnology Co., LTD | No.7 Rong Chang East Street, Long Sheng Industry Park | Building 203 BDA,100176, P.R.China For descriptions of symbols on product labels or product documents, go to thermofisher.com/symbols-definition. The information in this guide is subject to change without notice. DISCLAIMER: TO THE EXTENT ALLOWED BY LAW, THERMO FISHER SCIENTIFIC INC.
-
Page 3: Table Of Contents
Contents ■ CHAPTER 1 Product information ..........5 Product description . - Page 4 Contents ■ APPENDIX A Troubleshooting ........... . 26 ■...
-
Page 5: Chapter 1 Product Information
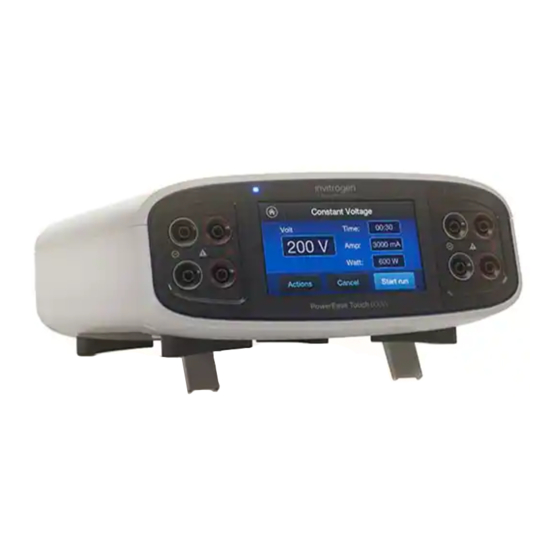
Product information Product description ™ ™ The Invitrogen PowerEase Touch 600W Power Supply is a universal power supply with high power and high current capacity that uses a touch-screen user interface. This power supply is ideal for DNA/RNA electrophoresis, SDS-PAGE, IEF, and native PAGE. The power supply unit has the following features: •... - Page 6 Chapter 1 Product information Product description Touch screen display Status indicator LED Output jacks Polyurethane feet Pop-up feet Figure 1 Front view of PowerEase ™ Touch 600W Power Supply Figure 2 Rear view of PowerEase ™ Touch 600W Power Supply PowerEase ™...
-
Page 7: Product Contents
Chapter 1 Product information Product contents Figure 3 USB port dust cover (Rear view of PowerEase ™ Touch 600W Power Supply) The USB port is shipped with a plastic dust cover for protection during shipment. This cover must be removed prior to port use. - Page 8 Chapter 1 Product information Product contents Table 2 Cat. No. PS0601 (230 VAC) Regulatory mark(s) on electrical Component Quantity plug ™ PowerEase Touch 600W Power 1 each Supply Extra Fuse 1 each Type G Power Cord 1 each ASTA Type CEE 7/7 Power Cord 1 each USB Cover 1 each...
-
Page 9: Chapter 2 Methods
Methods Procedural guidelines We recommend that you carefully review these guidelines before operating the instrument. ™ • To ensure safe, reliable operation, always operate the PowerEase Touch 600W Power Supply in accordance with the manufacturer’s instructions. • Avoid exposing the power supply to liquids as these may damage the unit and void the warranty. •... -
Page 10: Programming Options
Chapter 2 Methods Programming options 5. Plug the power supply into an appropriate electrical outlet (use properly grounded AC outlets and power cords). 6. Connect the leads from the electrophoresis unit to the power supply by inserting the positive lead (+) into the red output jack and the negative lead (-) into the black output jack. -
Page 11: Menu Navigation
Chapter 2 Methods Menu navigation Menu navigation ™ The PowerEase Touch 600W Power Supply uses several screen icons that simplify menu navigation. Icon Description The Home icon returns to the Home screen (Figure 4). The back arrow returns to the previous screen. Left and right arrows indicate that an additional screen is available. -
Page 12: Set Up A Run
Chapter 2 Methods Set up a run Set up a run 1. Switch the power switch located at the rear of the unit to the On position. 2. Touch Set up run. 3. In the Method Type screen touch either Constant voltage, Constant current, or Constant power. -
Page 13: Constant Current
Chapter 2 Methods Custom methods 7. Touch Start run to begin the run. When the run begins, the Run screen will display (see Figure 12). Note: If the run needs to be stopped or paused before completion, touch Stop or Pause. If run parameters need to be edited during the run, pause the run, enter changes, then touch Resume. -
Page 14: Select A Pre-Programed Method
Chapter 2 Methods Select a pre-programed method Figure 6 Custom Methods screen options Select a pre-programed method 1. On the Home screen touch Pre-programed Methods. 2. In the Pre-programed Methods screen, touch either Mini gels, Midi gels, or Western/Southern blotting (see Figure 7). •... - Page 15 Chapter 2 Methods Select a pre-programed method 5. Edit the method by touching Edit, then save the method using a new name (see Figure 9) or begin the run by touching Start run. Note: For a pre-programed method, only the run time can be edited until it is saved as a custom method.
-
Page 16: Manage Methods
Chapter 2 Methods Manage methods ™ Figure 8 Pre-programed method for NuPAGE Bis-Tris Mini Gels Manage methods New custom methods can be saved and pre-programed methods can be edited and then saved under a new (custom) name. Methods can be single step or have up to 20 steps per method. Up to 100 custom methods can be saved (Figure 10). -
Page 17: Edit A Method
Chapter 2 Methods Manage methods (New method) (Pre-programmed method) (Pre-programed method) Figure 9 Screens for saving methods Edit a method 1. To change any of the run parameters in a method, touch the data field for the parameter you wish to change. -
Page 18: Delete A Method
Chapter 2 Methods Manage methods Delete a method 1. On the Home screen, touch Custom methods, then touch Saved methods (Figure 4). This will bring up the Saved Methods screen. 2. Touch Manage to bring up the Manage Saved Methods screen. The methods are listed in alphabetical order. -
Page 19: Add A Step
Chapter 2 Methods Manage methods Add a step 1. Touch Actions, then Add step (see Figure 9). This will bring up the Constant Voltage, Constant Current, or Constant Power screen, depending on the method type selected for the method (see Figure 5). 2. -
Page 20: Instrument Display During A Run
Chapter 2 Methods Instrument display during a run Instrument display during a run After touching Start run, the run is initiated, and the Run screen is displayed for the selected method. As an example, a Run screen and a Method Settings screen for a constant voltage custom method is shown in the following figure: Figure 12 Run screen and Methods Settings screen Method name... -
Page 21: Method Settings Screen Features
Chapter 2 Methods Instrument display during a run Real time output parameters Electrical output parameters (mA, V, and W) will be displayed in real time in a bar at the bottom of the screen. The method parameter being held constant will be in highlighted font. Crossover indicator When electrical output is limited by a non-constant method parameter or by a power supply output maximum, the automatic crossover feature is activated. -
Page 22: Instrument Display After Run Completion
Chapter 2 Methods Instrument display after run completion Instrument display after run completion When the run is complete, a Run Complete screen with be displayed with options to Repeat the method or return to the Home screen. If an unsaved custom method was run, a Save run option will be displayed in the center dial (see Figure 13). -
Page 23: Settings
Chapter 2 Methods Settings Settings ™ The PowerEase Touch 600W Power Supply is equipped with a number of user adjustable settings (see Figure 14). The Settings menu is accessed from the Home screen by touching the Settings icon (see "Menu navigation" on page 11). To view Settings options not available on the first screen, gently swipe up with your finger as you would with a smart phone. -
Page 24: Settings Screen Features
Chapter 2 Methods Settings Settings screen features About Displays the power supply serial number and software version Last run report Displays run parameters of the last run (time, volts, mA, watts, step). Run parameters are recorded at the beginning of the run and every two minutes thereafter. This report can be exported to a USB device by touching Export. - Page 25 Chapter 2 Methods Settings Sleep mode off Sleep mode on Figure 15 Sleep mode settings Software update To update the power supply user interface software perform the following steps: 1. Insert a USB drive that contains the appropriate software update files into the USB port on the back of the power supply.
-
Page 26: Appendix A Troubleshooting
Troubleshooting Observation Possible cause Recommended action The LCD screen remains blank AC power cord is not Check AC power cord connections at both and the fan does not run when connected. ends. the power is turned on The fuse has blown. Replace the fuse (see Appendix B). - Page 27 Appendix A Troubleshooting Settings Observation Possible cause Recommended action Operation stops with alarm: Run was stopped before run Verify cable connections and running buffer Display shows “Incomplete Run” completion. level. Press Resume to continue the run or Restart to restart the run. Operation stops with alarm: Electrophoresis systems were Do not add or remove an electrophoresis...
-
Page 28: Appendix B Repair And Maintenance
Repair and maintenance ™ The PowerEase Touch 600W Power Supply requires no periodic maintenance other than an occasional dry wipe-down of the instrument. Encountering Problems Check the troubleshooting section, see Appendix A, “Troubleshooting”. Contact Technical Support, see Appendix F, “Documentation and support” If the unit must be shipped back for repair, contact support for a Return Authorization Number and shipping instructions;... - Page 29 Appendix B Repair and maintenance Replace the fuse 5. Snap the cover closed and re-attach the power cord. ™ Figure 16 Rearview of PowerEase Touch 600W Power Supply PowerEase ™ Touch 600W Power Supply User Guide...
-
Page 30: Appendix C Electrical Parameters For Electrophoresis
Electrical parameters for electrophoresis Ohm’s Law and Joule’s Law Electrophoresis is the migration of a charged particle under the influence of an electrical field. The power supply output parameters voltage, current, and power are related by the following two equations: •... -
Page 31: Appendix D General Safety
General safety WARNING! Protection impairment if used in a manner not specified by the manufacturer. Instrument safety Avoid electrical shock ™ The PowerEase Touch 600W Power Supply produces up to 3 A or 500 V outputs which are electrically isolated from ground to reduce the risk of electrical shock to the user. Follow the guidelines below to ensure safe operation of the unit. -
Page 32: Explanation Of Symbols And Warnings
Appendix D General safety Explanation of symbols and warnings Explanation of symbols and warnings Symbols and warnings Symbol English Français Caution, risk of electrical shock Attention, risque de choc électrique Caution, risk of danger Attention,risque de danger Consult the manual for further Consulter le manuel pour d’autres safety information. -
Page 33: Product Regulatory Compliance
Appendix D General safety Product regulatory compliance (continued) Symbol English Français Indicates that the product complies with TUV SUD safety requirements. The “C” and “US” indicate that the product is certified for both Canadian and U.S. markets, to the applicable Canadian and U.S. standards. -
Page 34: Appendix E Product Specifications
Product specifications Product specifications Feature Specifications Input Power 115 VAC, 50/60 Hz 230 VAC, 50/60 Hz Fuses One T10AH 250VAC, one extra fuse is provided Output power in 600 W watts Output voltage range 2 VDC – 500 VDC Output current range 0.01 A –... - Page 35 Appendix E Product specifications Product specifications (continued) Feature Specifications Stackable Housing material Polycarbonate Housing size 230 x 303 x 102 mm (W x D x H) Operating 0°C–40°C temperature Environmental ≤95% RH (non-condensing), 75 KPa–106 KPa, altitude not to exceed 2,000 meters conditions Weight 2.8 kg...
-
Page 36: Appendix F Documentation And Support
Documentation and support Customer and technical support Visit thermofisher.com/support for the latest service and support information. • Worldwide contact telephone numbers • Product support information – Product FAQs – Software, patches, and updates – Training for many applications and instruments •... - Page 38 PowerEase Touch 600W Power Supply_UG_MAN0025330-v2-GUID-F6684776-495C-4204- A06E-1B4D721CE663-2021/05/18 17:35:23 en 16:19:29.664+01:00 thermofisher.com/support | thermofisher.com/askaquestion thermofisher.com 20 May 2021...
Need help?
Do you have a question about the invitrogen PowerEase Touch and is the answer not in the manual?
Questions and answers