
Related Manuals for Naxa NPB-240


Summary of Contents for Naxa NPB-240
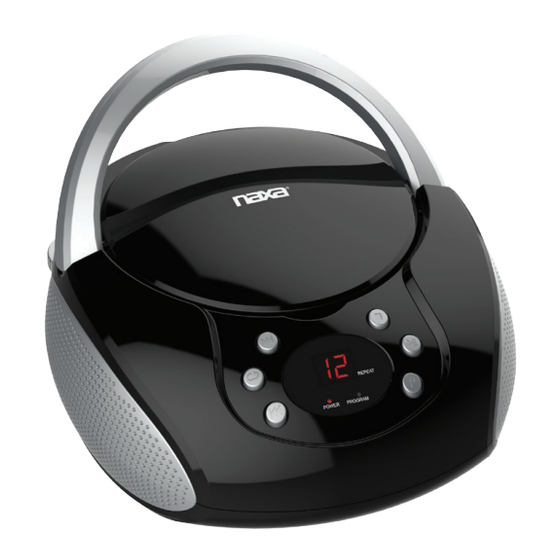
- Page 1 Portable CD Player with AM/FM Stereo Radio NPB-240 Instruction Manual Please read carefully before use and keep for future reference.
-
Page 2: Table Of Contents
Adjusting the Volume ..............8 Using the Radio ............. 8 Using the CD Player ............9 About Compact Discs ..............9 Loading a Disc ................. 9 Playing a Disc ................10 Repeat Playback ................10 Programming a Playlist ............... 11 Page 2 Naxa Electronics... -
Page 3: Thank You
You may also find the latest FAQ, documentation, and other product material at our website. Come visit • NB-240 portable CD player us on the web at www.naxa.com and see all that we • AC power cable have to offer! •... -
Page 4: Before You Start
• Before turning on the power for the first time, make sure that the power cord is properly installed. • Store your tapes or CD in a cool area to avoid dam- age from heat. Page 4 Naxa Electronics... -
Page 5: At A Glance
Press to stop playback. Press to start, pause, or resume playback. Play/Pause Press to enter Program mode in order to create a custom playlist. Program Battery Load 6 UM-2 “C” size batteries into the compartment compartment for portable power. www.naxa.com Page 5... - Page 6 AC power Connection for the included AC power socket cable. AUX Input Play audio from a device that is connect- jack ed to this 3.5mm input jack. Volume dial Turn the dial to adjust the volume level. Page 6 Naxa Electronics...
-
Page 7: Connect Power
Do not attempt to operate the radio on any other power source. You could cause dam- Batteries contain chemicals that may be age to the unit and void your warranty. regulated by your local government. Dispose of them properly according to regulations. www.naxa.com Page 7... -
Page 8: Basic Functions
Turn the VOLUME dial [17] clockwise or counter clock- wise to increase or decrease the volume level, respec- 3. Optimize radio reception: tively. • The antenna is built into the player. Adjust the orientation and position of the player itself to optimize radio reception. Page 8 Naxa Electronics... -
Page 9: Using The Cd Player
• The LED screen [11] will show the amount of playable tracks on the disc. To ensure good system performance, wait until the player recognizes and reads the disc before proceeding. www.naxa.com Page 9... -
Page 10: Playing A Disc
[5] to skip back to the previous track. The LED screen [11] will change tracks accord- • To repeat a single track, press [11] until the Re- ingly. peat indicator [12] flashes. The current track will replay repeatedly until play is stopped. Page 10 Naxa Electronics... -
Page 11: Programming A Playlist
[8] to save the track into the playlist. The LED screen [11] will then flash the next playlist track number (e.g., “02”). 5. Repeat steps 3 and 4 until your playlist is complete. You can save up to 20 tracks. www.naxa.com Page 11... -
Page 12: Using The Aux Input
4. Adjust the final volume. Turn the VOLUME dial [19] of the player to set the volume to a comfortable level. Use the audio source to control playback (e.g., stop, play, next). Use the player to control the volume. Page 12 Naxa Electronics... -
Page 13: Warnings And Precautions
Consider the environmental impact of your actions! • Invisible laser radiation when open and interlock has failed or been defeated. Avoid direct exposure to beam. • To prevent fire or shock hazard, do not expose this appliance to rain or moisture. www.naxa.com Page 13... - Page 14 Article 810 of the NationalElectrical Code, ANS/NFPA70 provides in- from overheating. These openings should never be blocked by placing formation withregard to proper grounding ofthe mast and support- Page 14 Naxa Electronics...
- Page 15 22. Safety Check: Upon completion of any service or repairs to this keep from touching suchpower lines or circuits, as contact with them product,ask the service technician to perform safety checks to ensure might be fatal. that the productis in proper operating condition. www.naxa.com Page 15...
- Page 16 • Connect the equipment into an outlet on a circuit different from that MAY RESULT IN HAZARDOUS RADIATION EXPOSURE. to which the receiver is connected. • Consult the dealer or an experienced radio/TV technician for help. Page 16 Naxa Electronics...
-
Page 17: Specifications
AC 120 V ~60 Hz the instructions in this manual. Please also visit us DC 9 V (6 x UM-2 “C” batteries) on the web at www.naxa.com to get up to the minute Dimensions 8.0 x 9.0 x 5.0 in (LWH) news, alerts, and documentation for your device. - Page 18 Reproductor de Disco Compacto (CD) con Radio AM/FM Estereo Portatil NPB-240 Manual de Operación Favor de leer el manual completamente antes de operar este producto. Conservar el manual para futuras referencias...
- Page 19 Operación del Disco Compacto ........9 Acerca de los discos compactos ..........9 Colocando un disco compacto ............. 9 Reproducción de un disco compacto ........10 Repetir reproducción ..............10 Programación de la reproducción ..........11 Pagina 2 Naxa Electronics...
-
Page 20: Agradecimiento
Sabemos que usted tiene muchas opciones cuando se trata de tecnología; gracias por elegir los productos de Naxa Electronics. Fundada en 2001 en Los Ángeles, Favor de tomar unos momentos para asegurarse de que California, estamos dedicados a ofrecer productos que se tiene todo lo que se enlista abajo. -
Page 21: Antes De Iniciar
• Al reemplazar las baterías, reemplazar todas las • Antes de encender el producto por primera vez, baterías al mismo tiempo. asegurarse que el cordón de alimentación está in- stalado adecuadamente. Pagina 4 Naxa Electronics... -
Page 22: Descripción De Partes
Presionar para entrar al modo de programación Botón de y crear una lista de reproducción deseada. programa Compar- Colocar 6 baterías de 1.5 Vcc tamaño “C” o timiento de “UM-2” en el interior del compartimiento. las baterías www.naxa.com Pagina 5... - Page 23 Conectar el cordón de alimentación de Vca removible Conector de en- Conector estéreo de 3.5 mm para repro- trada auxiliar ducir dispositivos de audio externos Control de Girar el control para ajustar el volumen al volumen nivel deseado Pagina 6 Naxa Electronics...
-
Page 24: Fuentes De Alimentación
Contactar a la compañía de luz local si tiene duda sobre substancias químicas, estas deben ser el voltaje de su localidad. ⚠ desechadas de forma adecuada para evitar daños al medioambiente. No operar este producto con otra fuente de alimentación a las especificadas, en caso www.naxa.com Pagina 7... -
Page 25: Funciones Básicas
Girar el control de volumen (17) a la izquierda o derecha • La antena está incorporada en el reproductor. para ajustar el volumen al nivel deseado. Ajuste la orientación y la posición del repro- ductor de sí mismo para optimizar la recepción de radio. Pagina 8 Naxa Electronics... -
Page 26: Operación Del Disco Compacto
1. Abrir el compartimiento del disco (10). Presionar hacia abajo en la esquina inferior derecha de la tapa para liberar el seguro y abrir el compartimiento. 2. Colocar un disco. Colocar un disco con el lado de la etiqueta hacia arriba. www.naxa.com Pagina 9... -
Page 27: Reproducción De Un Disco Compacto
Para seleccionar la pista a reproducir. • Para repetir todas las pistas. Presionar [4] dos • Presionar [5] o [3] para saltar a la pista veces para repetir continuamente todas las pistas anterior o siguiente respectivamente. La Pagina 10 Naxa Electronics... -
Page 28: Programación De La Reproducción
Para esto, pliega “01” (número de la memoria programada) y Presionar [8] mientras la reproducción después destella “02” (número de la siguiente me- está detenida, entonces presionar [7] moria a programar). www.naxa.com Pagina 11... -
Page 29: Operación De La Entrada Auxiliar
9. Iniciar la reproducción del dispositivo de audio ex- terno. Ajustar el nivel de volumen del dispositivo de audio externo al 80 % de su máximo nivel. 10. Ajustar el volumen al nivel deseado a través del control de volumen (19). Pagina 12 Naxa Electronics... - Page 30 Usar los controles de reproducción de la fuente de audio externa (por ejemplo, Detener, Reproducir, Anterior, etc.) para controlar la reproducción. Ajustar el volu- men al nivel deseado a través del control de volumen (19) de la unidad. www.naxa.com Pagina 13...
-
Page 31: Advertencias Y Precauciones
• Al desechar las baterías seguir la reglas de desechos sólidos de su localidad para evitar daños al medio ambiente. • Radiación láser invisible peligrosa al abrir y liberar los seguros. Evitar Pagina 14 Naxa Electronics... - Page 32 Poner atención particular en el cordón, la clavija, el tomacor- fabricante o vendido con el producto. La combinación del producto riente y en los puntos en donde estos salen del producto. www.naxa.com Pagina 15...
- Page 33 Si el producto no op- era adecuadamente siguiendo las instrucciones de operación. Ajustar solo los controles que son indicados en este manual de operación. El ajuste de otros controles puede ocasionar daños y a menudo se re- Pagina 16 Naxa Electronics...
- Page 34 Estos límites están diseñados para permitir una protección razonable consultar a un electricista o personal calificado para reemplazar el contra interferencia dañina en una instalación residencial. Este equipo tomacorriente obsoleto. No usar la clavija con un cordón de extensión www.naxa.com Pagina 17...
- Page 35 LOS SÍMBOLOS GRÁFICOS CON INFORMACION SUPLEMENTARIA SE EN- CUENTRAN EN LA PARTE INFERIOR DE LA UNIDAD. EL USO DE CONTROLES, AJUSTES O PROCEDIMIENTOS DIFERENTES A LOS EXPLICADOS EN ESTE MANUAL PUEDEN OCASIONAR EXPOSICIÓN A RA- DIACIÓN LÁSER PELIGROSA. Pagina 18 Naxa Electronics...
-
Page 36: Especificaciones
1.09 kg aproximadamente mentación que puede encontrar en nuestra pagina web Dimensiones: 203 mm x 230 mm x 127 mm www.naxa.com. Si necesita asistencia futura, favor de aproximadamente contactar al centro de servicio autorizado. Temperatura de operación: 5 ºC a 35 ºC...
Need help?
Do you have a question about the NPB-240 and is the answer not in the manual?
Questions and answers