Table of Contents
Advertisement
Quick Links
User Manual
• Thank you for purchasing COMMAX products.
• Thank you for purchasing COMMAX products.
• Please carefully read this User's Guide (in particular, precautions for safety) before using a product and follow
• Please carefully read this User's Guide (in particular, precautions for safety) before using a product and follow
instructions to use a product exactly.
instructions to use a product exactly.
• The company is not responsible for any safety accidents caused by abnormal operation of the product.
• The company is not responsible for any safety accidents caused by abnormal operation of the product.
CIOT-L2TM
Advertisement
Table of Contents

Subscribe to Our Youtube Channel
Related Manuals for Commax CIOT-L2TM


Summary of Contents for Commax CIOT-L2TM
- Page 1 User Manual CIOT-L2TM • Thank you for purchasing COMMAX products. • Thank you for purchasing COMMAX products. • Please carefully read this User’s Guide (in particular, precautions for safety) before using a product and follow • Please carefully read this User’s Guide (in particular, precautions for safety) before using a product and follow instructions to use a product exactly.
-
Page 2: Table Of Contents
Table of Contents Safety Warning & Caution ················································································2 1. CONFIGURATION ·························································································4 2. Screen Setting ·····························································································5 1.1. Initial Screen ························································································5 2.1. Status Icon ··························································································5 3. Guard Call ··································································································6 4. Household Call ····························································································7 4.1. Call Among Household ············································································7 5. Entry Authorization ························································································9 5.1. -
Page 3: Safety Warning & Caution
Safety Warning & Caution Please follow the things described below in order to prevent any danger or property damage. Prohibition. Warning It may cause a serious damage or No disassembly injury if violated. No touch Must follow strictly. Caution Shows plugging out the power cord It may cause a minor damage or without an exception injury if violated. - Page 4 Warning If an abnormal sound, burning Please don’t disassemble, Please don’t insert any Please use only the designated smell or smoke is coming out repair or rebuild this product metallic or burnable materials batteries for the products of of the product, please plug out arbitrarily (please contact the into the ventilation hole.
-
Page 5: Configuration
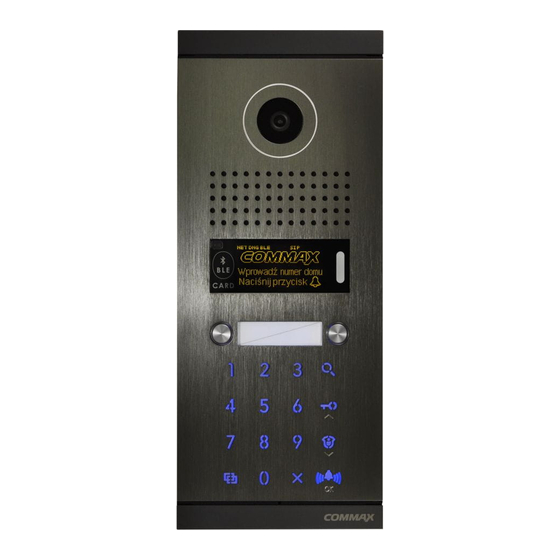
1. CONFIGURATION NAME NAME CAMERA ELECTRONIC KEY BUTTON SPEAKER GUARD CALL PROXIMITY SENSOR CALL BUTTON RF CARD READER NUMERIC KEY BUTTON LAN PORT PROGRAM BUTTON DC 14V DOOR OPEN HOUSEHOLE CALL BUTTON NAME SEARCH BUTTON ※ Proximity sensor - OLED screen turns on automatically when a person approaches within a certain distance (1m). ※... -
Page 6: Screen Setting
2. Screen Setting 1.1. Initial Screen 2.1. Status Icon Icon Description Icon Description LAN Connectivity Connected to Server OUT-Door Unconnected to Server Lobby Phone Local Server Building Lobby Phone Connectivity RF-Card Data Storage status BLE Connectivity Stats... -
Page 7: Guard Call
3. Guard Call ① Press (Guard Station) Button ② Press (Call) Button. ③ Call Guard Station with Ring Sound. ④ When Guard Answers the Call, Talk to Guard (Talk Time: 1Minute) ⑤ Press “X” Button If you Want to Hang up. ⑥... -
Page 8: Household Call
4. Household Call 4.1. Call Among Household I. In Case Each Building No. is Registered : Building No. Registered In Call Prefix PIC.2. Household No. Registration Screen ① Enter Household No. In Keyboard. Example) Household No. 101 Entry 101 ② Press (Call) Button ③... - Page 9 II. In Case Building No. not Registered : Building No. not Registered In Call Prefix PIC.3. Building, Household No. Entry Screen ① Enter Building No. In Keyboard Example) Building No. 101 Enter “101” ② Enter Household No. In Keyboard. Example) Household No.
-
Page 10: Entry Authorization
5. Entry Authorization 5.1. Entry with RF-Card ① Put RF-Card on card Reader. ② If Authorized, Door Open with “Door Open” Sound. ③ If Unauthorized, It Sounds a Dull Warning Sound. PIC.4. Putting RF-card 5.2. Entry with Password In Case Each Building No. Registered : Building No. - Page 11 II. In Case Building No. not Registered : Building No. not Registered In Call Prefix ① Enter Building No. In Keyboard Example) Building No. 101 Enter “101” ② Press (Call) Button. ③ Enter Household No. In Keyboard. Example) Household No. 101 Enter “101” ⑦...
-
Page 12: Entry With Password In Case Of Off-Line
5.3. Entry with Password In Case of off-Line Condition (Not Connected to Local Server) ① Press (Key) Button. ② Enter the Password. ③ Press (Call) Button. ※ Under on-Line Condition (Connected to Local Server), This Function does not work. ※ Under on-Line Condition, User must Delete Password for off-Line Entry. -
Page 13: Registration Of Smart E-Key & Door Open
6. Registration of Smart E-Key & Door Open 6.1. Registration of Smart E-Key ① Memorize„Gate name‟ Indicated In the Screen top of LobbyPhone. (EX: Gatename 0106-47) ② Input Gate name In „Building/Lobby number‟ ③ Input the number of Household (EX: 101) ④... -
Page 14: Open The Door At The Lobby
6.2. Open the Door at the Lobby. ① Press the Button „Door Open‟ In GREEN Color. ② the Door is Open after two Seconds. ※ Precautions - In Case of Change or Deletion of Lobby Password, Please Register E-Key once again. -
Page 15: Name Search
7. Name Search ① Press the Button (Name Search). ② Input the name on the Keypad. ③ Select the name you are Looking for by using up (Key) & down (Guard) Buttons. ④ Press the Button (Call) to Call the Household. 8. -
Page 16: Menu Of The Settings
Menu of the Settings 0: set Network+ 0: IP Address: (Input IP Address) 1: G/W Address (Input Gateway Address) 2: DNS Address (Input DNS Address) 3: NET Mask (Input Network Mask) 1: set VoIP+ 0: SIP Server (Input SIP Server Address) 1: Guard ID (Input Guard ID) 2: Management+ 0: Server Address (Input Local Server Address) - Page 17 3: Audio/Video+ 0: Audio+ 0: General SPE. VOL. (Speaker Volume Control When Calling Household) 1: General MIC VOL. (Microphone Volume Control When Calling Household) 2: Guard SPE. VOL. (Speaker volume Control When Calling Guard) 3: Guard MIC VOL. (MICRO Phone Volume Control When Calling Guard) 4: General number Speech (Setting Voice Button of Building/Household numbers) 5: Key Sound (Setting Key Sound)
- Page 18 * Fix the Skin theme by FLIP Clock type. 2: RED Clock * Fix the Skin theme by RED Clock type. 3: GREEN Clock * Fix the Skin theme by GREEN Clock type. 4: BLACK Clock * Fix the Skin theme by BLACK Clock type. 2: set Time+ 0: Door Open Time * 2, 5, 10, 15, 20, 25 SEC.
- Page 19 2:[ ] 400MS 3:[ ] 500MS 4:[ ] 600MS 4: BLE Intensity 0:[ ] 1 step 1:[ ] 2 step 2:[ ] 3 step 3:[ ] 4 step 4:[*] 5 step 5:[ ] 6 step 6:[ ] 7 step 7:[ ] 8 step 5: Change PWD * Please use the Button to Change the Password.
- Page 20 7: Test+ 0: Test Door Open 1: Test RF Card * Check the number of RF-Card * touch RF-Card to the RF-Card Reader 2: Test Elevator (TEST Calling Elevator) 3: ADC Sensor Test 4: Temp Sensor Test * Check the Sensor In “DEFROSTER : on” MODE 5: Call Button Test 0 : Panel Index : 1...
-
Page 21: Web Settings
9. Web settings It is Available to Access to the WEB System Inputting IP Address In Internet Browser. (EX : http://10.254.1.17/login.php) ① Input the Password for the panel (Initial Password : 0000) ② Push the Button “login” ※ Computer and Lobby Phone should be Connected In the same Network. -
Page 22: System Info
System Info 9.1. 9.1.1. Version Info - Check the version of system Easy Setup 9.1.2. - Call Prefix : Input the number of the Building * If you Do not Register the Building number, Date Input Screen will DisPLAY Automatically. - System ID : Input Serial number of the Lobby Phone - Guard ID : Input Guard ID ※... -
Page 23: Network Info
Network Info 9.2. Network Info 9.2.1. - IP Address : Input IP Address - Subnet Mask : Input Subnet Mask - Gateway : Input Gateway Address - DNS : Input DNS Address * after Setting all Information, Please Reboot the system. Server Info 9.2.2. -
Page 24: System Setting
System Reboot 9.2.3. - push the Button “Reboot” for all Settings to be applied. System Setting 9.3. Password 9.3.1. - Current Password - New Password - Re Password : Confirm new Password... - Page 25 VoIP 9.3.2. - Guard ID : Input Guard ID Audio 9.3.3. - General SPC Volume : Speaker Volume Control When Calling Household - General MIC Volume : Microphone Volume Control When Calling Household - Guard SPC Volume : Speaker Volume Control When Calling Guard - Guard MIP Volume : Microphone Volume Control When Calling Guard - Key Sound : Setting Key Sound - Ring Sound : Setting Ring Sound...
- Page 26 Video 9.3.4. - Video Quality : Adjust Video Quality * Available to Adjust the Quality by 1M/2M/3M ※ Date size Increases In Higher Quality Management 9.3.5. - Call Prefix : Setting Household number - System ID : Input the Serial number of the Product - Call Min Line : Input Minimum Call Line - Call Max Line : Input Maximum Call Line - BLE Intensity : Setting BLE Intensity...
- Page 27 - Sleep Mode Time : Setting Time of OLCD Sleep Mode * 30 SEC., 1, 2, 3, 4, 5 Min. Selection - Key Time Out * 10, 20, 30 SEC. Selection - Use 24-hour format : Select the type of Time (24Houres) - Off-Line Password : Enter the Password to Open the Door When offline * Initial off-Line Password is 123456...
- Page 28 Call Button 9.3.7. - Guard Setting : Available to set only one Button In the panel. - Unused : not use the Button...
-
Page 29: Initialize The Password
Factory Reset 9.3.8. - System is Reset to the Factory Settings * Changed IP is not Initialization . Initialize the Password 9.4. - Input “Lobby IP/key_event.php” Into the WEB BROWSER. (EX : http://10.254.1.17/key_event.php) ※ Please Change the Initial Password(0000) for SAFETY. ※... -
Page 30: Wiring Diagram
10.Wiring Diagram 11. Specifications Model name Specification Transmission TCP/IP Voltage DC14V/1.8A Power Consumption Max : 1.4A Standby :0.35A Telecommunication VoIP Display ” Video Format H.264 / MPEG4 Camera Pixel Call tone Electric chime : 3 Melody 2 times Temperature Using : - 40° ~ 50 °... - Page 31 513-11, Sangdaewon-dong, Jungwon-gu, Seongnam-si, Gyeonggi-do, Korea Int’l Business Dept. Tel. : +82-31-7393-540~550 Fax. : +82-31-745-2133 Web site : www.commax.com PM10703LCR10 Printed In Korea / 2016.03.104...
Need help?
Do you have a question about the CIOT-L2TM and is the answer not in the manual?
Questions and answers