Table of Contents
Advertisement
Quick Links
User Manual
• Thank you for purchasing COMMAX products.
• Thank you for purchasing COMMAX products.
• Please carefully read this User's Guide (in particular, precautions for safety) before using a product and follow
• Please carefully read this User's Guide (in particular, precautions for safety) before using a product and follow
instructions to use a product exactly.
instructions to use a product exactly.
• The company is not responsible for any safety accidents caused by abnormal operation of the product.
• The company is not responsible for any safety accidents caused by abnormal operation of the product.
CIOT-700M2
Advertisement
Table of Contents

Related Manuals for Commax CIOT-700M2


Summary of Contents for Commax CIOT-700M2
- Page 1 User Manual CIOT-700M2 • Thank you for purchasing COMMAX products. • Thank you for purchasing COMMAX products. • Please carefully read this User’s Guide (in particular, precautions for safety) before using a product and follow • Please carefully read this User’s Guide (in particular, precautions for safety) before using a product and follow instructions to use a product exactly.
- Page 2 41. RF-ID Model (Optional) ······································································· 66 Geetings * Thank you for purchasing a COMMAX product * This product is a high-end Main Entrance Interphone that supports Electronic Number Key (Password) and RF Card Keys features. Please read this manual thoroughly...
-
Page 3: Safety Warning & Caution
Safety Warning & Caution Please follow the things described below in order to prevent any danger or property damage. Prohibition. Warning It may cause a serious damage or No disassembly injury if violated. No touch Must follow strictly. Shows plugging out the power cord Caution It may cause a minor damage or without an exception... - Page 4 Warning If an abnormal sound, burning Please don’t disassemble, Please don’t insert any Please use only the designated smell or smoke is coming out repair or rebuild this product metallic or burnable materials batteries for the products of of the product, please plug out arbitrarily (please contact the into the ventilation hole.
-
Page 5: Main Function
Start 1 Main function Function Description Display of widget type such as today's weather, indoor COMMAX temperature and humidity, smart plug electricity amount, Widget absence information Login and User subscription and login to use UC and Cloud Membership To view and set the integrated value information provided by... - Page 6 Mobile call Calls to mobile phones login ID same as wallpad Video streaming Format reset function to send CCTV / Door image to external server (UC) Cloud server Wall pad control by smartphone through cloud server Fuction to notify emergency from your house Notification to mobile phone Interlocked mobile phone...
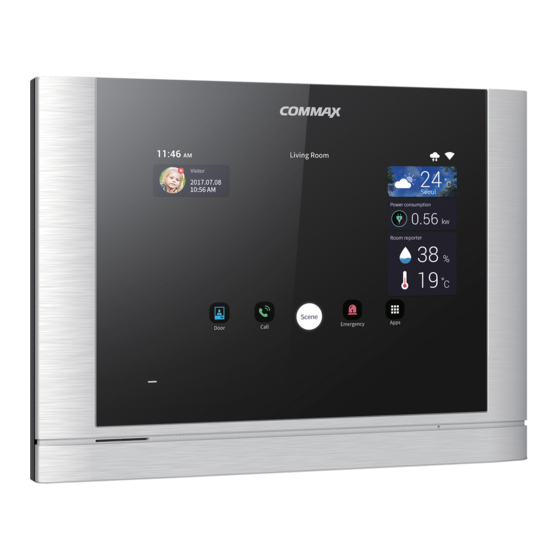
- Page 7 CIOT-700M2 CONTENTS CONTENTS Not Use Touch screen RS-485 SPEAKER POWER LED Wired sensor POWER S/W Micro SD Slot SENSOR B/D PIN DESCRIPTION...
-
Page 8: Basic Screen Configuration
SENSOR_MAI SENSOR ADAPTOR RS-485_MAIN RS-485 VCC_5V FIRE_IN TRX+ BURG_1 EM_IN VCC_5V BURG_2 GAS_IN UART_TX TRX- BURG_3 UART_RX BURG_4 BURG3_IN 485_IO BURG_5 BURG2_IN BURG1_IN FIRE Basic Screen Configuration The moving of screen for using scrolling The screen change The navigation bar of home screen bottom Go to home screen Go back Volume control... - Page 9 Go to Setting Home screen bottom setting bar Wifi setting Go to system wireless Wifi setting IPsetting Go to wired network IP setting Internet Check the status of external Internet connection status Door Go to IP Door Camera registration registration User Go to user registration...
-
Page 10: Home Screen
2 Home Screen Home Area View the door View the door camera camera dial Dial key for call Door, network, membership status display Device Icons is displayed during abnormal operation status all Apps All App list Scene contorl Scene and Reservation control Emergency User Emergency button... - Page 11 2.1. Editing a space list ‘Press an empty space on background screen for one second. 2) Press a Space background. Press the "X" button to delete the space. Press "+" button to add space Press the Cancel button to cancel editing Press the 'complete ' button to save the space list.
-
Page 12: Registering A Device
Adding Space Enter the name of the space. Press "Enter" on the keyboard. Select a space image 'OK' button to add space. ‘Press ‘Previous' button will move to previous screen * You can link smart phone and space image through the QR code. 2.2. - Page 13 2) Press register IoT Device Connect the device according to the device pairing method The device can be paired for up to 60 seconds. Press Cancel 'button to cancel the device pairing method. When a device is registered, the device is automatically placed on the screen...
- Page 14 Method 2. 1) Drag or click IoT Device ICON leftside on screen 2) Click IoT Pairing ICON on upside and drag center on screen.
- Page 15 3) Connect the device by using device pairing method. 2.3. Placing device (move / delete) Method1. Press an empty space on background screen for one second...
- Page 16 2) Press ‘Device icon placement’. You can move to the desired location by pressing the device you want to move. Drag the device, move it to the desired location, and release the device To delete a device, press the corresponding icon longer to move to the desired location To delete a device, press the icon longer and move it to the upper trash...
- Page 17 Method 2. 1) Drag or click IoT Device ICON leftside on screen 2) You can move to the desired location by pressing the device you want to move.
-
Page 18: Controlling Devices
2.4. Controlling devices Move to the space to control. You can turn the device on / off by pressing the device you want to control [The device control sreen] 2.5. Widget Area Provide a summary of our home environment and external environment information at present 2) Press empty space on background screen for one second. - Page 19 3) Press widget . Select and drag the widget you want to display on the background To delete a widget, press the widge tlonger and move it to the upper trash.
- Page 20 House Reporter We provide value information on the screen that allows us to understand our home environment and external conditions [The house reporter screen] 3.1. Edit house reporter 1) ) Press edit "button Press the "(On / Off)" button and you can select the value information item to be displayed..
- Page 21 3.2. Setting the weather area ‘Press the "Today's weather information" button. Enter the name of the area to search. Press the "Search" button Select one of areas from search list eather information will be provided to our house reporter when the internet is connected.
- Page 22 Home IoT Device More details. 1) Press the 'View Details' button on the home IoT device configured in Home reporter. 2) You can go to the control application and configure it.
- Page 23 4 Control ※ The name of the device and the button configuration that are linked with the pad and the field may be different. ※ For the improvement of function, it may be changed without prior notice. 4.1. Control lighting Go to the "Light"...
- Page 24 You can turn on the lights or off by pressing the power button. 4.2. Control entire lighting Go to the "Light" tab in the control main screen. You can turn on the entire lights or off by pressing the power button.
- Page 25 4.3. Control smart curtain Go to the "Indoor" tab in the control main screen. 2) The current status of the curtain is displayed. 3) You can control the curtain by pressing the 'Open' and 'Close' buttons. 4.4. Control smart plug Go to the "Energy"...
- Page 26 2)You can check the power usage of the plug. 3) Press the lug' icon to turn the smart plug on or off. 4.5. Control smart boiler Go to the "Indoor" tab in the control main screen. You can turn the smart boiler on or off by pressing the 'Power' button.
- Page 27 4.6. Control gas lock Go to the "Safety" tab in the control main screen. The current status of the gas lock is displayed. 3) If the gas lock is open, you can lock the gas valve by pressing the 'Lock' button. ※...
- Page 28 4.8. Monitoring Leak sensor Go to the "Indoor" tab in the control main screen. If a leak is detected, it displays the information values collected by the leak sensor. 4.9. Monitoring PIR Multi sensor Go to the "Indoor" tab in the control main screen.
- Page 29 4.10. Monitoring Air quality sensor Go to the "Indoor" tab in the control main screen. Displays the collected information value of the Air quality sensor.. 4.11. ZigBee Repeater Go to the "Etc" tab in the control main screen. 2) Displays the strength of the ZigBee repeater.
- Page 30 4.12. Smart consent Go to the "Energy" tab in the control main screen. 2) The upper level shows the power value of the power outlet at all times, and the lower level shows the power value of the power outlet. 3) The power outlet can be turned on or off with the 'Power' button.
- Page 31 4.14. Control Standby power cut-off switch Go to the "Energy" tab in the control main screen. 2) The current status of the standby power cut off switch is displayed. 3) You can turn the standby power off switch on / off via the power button.
- Page 32 4.16. Adding devices Control standby power Press the + button to enter the Add Device mode. Pairing mode is for 1 minute [Standby power Screen] [Standby power Screen] This function is available only when a wireless device is installed as an option. 4.17.
-
Page 33: Remove Device
Select the device and change the nickname. Press button and finish changing the nickname of the devices. [Device edit Screen] Remove device Select the device you want to delete. Press the “OK” button to complete the deletion of the devices. -
Page 34: Screen Layout
5 Application 5.1. Interphone 5.1.1. Screen Layout Call connection screen [Monitoring Screen] Press button to end the door monitoring. Press button to save video. -
Page 35: Open The Door
Call connection screen [Call connection Screen] call. Start Call / Open Door Save video Adjust call volume 5.2. Door entrance Monitor and call from door camera Click on the door entrance icon in the Quick Menu. You can monitor the door entrance by pressing the 'door entrance' button. -
Page 36: Call House
Get a call on door camera When you receive a call, the bell sound and visitor screen are displayed on screen. Press the (Talk) button to connect the call and press the "Reject" button to hang To stop during a call, press the "Exit" button. -
Page 37: Using Call Log
5.3. Call Log [Display for Call log] Using Call Log When you click icon at the top of screen, you can delete the call log. 5.4. Security CCTV CCTV monitoring and save the image monitoring Occur Occur emergency on urgent situation emergency 5.4.1. - Page 38 5.4.2. Occur emergency 1) You can activated the emergency for clicking the emergency button. Also it can be orpeated by sensors automatically. 2) The siren will be activated and display the emergency icons. [display for emergency situation] 5.4.3. Stop emergency 1) Click the “Stop”...
- Page 39 CCTV 5.4.5. Check the display of CCTV Save the image of CCTV [CCTV menu display] CCTV Display CCTV list CCTV Setting Return to app main screen CCTV 1) Click the "CCTV" icon in the app main screen.
- Page 40 2) The connected CCTV list ( ) is displayed. 3) Press the desired CCTV list and it will be displayed on CCTV video screen ( ). 5.5. Checking visitor Checking visitor Check the saved image of enterence or lobby 5.5.1. isitor Check the saved image of enterence or lobby [Display for saved image]...
- Page 41 Delete Delete the saved image With icons, you can check the location of saved movie clip. Enterence Movie clip from enterence Movie clip from lobby Lobby Missed Call Movie clip from missed call Check the saved movie clip You can check the time and date of saved movie clip from the enterence or lobby. Delete the saved movie clip 1) Click the ‘Delete’...
- Page 42 5.6. Etc App Calculator Calculation Set the alarm and time Clock Sign up / Edit / Initialization Sign up Wallpad setting Setting for wallpad OS setting Android setting Brower Internet brower...
- Page 43 5.6.1. Calculator You can use it for calculation. [Display for calculation] 5.6.2. Brower This is the web brower for internet.
- Page 44 5.6.3. Sign up Sign up / Edit / Initialization 1) Enter ‘ID’ and clikc ‘Duplication check’. 2) Select the living country. 3) Enter ‘Passward’, ‘Retype Passward’ and click ‘Registration’. Edit & Initialization 1) If you have already siged up, you can see the current ID on the display. You can change the passward to click ‘P/W change’...
- Page 45 5.7. Wallpad setting Tap the "WallPad Setting" icon on the app home screen. 2) Enter the password (initial password: 1234). [Display for Wallpad setting]...
- Page 46 - If wallpad sets Slave, input IP of Master wallpad and select Slave number (501 ~ 510) ※ If you are a member of COMMAX, you need to initialize the member information before setting it as Slave. ※ After the setting of the month pad type is completed, it is automatically rebooted.
- Page 47 1) You can change the password for disarming emergency and Away mode. Enter the new password. Re-enter the same password. If passwords are same, it has been changed. ※ Initial password is 1234. 2) You can change the building & household number. ※...
-
Page 48: Data Initialization
When you click the “Initialization” button, all the connecting IoT devices will be initialized. After initialization, individual devices can be controlled but all the scenario or scenes will be deleted. 5.7.3. Data initialization You can initialize all the date from wallpad. After initialization, you can not restore the data. - Page 49 5.7.4. Door camera setting You can register IP door camera. 1) ) Clic “Door Camera Setting”, push the button of door camera for 5 seconds, the camera image will be displayed automatically. Clic “Camera Preview”, you can check the image of door camera. 2) )
- Page 50 Clic ‘Registeration’ button, the door camera will be registered to wallpad 3) ) automatically. 4) You can change the name of door camera to click “Edit” button. 5.7.5. CCTV Registration You can register IP type CCTV camera. Clic “CCTV camera register’ button, you can see the list of CCTV camera on 1) ) the display..
- Page 51 Clic “Preview” button and enter the ID & Passward, you can check the 2) ) image of CCTV camera. Clikc “Register” button, that CCTV camera will be registered.
-
Page 52: Call Setting
4) Click “Edit” button, you can change the name of CCTV camera. 5.7.6. Call setting You can adjust the calling functions. The menu is as below. 1) Continuous call time : You can select the call time between 30 sec ~ 3 min. 2) Video recording time : You can select the recording time between 10 sec ~ 60 sec. - Page 53 5.7.7. Setting for Home Theme You can set the home theme. 5.7.8. Ringtone You can select the ringtone from connected devices.
- Page 54 1) Select the place and select the ringtone. (Preview for ringtone) 2) Click the ‘Confirm’ button, the ringtone has been selected. 5.7.9. Wallpad information You can check the information of systems such as versions of S/W.
- Page 55 5.7.10. Check the version of application 1) Click “Application” button. 2) The version of app will be displayed.
- Page 56 6 Scene / Booking control [Main display of Scene / Scenario menu] Move to Home display Detail of Scene Add Scene Quick move to scenario control 6.1.1. Add Scene 1) In the menu, click the ‘Add scene‘ button. 2) Click ‘Create the scene with selected device’ button, you can see the selection of device window.
-
Page 57: Away Mode
6.1.2. Away mode Activate & Deactivate the away mode Display for away mode status You can set the sensors, saving visitor image, turn-off the light or bypass the call in the away mode.. Activate the away mode Click the away mode icon. After the curtain time, the away mode will be activated. - Page 58 [Setting display for away mode] Disarm for away mode Click away mode icon in home display. Enter the password and click ‘Confirm’ button. If the password is correct, the away mode will be disarmed. 6.1.3. Security Arm / Disarm the security Display the status of security sensor This function will be activated when the sensors are installed in the house.
-
Page 59: Scene Control
The list of sensor will be displayed which has connected with wallpad. Disarm the security 1) Click ‘Security setting’ button. 2) Enter the password and click “Confirm”. 3) If the password is correct, the selected sensors will be disarmed. 6.1.4. Scene control 1) Click the scene among the list. - Page 60 PRODUCT MODLE CIOT-700M2 SPEC LINE UTP (CAT.5e) VOLTAGE INPUT : PoE DC 36V ~ 54V / DC5V POWER STANDBY :4W , MAX :8W TELECOMUNNICATION AUDIO : VoIP, VIDEO : H.264 STANDARD UTP (CAT.5e) 70m LINE & DISTANCE (FROM THE PSE)
- Page 61 PACKAGE CONTENTS.
- Page 62 513-11, Sangdaewon-dong, Jungwon-gu, Seongnam-si, Gyeonggi-do, Korea Int’l Business Dept. Tel. : +82-31-7393-540~550 Fax. : +82-31-745-2133 Web site : www.commax.com PM10703LCR10 Printed In Korea / 2016.03.104...
Need help?
Do you have a question about the CIOT-700M2 and is the answer not in the manual?
Questions and answers