Table of Contents
Advertisement
Quick Links
Advertisement
Table of Contents

Related Manuals for Hytera PD792IS


Summary of Contents for Hytera PD792IS
- Page 1 USER MANUAL PD79XIS DIGITAL PORTABLE RADIO...
- Page 2 Welcome to the world of Hytera and thank you for purchasing this product. This manual includes a description of the functions and step- by-step procedures for use. It also includes a troubleshooting guide. To avoid bodily injury or property loss caused by incorrect operation, please carefully read the Safety Information Booklet before use.
- Page 3 Note: Changes or modifications to this unit not expressly Copyright Information information, please visit our website at: approved by the party responsible for compliance could http://www.hytera.com. void the user's authority to operate the equipment. Hytera is the trademark or registered trademark of Hytera Communications Corporation Limited (the...
- Page 4 l Transmit no more than the rated duty factor of 50% This device complies with Industry Canada license- of the time. To transmit (talk), press the Push-to-Talk exempt RSS standard (s). Operation is subject to the ( PTT) key. To receive calls, release the PTT key. following two conditions: Transmitting 50% of the time, or less, is important l This device may not cause harmful interference.
-
Page 5: Table Of Contents
Contents Documentation Conventions Scan Switching the Operation Mode Intrinsically Safe Radio Information Hunt Selecting a Zone and Channel Roam Product Marking Status Indications Talk Around Explosives Classification LCD Icons Time-out Timer Hazardous Area Classification LED Indications No Misoperations Call Services Call Divert Safety Instructions Group Call... -
Page 6: Documentation Conventions
Item Description Example Certificate Documentation Conventions Marking Number For details about using the Denotes Italic DWS, refer to Dispatch Ex ia IIC T3 Ga – 20°C ≤ Ta ≤ Icon Conventions document titles. Workstation User Guide. +55°C Icon Description Denotes To set the IP address, run Ex ia I Ma –... -
Page 7: Explosives Classification
T3/T4: temperature class. T3 indicates that the Certificate Certificate Marking Marking maximum surface temperature during product use is Number Number 200°C. T4 indicates that the maximum surface Class I Division 1, Groups A,B,C,D Class I, Zone 0, Ex ia IIC T3B Ga – temperature during product use is 135°C. -
Page 8: No Misoperations
AN0375H14 and AN0375H15 antenna, and other year) year) year) Hytera-specified accessories. The safety or reliability of the product may be Gases Zone 0 Zone 1 Zone 2 Do not replace the battery or accessories in a... -
Page 9: Compliance Standards
Packing List Compliance Standards Please unpack carefully and check that you have Issue Standard Date received the following items. If any item is missing or damaged, please contact your dealer. IECEx IEC-60079-0 (Ed. 6.0) 2011 Quantity Quantity Item Item (PCS) (PCS) IEC-60079-11 (Ed. -
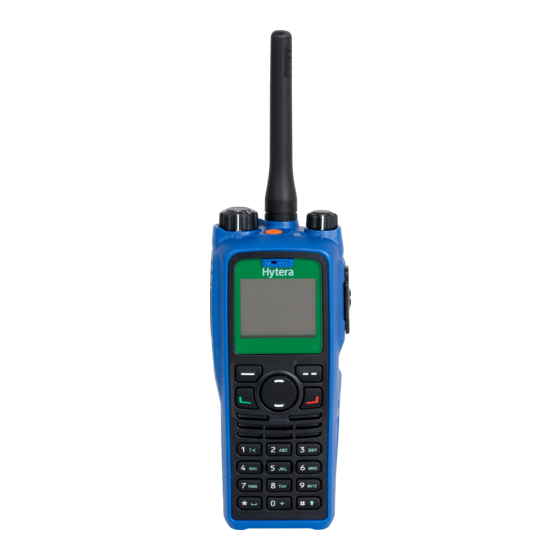
Page 10: Product Overview
Part Name Part Name Top Key (TK) Accessory Connector Product Overview Channel/Group Selector Knob 16 Back/Subgroup Key Product Layout Microphone P2/End Key LCD Display Up Key OK/Menu Key Down Key P1/Answer Key Battery Latch Speaker Belt Clip Numeric Keypad Battery Programmable Keys You can request your dealer to program the following programmable keys as shortcuts to assignable radio features: SK1, SK2, TK, P1 key, P2 key, Up key, and Down key. -
Page 11: Attach The Battery
LED Indicator Description Glows red The battery is charging. 3 . Push the battery until it is fully fitted into the slot, and The battery is charged to 90% or Glows orange then release the battery latch. above. Glows green The battery is fully charged. -
Page 12: Basic Operations
Basic Operations Switching the Operation Mode LED Indicator Alert Tone Battery Power The radio can operate in conventional mode or trunking Under the low battery Turning the Radio On or Off mode. In conventional mode, you can receive and Low battery threshold. -
Page 13: Status Indications
Status Indications Icon Radio Status Icon Radio Status strength in conventional or TM-DW mode. The Monitor feature is enabled. LCD Icons There is no signal in TM-DL mode. The speaker is turned on. The following tables list icons that may appear on the radio's liquid-crystal display (LCD). -
Page 14: Led Indications
Initiating a Group Call Icon Radio Status LED Indicator Radio Status The following table describes how to initiate a group call An all call is in progress or an all call being transmitted or received in conventional mode and trunking mode. contact is on the contact list. -
Page 15: Private Call
Ending a Group Call Mode Manner Operation Mode Manner Operation In conventional mode and trunking mode, a group call group contact. 3. Press 2. Press and hold the automatically ends when the call hang time expires. press and hold the PTT key. - Page 16 Receiving a Private Call Mode Manner Operation Mode Manner Operation 3. Press and hold the select Enable. Conventional Mode 2. From the home PTT key. When you receive a private call, the radio displays screen, enter the 1. Go to Menu > The call is established automatically.
-
Page 17: Phone Call
Phone Call Mode Manner Operation Mode Manner Operation press and hold In conventional mode, you can initiate a call to or receive Contact > the PTT key. a call from a Public Switched Telephone Network Favorites/Private (PSTN) terminal. Contact. After accessing the 2. -
Page 18: All Call
In trunking mode, a phone call ends in any of the Mode Manner Operation Mode Manner Operation following cases: screen, press 1. Rotate the Channel l The calling or called party ends the call. Selector knob to select l The call duration exceeds the period preset by your preprogrammed as Preset the channel associated... -
Page 19: Broadcast Call (Trunking Only)
Ending an All Call Receiving a Broadcast Call Manner Operation In conventional mode and trunking mode, an all call ends In conventional mode, when you receive a broadcast call, 3. Select the required group contact, when the Time-out Timer (TOT) expires. the radio displays . -
Page 20: Message Services
1. Rotate the Channel Selector knob to select the Inbox/Outbox/Drafts > Inbox List /Outbox List /Drafts Deleting a Message required channel. List, and then select the required message. To delete a message from the InBox, OutBox, or Drafts, 2. Press and hold the PTT key, and speak into the do as follows: Sending a Message microphone. -
Page 21: Feature Description
Conventional If you want to... Then... Feature Description Feature Trunking Digital Analog 1. Go to Password > Password The features supported by the radio vary with the Set. (DGNA) operation mode. For details, see the following table. 2. Enter the old password √... -
Page 22: Contact Management
3. Select the contact type (Private ID, PABX, or If you want to... Then... If you want to... Then... PSTN). 2. Select On/Off, and then Go to Date & Time > Time 4. Select Input Alias, and enter the alias. Set the time format select Enable or Disable. -
Page 23: Audio Optimization
MIC & SPK To turn this feature on or off, go to Menu > Settings > Audio Optimization Audio Set > Audio Optimization > 3-Band Equalizer > The MIC & SPK feature allows you to select the The features described in this section help optimize voice Equalizer Switch, and then select On or Off. -
Page 24: One Touch Call/Menu
l External First : When an audio accessory is Turning the Scan Feature On or Off Service Description connected, the radio uses the external speaker; Type To turn the Scan feature on or off, go to Menu > Scan > otherwise, it uses the internal speaker. -
Page 25: Hunt
To change a priority channel to a non- priority channel, Turning the Background Hunt To turn this feature on or off, go to Menu > Hunt > select the priority channel marked with , and Handover > Handover On/Off, and then select Enable or Feature On or Off then select Edit Prio CH >... -
Page 26: Vox
This feature aims to prevent a radio user from occupying Turning the GPS Feature On or Off Call Priority a channel for an extended period. It also avoids potential The Call Priority feature allows you to set the priority of In conventional mode, go to Menu >... -
Page 27: Work Order
In trunking mode, you can send your location information 2. Select the required task, and then select Details. to the dispatch station as follows: Reporting the Task State 1. Go to Menu > Accessories > GPS > Msg with To report the latest state of a task, do as follows: Position. -
Page 28: Control Services
Control Services Turning the Compandor Feature On or Off On a digital channel in conventional mode, you can initiate the following control services The Compandor feature allows the radio to compress transmitted voice signals, which to a private contact. suppresses ambient noise and improves audio quality. To turn this feature on or off, go to Menu >... -
Page 29: Personal Safety Services
Setting the CTCSS/CDCSS Feature 3. Press and hold the PTT key to initiate the call. Emergency Description Type If the Call to Follow feature is enabled by your dealer, the Continuous Tone- Coded Squelch System radio will transmit automatically. You can directly speak (CTCSS)/Continuous Digital- Coded Squelch System received call. -
Page 30: Communication Security Services
Selecting an Encrypt Key access. Communication Security 1. Go to Menu > Settings > Radio Set > Encrypt > To erase the data, press the SK1 and PTT key by turns Services Key List. twice, and make sure the press interval is less than 1.5 features described this... -
Page 31: Troubleshooting
Troubleshooting Phenomena Analysis Solution The battery may be installed improperly. Remove and reattach the battery. The battery power may run out. Recharge or replace the battery. You cannot turn the radio on. The battery may suffer from poor contact caused by dirty or damaged Clean the battery contacts or replace the battery. - Page 32 Phenomena Analysis Solution The radio registers repeatedly. The signal may be intermittent. Make sure the radio is within the coverage of the BS. The radio cannot establish a call. The signal may be weak. Make sure the radio is within the coverage of the BS. The voice is unclear.
-
Page 33: Care And Cleaning
TM-DW Trunking Mode - Digital Wide l Do not pierce or scrape the product. Use the accessories specified by Hytera only; Top Key l Keep the product far away from substances that can otherwise, the Company will not be liable for any loss or damage arising out of the use of any corrode the circuitry. - Page 34 Hytera Communications Corporation Limited. 2017 Hytera Communications Corporation Limited. All Rights Reserved. Address: Hytera Technology Park, No.3, 4# Baolong Road, Baolong Industrial City, Longgang District, Shenzhen,People's Republic of China Postcode: 518116 http:// www.hytera.com...
Need help?
Do you have a question about the PD792IS and is the answer not in the manual?
Questions and answers