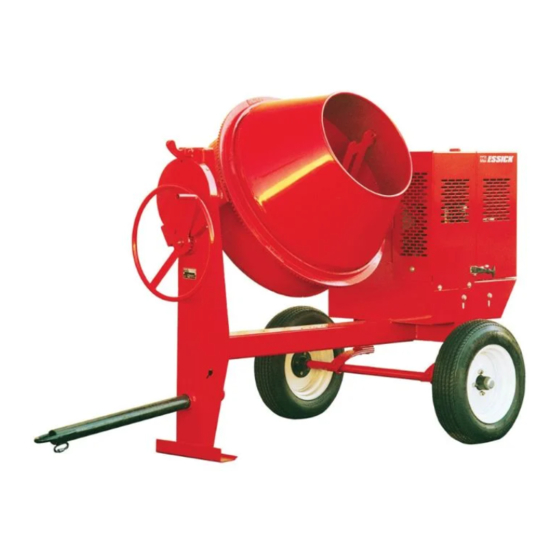
MULTIQUIP MC-94P Operation And Parts Manual
Concrete mixers
Hide thumbs
Also See for MC-94P:
- Operation and parts manual (84 pages) ,
- Specification (8 pages) ,
- Specifications (8 pages)

Related Manuals for MULTIQUIP MC-94P


Summary of Contents for MULTIQUIP MC-94P
- Page 1 OPERATION AND PARTS MANUAL MC-94S MC-94P CONCRETE MIXERS Revision #4 (11/04/05) www.discount-equipment.com...
- Page 2 One of our experienced staff members will get back to you with a quote for the right part that your machine needs. We sell worldwide for the brands: Genie, Terex, JLG, MultiQuip, Mayco, Toro/Stone, Diamond Products, Magnum, Airman, Mustang, Power Blanket, Nifty Lift, Atlas Copco,...
-
Page 4: Table Of Contents
Cabinet Assembly ..........44-45 Gas Engine Mounting Plate Asasembly ..... 46-47 Electric Motor Mounting Plate Asasembly ..48-49 Specification and part number NOTE are subject to change without notice PAGE 4 —MC-94P/S CONCRETE MIXERS — OPERATION & PARTS MANUAL — REV. #4 (11/04/05) - Page 5 . t f e t i l ) s r y t i c i r r o t ) . g PAGE 6 —MC-94P/S CONCRETE MIXERS — OPERATION & PARTS MANUAL — REV. #4 (11/04/05)
-
Page 6: Dimensions (Mixer)
MC-94P/S CONCRETE MIXER — DIMENSIONS (MIXER) See Table 2 for mixer dimensions Figure 1. Mixer Dimensions MC-94P/S CONCRETE MIXERS — OPERATION & PARTS MANUAL — REV. #4 (11/04/05) — PAGE 7... -
Page 7: Safety Message Alert Symbols
Symbols which appear throughout this manual, and will be surrounding environment could referenced in conjunction with Safety Message Alert Symbols. NOTE be damaged if you do not follow instructions. PAGE 8 —MC-94P/S CONCRETE MIXERS — OPERATION & PARTS MANUAL — REV. #4 (11/04/05) -
Page 8: Rules For Safe Operation
■ NEVER! place hands inside the drum while the drum is the equipment and/or injury to user may result. rotating. ■ Manufacturer does not assume responsibility for any accident due to equipment modifications. MC-94P/S CONCRETE MIXERS — OPERATION & PARTS MANUAL — REV. #4 (11/04/05) — PAGE 9... - Page 9 ■ High Temperatures – Always stop engine and allow the engine to cool before adding fuel, oil or performing service and maintenance functions. Contact with hot components can cause serious burns. PAGE 10 —MC-94P/S CONCRETE MIXERS — OPERATION & PARTS MANUAL — REV. #4 (11/04/05)
-
Page 10: Operation And Safety Decals
Machine Safety Decals The Multiquip MC-94P/S mixers are equipped with a number of safety decals (Figure 1A). These decals are provided for operator safety and maintenance information. The illustration below and on the next page shows these decals as they appear on the machine. - Page 11 Table 5. Remember cable distance affects the with the engine. current-voltage capacity of the extension cable. ) . s , s t . c t PAGE 12 —MC-94P/S CONCRETE MIXERS — OPERATION & PARTS MANUAL — REV. #4 (11/04/05)
-
Page 12: Mixer Basic Components
24 inches into inches long zinc-plated saftey chain. ALWAYS connect the the lift pockets. safety chain when towing. MC-94P/S CONCRETE MIXERS — OPERATION & PARTS MANUAL — REV. #4 (11/04/05) — PAGE 13... -
Page 13: Basic Engine Components
10. Fuel Tank – Holds unleaded gasoline. For additional information refer to engine owner's manual. PAGE 14 —MC-94P/S CONCRETE MIXERS — OPERATION & PARTS MANUAL — REV. #4 (11/04/05) -
Page 14: Handwheel Assembly
The MC-94P/S concrete mixers are shipped with the handwheel detached. Attach the handwheel to the mixer as shown in Figure 4. Figure 4. Handwheel Assembly MC-94P/S CONCRETE MIXERS — OPERATION & PARTS MANUAL — REV. #4 (11/04/05) — PAGE 15... -
Page 15: Towing Guidelines
3. As a minimum, use a 1/2-inch bolt and nylock nut grade position (gasoline models only). 5 when securing either tow bar to the towing vehicle, PAGE 16 —MC-94P/S CONCRETE MIXERS — OPERATION & PARTS MANUAL — REV. #4 (11/04/05) -
Page 16: Safety Chain Connection
1/2-inch bolt through tow bar and frame. Secure tow bar to frame with 1/2-inch nylock nut. Tighten to 40 ft.-lbs. Figure 5. Tow Bar and Safety Chain Installation MC-94P/S CONCRETE MIXERS — OPERATION & PARTS MANUAL — REV. #4 (11/04/05) — PAGE 17... -
Page 17: Electric Motor
. t f . t f . t f . t f a t l PAGE 18 —MC-94P/S CONCRETE MIXERS — OPERATION & PARTS MANUAL — REV. #4 (11/04/05) - Page 18 MC-94P/S CONCRETE MIXER — ELECTRIC MOTOR Figure 7. Single Phase Electric Motor MC-94P/S CONCRETE MIXERS — OPERATION & PARTS MANUAL — REV. #4 (11/04/05) — PAGE 19...
- Page 19 Check the zerk grease fittings (Figure 27) as shown in the maintenance section of this manual. These grease fittings lubricate the handwheel and the yoke mechanism . Figure 9. Engine Oil Dipstick (Oil Level) PAGE 20 —MC-94P/S CONCRETE MIXERS — OPERATION & PARTS MANUAL — REV. #4 (11/04/05)
- Page 20 Move the throttle lever (Figure 12) away from the slow position, about 1/3 of the way toward the fast position. Figure 15. Starter Grip Figure 12. Throttle Lever MC-94P/S CONCRETE MIXERS — OPERATION & PARTS MANUAL — REV. #4 (11/04/05) — PAGE 21...
-
Page 21: Initial Start-Up (Electric Motor)
NOTE extension cord so that it lays flat and is not curled underneath the mixer. Figure 18. Electric Motor ON/OFF Switch (ON Position) PAGE 22 —MC-94P/S CONCRETE MIXERS — OPERATION & PARTS MANUAL — REV. #4 (11/04/05) -
Page 22: Operation
(OFF Position) Disconnect the electric motor's extension cord from its power source. Figure 20. Filling Mixing Drum Clean drum of all debris and foreign matter. MC-94P/S CONCRETE MIXERS — OPERATION & PARTS MANUAL — REV. #4 (11/04/05) — PAGE 23... - Page 23 ) 3 ( a i c i t a r e t t n i r e t . s l PAGE 24 —MC-94P/S CONCRETE MIXERS — OPERATION & PARTS MANUAL — REV. #4 (11/04/05)
-
Page 24: Maintenance (Engine)
DO NOT overfill. 4. Install drain bolt with sealing washer and tighten se- curely. Figure 26. Engine Air Cleaner Figure 25. Engine Oil (Draining) MC-94P/S CONCRETE MIXERS — OPERATION & PARTS MANUAL — REV. #4 (11/04/05) — PAGE 25... -
Page 25: Maintenance (Mixer)
For thorough mix and longer drum life, always wash drum out after each use. NEVER! pour or spray water over the engine or electric Figure 28. Grease Fittings Electric Motor motor. PAGE 26 —MC-94P/S CONCRETE MIXERS — OPERATION & PARTS MANUAL — REV. #4 (11/04/05) - Page 26 CAUTION: ALWAYS wear safety glasses NOTE when removing or installing force fitted parts. Failure to comply may result in serious injury. Figure 30. Suspension Components MC-94P/S CONCRETE MIXERS — OPERATION & PARTS MANUAL — REV. #4 (11/04/05) — PAGE 27...
- Page 27 Place the mixing drum in the down position (mouth facing downward). Cover the mixer and place it a clean dry area, that is protected from harsh elements. Figure 31. Wheel Lug Nuts Tightening Sequence PAGE 28 —MC-94P/S CONCRETE MIXERS — OPERATION & PARTS MANUAL — REV. #4 (11/04/05)
-
Page 28: Troubleshooting (Engine)
. r e l a v c n i r r o h t i e r r PAGE 30 —MC-94P/S CONCRETE MIXERS — OPERATION & PARTS MANUAL — REV. #4 (11/04/05) -
Page 29: Troubleshooting (Engine/Mixer)
. t l n i r e v i i n i . y r e v i c i r c i r . r o MC-94P/S CONCRETE MIXERS — OPERATION & PARTS MANUAL — REV. #4 (11/04/05) — PAGE 31... -
Page 30: Explanation Of Code In Remarks Column
>, belong to the same assembly or kit. If more than one of the same NOTE reference number is listed, the last one listed indicates newest (or latest) part available. PAGE 32 —MC-94P/S CONCRETE MIXERS — OPERATION & PARTS MANUAL — REV. #4 (11/04/05) -
Page 31: Suggested Spare Parts
2 ..3469 ....DUST CAP, AXLE 3 ..9807956846 ..SPARK PLUG 3 ..17210ZE2505 ..AIR FILTER 1 ..17620ZH7023 ..CAP, FUEL 1 ..28462ZEW211 ..ROPE MC-94P/S CONCRETE MIXERS — OPERATION & PARTS MANUAL — REV. #4 (11/04/05) — PAGE 33... -
Page 32: Nameplate And Decals
MC-94P/S CONCRETE MIXER — NAME PLATE AND DECALS NAME PLATE AND DECALS PAGE 34 —MC-94P/S CONCRETE MIXERS — OPERATION & PARTS MANUAL — REV. #4 (11/04/05) - Page 33 DCL151 DECAL, TOWING INSTRUCTIONS 35137 DECAL, WARNING READ 13118 DECAL, POWDER COATED NAMEPLATE ............1 ..CONTACT PARTS DEPT. SEE DECAL ILLUSTRATIONS ON PAGE 9 MC-94P/S CONCRETE MIXERS — OPERATION & PARTS MANUAL — REV. #4 (11/04/05) — PAGE 35...
- Page 34 MC-94P/S — PLASTIC BARREL PLASTIC BARREL ASSY. PAGE 36 —MC-94P/S CONCRETE MIXERS — OPERATION & PARTS MANUAL — REV. #4 (11/04/05)
- Page 35 LOCKNUT, HEX 5/8" NC 510647 YOKE 508496 BLADE, PLASTIC (SHOVEL) 500980 WASHER, FLAT 1-9/16" 505472 SPACER, BARREL 515450 STEEL BLADES ........3 ....EFFECTIVE 02/2005 MC-94P/S CONCRETE MIXERS — OPERATION & PARTS MANUAL — REV. #4 (11/04/05) — PAGE 37...
- Page 36 MC-94P/S — STEEL BARREL STEEL BARREL ASSY. PAGE 38 —MC-94P/S CONCRETE MIXERS — OPERATION & PARTS MANUAL — REV. #4 (11/04/05)
- Page 37 07037-024 NUT, HEX LOWER 1-1/2" NF ....1 ..... REPLACES EM968306 492406 BOLT 5/8" NC X 1-1/2" NC 492586 LOCKNUT, HEX 5/8" NC 510593 YOKE MC-94P/S CONCRETE MIXERS — OPERATION & PARTS MANUAL — REV. #4 (11/04/05) — PAGE 39...
-
Page 38: Main Frame Assembly
MC-94P/S — MAIN FRAME ASSEMBLY MAIN FRAME ASSY. PAGE 40 —MC-94P/S CONCRETE MIXERS — OPERATION & PARTS MANUAL — REV. #4 (11/04/05) - Page 39 BALL HITCH 2-INCH ........1 ..... CONTACT UNIT SALES HLC-1 LOOP HITCH ..........1 ..... CONTACT UNIT SALES HPC-1 PIN HITCH 1-INCH ........1 ..... CONTACT UNIT SALES MC-94P/S CONCRETE MIXERS — OPERATION & PARTS MANUAL — REV. #4 (11/04/05) — PAGE 41...
-
Page 40: Axle Assembly
MC-94P/S — AXLE ASSEMBLY AXLE ASSY. PAGE 42 —MC-94P/S CONCRETE MIXERS — OPERATION & PARTS MANUAL — REV. #4 (11/04/05) - Page 41 COTTER PIN 1/8" X 1-1/2' 8164 NUT, SLOTTED HEX JAM 1"-20 3005 TIRE AND RIM, CARLISE 19 # 8115 LUG NUTS 20 # 3469 DUST CAP MC-94P/S CONCRETE MIXERS — OPERATION & PARTS MANUAL — REV. #4 (11/04/05) — PAGE 43...
-
Page 42: Cabinet Assembly
MC-94P/S — CABINET ASSEMBLY CABINET ASSY. PAGE 44 —MC-94P/S CONCRETE MIXERS — OPERATION & PARTS MANUAL — REV. #4 (11/04/05) - Page 43 RHMS 8-32 X 1/2" ............. 6 ..... REPLACEMENT PART ONLY 491010 LATCH ASSY., COMPLETE 492598 WASHER, FLAT 3/8" 2105164 NUT 3/8" NC G5 EM974007 PAINT, SPRAY CAN 12 OZ. TRAFFIC RED MC-94P/S CONCRETE MIXERS — OPERATION & PARTS MANUAL — REV. #4 (11/04/05) — PAGE 45...
- Page 44 MC-94P/S — GAS ENGINE MOUNTING PLATE ASSEMBLY GAS ENGINE MOUNTING PLATE ASSY. PAGE 46 —MC-94P/S CONCRETE MIXERS — OPERATION & PARTS MANUAL — REV. #4 (11/04/05)
- Page 45 BOLT, HEX 1/2" NC 1-1/2" G5 29174-001 BUTTON, STOP 29173-001 SWITCH, STOP 510573C ENGINE CABLE HARNESS 492584 LOCKNUT 1/2" 492367 BOLT 5/16" X 1-3/4" G5 514656 SUPPORT BRACKET MC-94P/S CONCRETE MIXERS — OPERATION & PARTS MANUAL — REV. #4 (11/04/05) — PAGE 47...
- Page 46 MC-94P/S — ELECTRIC MOTOR MOUNTING PLATE ASSEMBLY ELECTRIC MOTOR MOUNTING PLATE ASSY. PAGE 48 —MC-94P/S CONCRETE MIXERS — OPERATION & PARTS MANUAL — REV. #4 (11/04/05)
- Page 47 BUTTON, STOP 29173-001 SWITCH, STOP 510573C ENGINE CABLE HARNESS 492584 LOCKNUT 1/2" 492367 BOLT 5/16" X 1-3/4" G5 514656 SUPPORT BRACKET 0202 5/16" X 1" G5 MC-94P/S CONCRETE MIXERS — OPERATION & PARTS MANUAL — REV. #4 (11/04/05) — PAGE 49...
- Page 48 HONDA GX240K1QA2 ENGINE — AIR CLEANER ASSY. AIR CLEANER ASSY. PAGE 50 —MC-94P/S CONCRETE MIXERS — OPERATION & PARTS MANUAL — REV. #4 (11/04/05)
- Page 49 ELBOW COMP., AIR CLEANER ....1 ..... INCLUDES ITEM W/ # 0037806000 WINGNUT 6MM 90325044000 WINGNUT, TOOL BOX SETTING 90009ZE2003 BOLT- WASHER 6 X 22 9405006000 NUT, FLANGE 6MM MC-94P/S CONCRETE MIXERS — OPERATION & PARTS MANUAL — REV. #4 (11/04/05) — PAGE 51...
- Page 50 HONDA GX240K1QA2 ENGINE — CAMSHAFT ASSY. CAMSHAFT ASSY. PAGE 52 —MC-94P/S CONCRETE MIXERS — OPERATION & PARTS MANUAL — REV. #4 (11/04/05)
- Page 51 RETAINER, IN. VALVE SPRING 14773ZE2000 RETAINER, EX. VALVE SPRING 14781ZE2000 ROTATOR, VALVE 14791ZE2010 PLATE, PUSH ROD GUIDE 90012ZE0010 BOLT, PIVOT 8MM 90206ZE1000 NUT, PIVOT ADJ. MC-94P/S CONCRETE MIXERS — OPERATION & PARTS MANUAL — REV. #4 (11/04/05) — PAGE 53...
- Page 52 HONDA GX240K1QA2 ENGINE — CARBURETOR ASSY. CARBURETOR ASSY. PAGE 54 —MC-94P/S CONCRETE MIXERS — OPERATION & PARTS MANUAL — REV. #4 (11/04/05)
- Page 53 JET, MAIN #82, OPTIONAL 99101ZH70850 JET, MAIN #85, OPTIONAL 99101ZH80880 JET, MAIN #88 99204ZE20400 JET SET, PILOT #40 16015ZE8005 CHAMBER SET, FLOAT ....1 ..INCLUDES ITEMS W/ MC-94P/S CONCRETE MIXERS — OPERATION & PARTS MANUAL — REV. #4 (11/04/05) — PAGE 55...
- Page 54 HONDA GX240K1QA2 ENGINE — CONTROL ASSY. CONTROL ASSY. PAGE 56 —MC-94P/S CONCRETE MIXERS — OPERATION & PARTS MANUAL — REV. #4 (11/04/05)
-
Page 55: Control Assembly
BOLT, FLANGE (6 X 12) (CT200) 90015ZE5010 BOLT, GOVERNOR ARM 90114SA0000 NUT, SELF- LOCK (6MM) 93500050280A SCREW, PAN (5 X 28) 93500050160A SCREW, PAN (5 X 16) 9405006000 NUT, FLANGE MC-94P/S CONCRETE MIXERS — OPERATION & PARTS MANUAL — REV. #4 (11/04/05) — PAGE 57... - Page 56 HONDA GX240K1QA2 ENGINE — CRANKCASE COVER ASSY. CRANKCASE COVER ASSY. PAGE 58 —MC-94P/S CONCRETE MIXERS — OPERATION & PARTS MANUAL — REV. #4 (11/04/05)
- Page 57 BOLT, FLANGE (8 X 35) 961006202000 BEARING, RADIAL BALL (6202) 961006204000 BEARING, RADIAL BALL (6204) 961006206000 BEARING, RADIAL BALL (6206) 961006302000 BEARING, RADIAL BALL (6302) MC-94P/S CONCRETE MIXERS — OPERATION & PARTS MANUAL — REV. #4 (11/04/05) — PAGE 59...
- Page 58 HONDA GX240K1QA2ENGINE — CRANKSHAFT ASSY. CRANKSHAFT ASSY. PAGE 60 —MC-94P/S CONCRETE MIXERS — OPERATION & PARTS MANUAL — REV. #4 (11/04/05)
- Page 59 CRANKSHAFT (Q- TYPE) ......1 ..INCLUDES ITEM W/ 13351ZE2010 WEIGHT BALANCER 90745ZE2600 KEY 6.3 X 6.3 X 43 MM 961006206000 BEARING, RADIAL BALL (6206) MC-94P/S CONCRETE MIXERS — OPERATION & PARTS MANUAL — REV. #4 (11/04/05) — PAGE 61...
- Page 60 HONDA GX240K1QA2 ENGINE — CYLINDER BARREL ASSY. CYLINDER BARREL ASSY. PAGE 62 —MC-94P/S CONCRETE MIXERS — OPERATION & PARTS MANUAL — REV. #4 (11/04/05)
- Page 61 WASHER, DRAIN PLUG 12MM 9425110000 PIN, LOCK 10MM 957010601200 BOLT, FLANGE 6X12 961006202000 BEARING, RADIAL BALL 6202 90013883000 BOLT, FLANGE 6X12 CT200 34150ZH7003 ALERT UNIT, OIL MC-94P/S CONCRETE MIXERS — OPERATION & PARTS MANUAL — REV. #4 (11/04/05) — PAGE 63...
- Page 62 HONDA GX240K1QA2 ENGINE — CYLINDER HEAD ASSY. CYLINDER HEAD ASSY. PAGE 64 —MC-94P/S CONCRETE MIXERS — OPERATION & PARTS MANUAL — REV. #4 (11/04/05)
- Page 63 9430112200 PIN A, DOWEL 12X20 950051100130M BULK HOSE, VACUUM 11X1000, 11X100 957011008000 BOLT, FLANGE 10X80 9807956846 SPARK PLUG, BPR6ES, NGK 9807956855 SPARK PLUG, W20EPR-U, DENSO MC-94P/S CONCRETE MIXERS — OPERATION & PARTS MANUAL — REV. #4 (11/04/05) — PAGE 65...
- Page 64 HONDA GX240K1QA2 ENGINE — FAN COVER ASSY. FAN COVER ASSY. PAGE 66 —MC-94P/S CONCRETE MIXERS — OPERATION & PARTS MANUAL — REV. #4 (11/04/05)
- Page 65 CLIP, TUBE 19610ZE2010ZC COVER COMP., FAN *NH1* BLACK 19631ZE2D00 SHROUD 32197ZH8003 SUB-HARNESS 36100ZE1015 SWITCH ASSY., ENGINE STOP 90013883000 BOLT, FLANGE 6X12, CT200 90684ZA0601 CLIP, WIRE HARNESS MC-94P/S CONCRETE MIXERS — OPERATION & PARTS MANUAL — REV. #4 (11/04/05) — PAGE 67...
- Page 66 HONDA GX240K1QA2 ENGINE — FLYWHEEL ASSY. FLYWHEEL ASSY. PAGE 68 —MC-94P/S CONCRETE MIXERS — OPERATION & PARTS MANUAL — REV. #4 (11/04/05)
- Page 67 PART NAME QTY. REMARKS 19511ZE2000 FAN, COOLING 28450ZE2W11 PULLEY COMP., STARTER, SCREEN GRID 31100ZE2010 FLYWHEEL COMP. 90201ZE3V00 NUT, SPECIAL 16MM 90741ZE2000 KEY, SPECIAL WOODRUFF 25X18 MC-94P/S CONCRETE MIXERS — OPERATION & PARTS MANUAL — REV. #4 (11/04/05) — PAGE 69...
- Page 68 HONDA GX240K1QA2 ENGINE — MUFFLER ASSY. MUFFLER ASSY. PAGE 70 —MC-94P/S CONCRETE MIXERS — OPERATION & PARTS MANUAL — REV. #4 (11/04/05)
- Page 69 BOLT, FLANGE (6 X 12) (CT200) 90050ZE1000 SCREW, TAPPING (5 X 8) 90055ZE1000 SCREW, TAPPING (4 X 6) 90050ZE1000 SCREW, TAPPING (5 X 8) (OPTIONAL) 9405008000 NUT, FLANGE (8MM) MC-94P/S CONCRETE MIXERS — OPERATION & PARTS MANUAL — REV. #4 (11/04/05) — PAGE 71...
- Page 70 HONDA GX240K1QA2 ENGINE — FUEL TANK ASSY. FUEL TANK ASSY. PAGE 72 —MC-94P/S CONCRETE MIXERS — OPERATION & PARTS MANUAL — REV. #4 (11/04/05)
- Page 71 17672ZE2W01 FILTER, FUEL 91353671003 O-RING 14MM, ARAI 9405008000 NUT, FLANGE 8MM 950014500360M BULK HOSE, FUEL 4.5X3000, 4.5X222 9500202080 CLIP, TUBE, B8 957010802500 BOLT, FLANGE 8X25 MC-94P/S CONCRETE MIXERS — OPERATION & PARTS MANUAL — REV. #4 (11/04/05) — PAGE 73...
-
Page 72: Ignition Coil
HONDA GX240K1QA2 ENGINE — IGNITION ASSY. IGNITION COIL ASSY. PAGE 74 —MC-94P/S CONCRETE MIXERS — OPERATION & PARTS MANUAL — REV. #4 (11/04/05) - Page 73 PART NAME QTY. REMARKS 30500ZF6W02 COIL ASSY., IGNITION 30700ZE1013 CAP ASSY., NOISE SUPPRESSOR 31512ZE2000 GROMMET, WIRE 36101ZE1010 WIRE, STOP SWITCH 370MM 90015883000 BOLT, FLANGE 6X28 MC-94P/S CONCRETE MIXERS — OPERATION & PARTS MANUAL — REV. #4 (11/04/05) — PAGE 75...
- Page 74 HONDA GX240K1QA2 ENGINE — PISTON ASSY. PISTON ASSY. PAGE 76 —MC-94P/S CONCRETE MIXERS — OPERATION & PARTS MANUAL — REV. #4 (11/04/05)
- Page 75 ROD ASSY., CONNECTING STANDARD ....1 ..INCLUDES ITEMS W/ 13200ZE2305 ROD ASSY., CONNECTING, US 0.25, OPT. 90001ZE8000 BOLT, CONNECTING ROD 90551ZE1000 CLIP, PISTON PIN 18MM MC-94P/S CONCRETE MIXERS — OPERATION & PARTS MANUAL — REV. #4 (11/04/05) — PAGE 77...
-
Page 76: Recoil Starter
HONDA GX240K1QA2 ENGINE — RECOIL STARTER ASSY. RECOIL STARTER ASSY. PAGE 78 —MC-94P/S CONCRETE MIXERS — OPERATION & PARTS MANUAL — REV. #4 (11/04/05) - Page 77 SPRING, FRICTION 28442ZE2W01 SPRING, STARTER RETURN 28443ZE2W01 SPRING RATCHET 28444ZE2W01 RETAINER, SPRING 28461ZE2W02 GRIP, STARTER 28462ZE2W11 ROPE, RECOIL STARTER 90004ZE2W01 SCREW, CENTER 90008ZE2003 BOLT, FLANGE 6X10 MC-94P/S CONCRETE MIXERS — OPERATION & PARTS MANUAL — REV. #4 (11/04/05) — PAGE 79...
- Page 78 HONDA GX240K1QA2 ENGINE — LABEL ASSY. LABEL ASSY. PAGE 80 —MC-94P/S CONCRETE MIXERS — OPERATION & PARTS MANUAL — REV. #4 (11/04/05)
- Page 79 PART NAME QTY. REMARKS 87521ZE2W01 EMBLEM, INTERNAL 87522ZE1810 MARK, CAUTION, EXTERNAL 87522ZH9000 LABEL, CAUTION 87528ZE2810 MARK, CHOKE, EXTERNAL 87586ZH7W00 LABEL, FUEL CAUTION 87532ZH8810 MARK, OIL ALERT MC-94P/S CONCRETE MIXERS — OPERATION & PARTS MANUAL — REV. #4 (11/04/05) — PAGE 81...
- Page 80 One of our experienced staff members will get back to you with a quote for the right part that your machine needs. We sell worldwide for the brands: Genie, Terex, JLG, MultiQuip, Mayco, Toro/Stone, Diamond Products, Magnum, Airman, Mustang, Power Blanket, Nifty Lift, Atlas Copco,...
Need help?
Do you have a question about the MC-94P and is the answer not in the manual?
Questions and answers
Do you make big ring gear mc 94p conc mixer ser no d2952040 or o first digit