
Subscribe to Our Youtube Channel
Related Manuals for Candy FCP651SX


Summary of Contents for Candy FCP651SX
- Page 1 OVENS USER INSTRUCTIONS FORNI ISTRUZIONI PER L'USO CANDY HOOVER GROUP S.R.L. • Via Privata Eden Fumagalli • 20047 Brugherio Milano Italy...
- Page 2 Safety Indications • WARNING: the appliance and accessible parts become hot during use. Be careful not to touch any hot parts. •WARNING: the accessible parts can become hot when the oven is in use. Children must be kept at a safe distance.
- Page 3 Summary 1.1 Safety indications General Instructions 1.2 Electrical safety 1.3 Recommendations 1.4 Installation 1.5 Waste management 1.6 Conformity declaration 2.1 Overview Product Description 2.2 Accessories 2.3 First use 3.1 Display description Use of the Oven 3.2 Cooking Modes 3.3 Using The Steam Function 4.1 General notes on cleaning Oven Cleaning and Maintenance 4.2 Aquactiva Function...
- Page 4 1. General Instructions We thank you for choosing one of our products. For the best results with your oven, you should read this manual carefully and retain it for future reference. Before installing the oven, take note of the serial number so that you can give it to customer service staff if any repairs are required. Having removed the oven from its packaging, check that it has not been damaged during transportation.
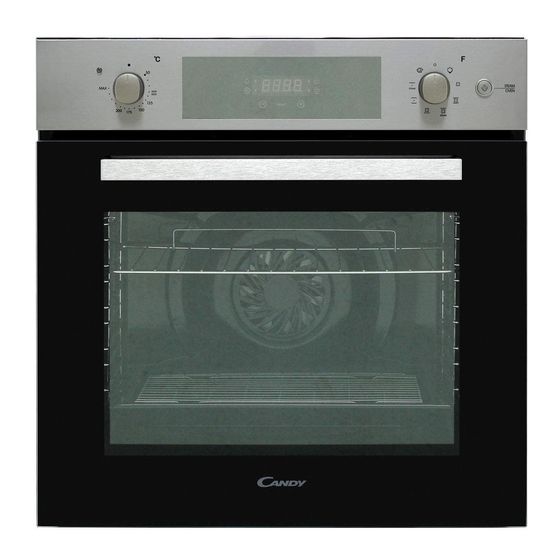
- Page 5 2. Product Description 2.1 Overview 1. Control panel 2. Shelf positions (lateral wire grid if included) 3. Metal grill 4. Drip pan 5. Fan (behind the steel plate) 6. Oven door 2.2 Accessories 1 Drip pan 3 Lateral wire grids Collects the residues that drip during the cooking of foods on the grills.
- Page 6 3. Use of the Oven 3.1 Display description ATTENTION : the first operation to carry out after the oven has been installed or following the interruption of power supply (this 1. Minute minder is recognizable the display pulsating and showing 12:00 ) is 2.
- Page 7 3.2 Cooking Modes T °C Function Function (Depends on the oven model) range Dial LAMP: Turns on the oven light. DEFROST: When the dial is set to this position. The fan circulates air at room temperature around the frozen food so that it defrosts in a few minutes without the protein content of the food being changed or altered.
- Page 8 3.3 Using The Steam Function 4.2 Aquactiva Function The Aquactiva procedure uses steam to help remove remaining Steam function lets you have better hummidity during cooking fat and food particles from the oven. cycle. We recommend alternating steam cooking with traditional 1.
- Page 9 REMOVAL AND CLEANING OF THE GLASS DOOR 7. At the end of cleaning or substitution, reassemble the parts in 1. Open the oven door. reverse order. 2.3.4. Lock the hinges, remove the screws and remove the upper On all glass, the indication "Pyro" must be legible and positioned on metal cover by pulling it upwards.
- Page 10 CHANGING THE BULB 1. Disconnect the oven from the mains supply. 2. Undo the glass cover, unscrew the bulb and replace it with a new bulb of the same type. 3. Once the defective bulb is replaced, replace the glass cover. 5.
- Page 11 Indicazioni di Sicurezza • ATTENZIONE: l'apparecchio e le parti accessibili diventano calde durante l'uso. Prestare attenzione a non toccare le parti calde. • ATTENZIONE: le parti accessibili possono diventare molto calde quando si utilizza il forno. I bambini devono essere tenuti a distanza di sicurezza. •...
-
Page 12: Table Of Contents
Sommario 1.1 Suggerimenti sulla sicurezza Avvertenze Generali 1.2 Sicurezza elettrica 1.3 Raccomandazioni 1.4 Installazione 1.5 Gestione dei rifiuti 1.6 Dichiarazione di conformità 2.1 Panoramica Descrizione del Prodotto 2.2 Accessori 2.3 Primo utilizzo 3.1 Descrizione del display Utilizzo del Forno 3.2 Modalità di cottura 3.3 Uso della funzione a vapore 4.1.Note generiche di pulizia Pulizia e Manutenzione del Forno... -
Page 13: Avvertenze Generali
1. Avvertenze Generali Vi ringraziamo per aver scelto uno dei nostri prodotti. Per utilizzare il forno in modo ottimale è consigliabile leggere con attenzione questo manuale e conservarlo con cura per ogni ulteriore consultazione. Prima di installare il forno, prendere nota del numero di serie in modo da poterlo comunicare al personale del servizio di assistenza in caso di richiesta di intervento. -
Page 14: Descrizione Del Prodotto
2. Descrizione del Prodotto 2.1 Panoramica 1. Pannello di controllo 2. Posizioni ripiani (castelletto se previsto) 3. Griglia metallica 4. Leccarda 5. Ventola (dietro alla piastra di acciaio) 6. Porta forno 2.2 Accessories 1 Leccarda 3 Griglie a filo laterale Raccoglie i residui che gocciolano durante la cottura di alimenti con i grill. -
Page 15: Utilizzo Del Forno
3. Utilizzo del Forno 3.1 Descrizione del display ATTENZIONE: la prima operazione da eseguire dopo l’installazione o dopo una interruzione di corrente (tali situazioni 1- Timer contaminuti 12:00 ) si riconoscono perchè sul dispay lampeggia l’ora è la 2- Regolazione dell'ora regolazione dell’ora, come di seguito descritto. -
Page 16: Modalità Di Cottura
3.2 Modalità di cottura Intervallo Manopola Funzione (a seconda del modello) di T° commutatore LAMPADA: accende la luce interna. SCONGELAMENTO: questa posizione permette di far circolare l’aria a temperatura ambiente intorno al cibo surgelato facendolo così scongelare in pochi minuti senza modificare od alterare il contenuto proteico. FORNO VENTILATO: l’aria calda viene ripartita sui diversi ripiani. -
Page 17: Uso Della Funzione A Vapore
3.3 Uso della funzione a vapore La funzione a vapore permette di ottenere una maggiore umidità La Funzione Aquactiva durante il processo di cottura. Si consiglia di alternare cotture con vapore a cotture tradizionali. La procedura “ AQUACTIVA ” utilizza il vapore per facilitare la AVVERTENZA: Rischio di ustione e di danneggiamento rimozione dal forno del grasso e dei pezzi di cibo rimasti. -
Page 18: Rimozione E Pulizia Della Porta In Vetro
RIMOZIONE E PULIZIA DELLA PORTA IN VETRO 1. Aprile la porta del forno. 2.3.4. Bloccare le cerniere, rimuovere le viti e rimuovere la copertura metallica superiore tirandola verso l’alto. 5.6. Rimuovere il vetro, estraendolo con molta cura, dalla controporta del forno (NB: nei forni pirolitici, rimuovere anche il secondo e terzo vetro (se presente)). -
Page 19: Sostituzione Della Lampadina
SOSTITUZIONE DELLA LAMPADINA 1. Scollegare il forno alla rete. 2. Allentare la copertura in vetro, svitare la lampadina e sostituirla con una nuova dello stesso modello. 3. Una volta sostituita la lampadina difettosa, riavvitare la copertura in vetro. 5. Risoluzione dei Problemi 5.1 FAQ PROBLEMA POSSIBILE CAUSA... - Page 20 INSTALLATION INSTALLAZIONE Opening / Apertura 460mm x 15 mm 560 mm 560 mm 580 mm 595 mm 546 mm 595 mm 22 mm If the furniture is coverage with a bottom at the back part, provide an opening for the power supply cable. Se il mobile ha un fondo posteriore, praticare un foro per il passaggio del cavo di alimentazione.
Need help?
Do you have a question about the FCP651SX and is the answer not in the manual?
Questions and answers