Table of Contents
Advertisement
Available languages
Available languages
This equipment has been tested and found to comply with the limits of a Class B digital device,
pursuant to Part 15 of the FCC Rules. These limits are designed to provide reasonable protection
against harmful interference in a residential installation. This equipment generates, uses, and can
radiate radio frequency energy and, if not installed and used in accordance with the instructions,
may cause harmful interference to radio communications. There is no guarantee that interference
will not occur in a particular installation.
The vendor makes no representations or warranties with respect to the contents here and
specially disclaims any implied warranties of merchantability or fitness for any purpose. Further
the vendor reserves the right to revise this publication and to make changes to the contents here
without obligation to notify any party beforehand.
Duplication of this publication, in part or in whole, is not allowed without first obtaining the
vendor's approval in writing.
The content of this user's manual is subject to be changed without notice and we will not be
responsible for any mistakes found in this user's manual. All the brand and product names are
trademarks of their respective companies.
FCC Information and Copyright
Dichiarazione di conformità sintetica
Ai sensi dell'art. 2 comma 3 del D.M. 275 del
30/10/2002
Si dichiara che questo prodotto è conforme
alle normative vigenti e soddisfa i requisiti
essenziali richiesti dalle direttive
2004/108/CE, 2006/95/CE e 1999/05/CE
quando ad esso applicabili
Short Declaration of conformity
We declare this product is complying with the
laws in force and meeting all the essential
requirements as specified by the directives
2004/108/CE, 2006/95/CE and 1999/05/CE
whenever these laws may be applied
Advertisement
Chapters
Table of Contents

Related Manuals for Biostar H310MHP


Summary of Contents for Biostar H310MHP
- Page 1 FCC Information and Copyright This equipment has been tested and found to comply with the limits of a Class B digital device, pursuant to Part 15 of the FCC Rules. These limits are designed to provide reasonable protection against harmful interference in a residential installation. This equipment generates, uses, and can radiate radio frequency energy and, if not installed and used in accordance with the instructions, may cause harmful interference to radio communications.
-
Page 2: Table Of Contents
Table Of Contents FCC Information and Copyright ������������������������������������������������������������������������������� 1 Chapter 1: Introduction ������������������������������������������������������������������������������������������� 3 1.1 Before You Start ........................3 1.2 Package Checklist ........................ 3 1.3 Specifications ........................4 1.4 Rear Panel Connectors ......................5 1.5 Motherboard Layout ......................6 Chapter 2: Hardware installation �����������������������������������������������������������������������������... -
Page 3: Chapter 1: Introduction
H310MHP Chapter 1: Introduction 1�1 Before You Start Thank you for choosing our product. Before you start installing the motherboard, please make sure you follow the instructions below: • Prepare a dry and stable working environment with sufficient lighting. • Always disconnect the computer from power outlet before operation. -
Page 4: Specifications
1x Clear CMOS Header 1x COM Port Header Form Factor uATX Form Factor, 226mm x 171mm Windows 7/ 10(64bit) OS Support * Biostar reserves the right to add or remove support for any OS with or without notice. 4 | Chapter 1: Introduction... -
Page 5: Rear Panel Connectors
H310MHP 1.4 Rear Panel Connectors Note » HDMI/ VGA ports only work with an Intel® integrated Graphics Processor. » Maximum resolution HDMI: 4096 x 2160 @24Hz, compliant with HDMI 1.4 VGA: 1920 x 1200 @60Hz » When using the front HD audio jack and plug in the headset / microphone , the rear sound will be automatically Disabled. » The mainboard supports two onboard display outputs at same time and the display output configuration can be selected in Intel graphics driver utility. » To configure 7.1-channel audio, you have to use a chassis with HD front panel audio module and enable the multi-channel audio feature through O.S. Audio Utility. The 2/ 4/ 5.1/ 7.1-channel configuration Audio Port 2-channel 4-channel 5.1 channel 7.1 channel Blue (Rear Panel) -
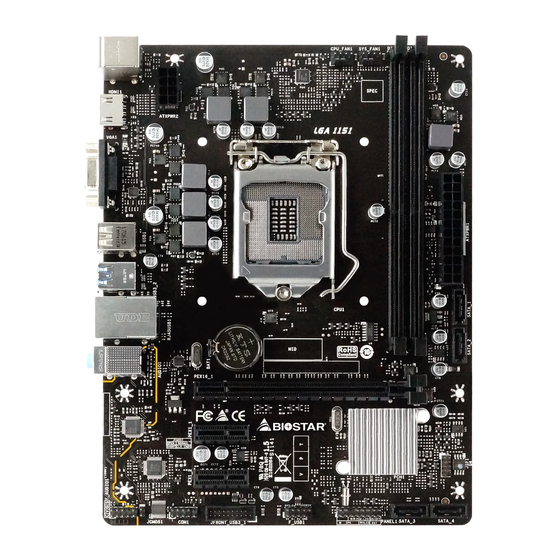
Page 6: Motherboard Layout
1.5 Motherboard Layout Note » represents the 1st pin. 6 | Chapter 1: Introduction... -
Page 7: Chapter 2: Hardware Installation
H310MHP Chapter 2: Hardware installation 2.1 Install Central Processing Unit (CPU) Step 1: Locate the CPU socket on the motherboard Note » Remove pin cap before installation, and make good preservation for future use. When the CPU is removed, cover the pin cap on the empty socket to ensure pin legs won’t be damaged. » The motherboard might equip with two different types of pin cap. Please refer below instruction to remove the pin cap. Step 2: Pull the socket locking lever out from the socket and then raise the lever up. - Page 8 Step 4: Hold processor with your thumb and index fingers, oriented as shown. Align the notches with the socket. Lower the processor straight down without tilting or sliding the processor in the socket. Step 5: Hold the CPU down firmly, and then lower the lever to locked position to complete the installation.
-
Page 9: Install A Heatsink
H310MHP 2.2 Install a Heatsink Step 1: Place the CPU fan assembly on top of the installed CPU and make sure that the four fasteners match the motherboard holes. Orient the assembly and make the fan cable is closest to the CPU fan connector. -
Page 10: Connect Cooling Fans
2.3 Connect Cooling Fans These fan headers support cooling-fans built in the computer. The fan cable and connector may be different according to the fan manufacturer. CPU_FAN1: CPU Fan Header Pin Assignment Ground +12V FAN RPM rate sense AI Fan Control (By Fan) SYS_FAN1: System Fan Header Pin Assignment Ground... - Page 11 H310MHP Step 1: Unlock a DIMM slot by pressing the retaining clips outward. Align a DIMM on the slot such that the notch on the DIMM matches the break on the slot. Step 2: Insert the DIMM vertically and firmly into the slot until the retaining clips snap back in place and the DIMM is properly seated.
-
Page 12: Expansion Slots
2.5 Expansion Slots PEX16_1: PCI-Express Gen3 x16 Slot • PCI-Express 3.0 compliant. • Maximum theoretical realized bandwidth of 16GB/s simultaneously per direction, for an aggregate of 32GB/s totally. PEX1_1/ PEX1_2: PCI-Express Gen2 x1 Slots • PCI-Express 2.0 compliant. • Data transfer bandwidth up to 0.5GB/s per direction; 1GB/s in total Install an Expansion Card You can install your expansion card by following steps: • ... -
Page 13: Jumper & Switch Setting
H310MHP 2.6 Jumper & Switch Setting The illustration shows how to set up jumpers. When the jumper cap is placed on pins, the jumper is “close”, if not, that means the jumper is “open”. Pin opened Pin closed Pin 1-2 closed JCMOS1: Clear CMOS Jumper The jumper allows users to restore the BIOS safe setting and the CMOS data. -
Page 14: Headers & Connectors
2.7 Headers & Connectors ATXPWR1: ATX Power Source Connector For better compatibility, we recommend to use a standard ATX 24-pin power supply for this connector. Make sure to find the correct orientation before plugging the connector. Assignment Assignment +3.3V +3.3V -12V +3.3V Ground... - Page 15 H310MHP PANEL1: Front Panel Header This 16-pin header includes Power-on, Reset, HDD LED, Power LED, and speaker connection. Pin Assignment Function Pin Assignment Function Speaker 10 N/A Connector 11 N/A Speaker 12 Power LED (+) Power HDD LED (+) Hard drive...
- Page 16 F_USB1: Header for USB 2.0 Ports at Front Panel This header allows user to add additional USB ports on the PC front panel, and also can be connected with a wide range of external peripherals. Assignment +5V (fused) +5V (fused) USB- USB- USB+...
-
Page 17: Chapter 3: Uefi Bios & Software
The BIOS can be updated using either of the following utilities: • BIOSTAR BIO-FLASHER: Using this utility, the BIOS can be updated from a file on a hard disk, a USB drive (a flash drive or a USB hard drive), or a CD-ROM. - Page 18 6. Select the proper BIOS file, and a message asking if you are sure to flash the BIOS file. Click “Yes” to start updating BIOS. 7. A dialog pops out after BIOS flash is completed, asking you to restart the system. Press the <Y> key to restart system.
- Page 19 Then, the BIOS Update is completed. BIOS Update Utility (through a BIOS file) 1. Installing BIOS Update Utility from the DVD Driver. 2. Download the proper BIOS from http://www.biostar.com.tw/ 3. Launch BIOS Update Utility and click the “Update BIOS” button on the main screen.
- Page 20 5. Choose the location for your BIOS file in the system. Please select the proper BIOS file, and then click on “Open”. It will take several minutes, please be patient. 6. After the BIOS Update process is finished, click on “OK” to reboot the system. 7.
-
Page 21: Software
H310MHP 3.3 Software Installing Software Insert the Setup DVD to the optical drive. The driver installation program would appear if the Auto-run function has been enabled. Select Software Installation, and then click on the respective software title. Follow the on-screen instructions to complete the installation. -
Page 22: Chapter 4: Useful Help
Chapter 4: Useful help 4.1 Driver Installation After you installed your operating system, please insert the Fully Setup Driver DVD into your optical drive and install the driver for better system performance. You will see the following window after you insert the DVD The setup guide will auto detect your motherboard and operating system. -
Page 23: Ami Bios Beep Code
H310MHP 4.2 AMI BIOS Beep Code Boot Block Beep Codes Number of Beeps Description Continuing Memory sizing error or Memory module not found POST BIOS Beep Codes Number of Beeps Description Success booting. Display memory error (system video adapter) 4.3 AMI BIOS post code... - Page 24 Code Description South Bridge DXE initialization is started South Bridge DXE SMM initialization is started South Bridge devices initialization South Bridge DXE Initialization (South Bridge module specific) ACPI module initialization Boot Device Selection (BDS) phase is started Driver connecting is started PCI Bus initialization is started PCI Bus Hot Plug Controller Initialization PCI Bus Enumeration...
-
Page 25: Troubleshooting
H310MHP 4.4 Troubleshooting Probable Solution 1. There is no power in the system. Power LED does 1. Make sure power cable is securely plugged in. not shine; the fan of the power supply does not work 2. Replace cable. 2. Indicator light on keyboard does not shine. -
Page 26: Appendix I: Specifications In Other Languages
اﻟﻤﺄﺧﺬ ﻗﺎﻋﺪة وﺣﺪة اﻟﻤﻌﺎﻟﺠﺔ ® .ﺳﻠﺴﻠﺔ ﻓﻘﻂ ™ ﻋﺎﺋﻠﺔ اﻟﻤﻌﺎﻟﺞ آﻮر Intel ﻣﻦ ﺗﺪﻋﻢ اﻟﺠﻴﻞ اﻟﻤﺮآﺰﻳﺔ ﻟﻘﺎﺋﻤﺔ دﻋﻢ اﻟﻤﻌﺎﻟﺞ www.biostar.com.tw ﻳﺮﺟﻰ اﻟﺮﺟﻮع إﻟﻰ اﻟﻤﻮﻗﻊ ® INTEL H310 ﻣﺠﻤﻮﻋﺔ اﻟﺸﺮاﺋﺢ 1866/2133/2400/2666 DDR4 . ار دي ﺗﺪﻋﻢ ﻗﻨﺎة ﻣﺰدوﺟﺔ دي ﺟﻴﺠﺎﺑﺎﻳﺖ ذاآﺮة... -
Page 27: German
1x Header für Seriellen Anschluss Formfaktor uATX Formfaktor, 226 mm x 171mm Windows 7/ 10(64bit) OS-Unterstützung * Biostar reserves the right to add or remove support for any OS with or without notice. APPENDIX I: Specifications in Other Languages | 27... -
Page 28: Spanish
Factor de Forma Factor de Forma uATX, 226mm x 171mm Windows 7/ 10(64bit) Soporte OS * Biostar reserva su derecho de añadir o retirar el soporte para cada OS con o sin notificación. 28 | APPENDIX I: Specifications in Other Languages... -
Page 29: Thai
สนั บ สนุ น OS * Biostar ขอสงวนสิ ท ธิ ์ ใ นก�รเพิ ่ ม หรื อ ถอดก�รสนั บ สนุ น สำ � หรั บ ระบบปฏิ บ ั ต ิ ก �ร OS ต่ � งๆ โดยไม่ ต ้ อ งแจ้ ง ให้ ท ร�บล่ ว งหน้ �... -
Page 30: Japan
Japan 仕様 ソケット1151サポートの第8/9世代Intel ® Core™、Pentium、Celeronプロセッサー CPU 対応 * 第8/9世代Intel ® Core™プロセッサーファミリーは300シリーズのみに対応しています * 対応CPUの一覧は、www.biostar.com.twを参照してください チップセット Intel ® H310 デュアルチャンネルDDR4 1866/ 2133/ 2400/ 2666 に対応 2x DDR4 DIMMメモリースロット、最大32GBのメモリーに対応 メモリ 各DIMMは非ECC 4/ 8/ 16GB DDR4モジュールに対応 * 対応メモリーの一覧は、www.biostar.com.twを参照してください。 ストレージ 4x SATA IIIコネクタ(6Gb/s) RTL8111H 10/ 100/ 1000 Mb/秒の自動ネゴシエーション、半二重/全二重に対応... - Page 31 Информация FCC и авторское право Это оборудование было протестировано и признано соответствующим ограничениям для цифровых устройств класса B в соответствии с частью 15 правил Федеральной комиссии по связи США (FCC). Эти ограничения разработаны для обеспечения разумной защиты от вредных помех при установке в жилых помещениях. Это оборудование генерирует, использует...
- Page 32 Содержание Информация FCC и авторское право �������������������������������������������������������������������� 1 Глава 1: Введение �������������������������������������������������������������������������������������������������� 3 1.1 Перед началом ........................3 1.2 Состав упаковки ........................ 3 1.3 Технические характеристики .................... 4 1.4 Разъемы задней панели ....................5 1.5 Компоновка материнской платы ..................6 Глава...
-
Page 33: Глава 1: Введение
H310MHP Глава 1: Введение 1�1 Перед началом Спасибо, что выбрали наш продукт. Перед тем, как начать установку материнской платы, убедитесь,что вы следуете приведенным ниже инструкциям: • Подготовьте сухую и стабильную рабочую среду с достаточным освещением • Обязательно отключите компьютер от розетки перед работой. -
Page 34: Технические Характеристики
1 штыревой соединитель очистки CMOS 1 контакт последовательного порта Форм-фактор uATX Form Factor, 226 mm x 171 mm Windows 7/ 10(64bit) Поддержка ОС Biostar reserves the right to add or remove support for any OS with or without notice. 4 | Глава 1: Введение... - Page 35 H310MHP 1�4 Разъемы задней панели » » Порты HDMI/ VGA работают только со встроенным графическим процессором Intel®. » » Максимальное разрешение HDMI: 4096 x 2160 @24Hz, совместимо с HDMI 1.4 VGA: 1920 x 1200 @60Hz » » При использовании переднего аудиоразъема HD и подключении гарнитуры задний звук будет автоматически отключен. » » Материнская плата поддерживает два встроенных вывода на дисплей одновременно, а конфигурацию вывода на дисплей можно выбрать в утилите графического драйвера Intel. » » Для настройки 7.1-канального звука необходимо использовать шасси с аудиомодулем HD на передней панели и включить функцию многоканального звука через O.S. Аудио утилита. 2/4 / 5�1 / 7�1-канальная конфигурация Аудио порт 2-канал 4-канал 5�1 канал 7�1 канал Синий...
- Page 36 1�5 Компоновка материнской платы » » представляет собой 1-й контакт. 6 | Глава 1: Введение...
-
Page 37: Глава 2: Установка Оборудования
H310MHP Глава 2: Установка оборудования 2�1 Установка центрального процессора (ЦП) Шаг 1: Найдите сокет ЦП на материнской плате. » » Снимите штырьковый цоколь перед установкой и сохраните его для будущего использования. После снятия ЦП накройте штырьковый цоколь на пустом сокете, чтобы не повредить ножки штырьков. » » Материнская плата может быть оснащена штырьковым цоколем двух разных типов. См. следующие указания, чтобы снять штырьковый цоколь. Шаг 2: Потяните из сокета фиксирующий рычаг, а затем поднимите рычаг. Шаг 3: Снимите штырьковый цоколь. - Page 38 Шаг 4: Удерживая процессор большим и указательным пальцами, сориентируйте его, как показано на рисунке. Совместите выемки с сокетом. Опустите процессор прямо вниз, не наклоняя и не сдвигая процессор в сокете. Шаг 5: Крепко удерживая ЦП, опустите рычаг в положение фиксации, чтобы завершить установку.
-
Page 39: Установка Радиатора
H310MHP 2�2 Установка радиатора Шаг 1: Установите вентилятор ЦП в сборе поверх установленного ЦП и убедитесь, что четыре крепежных элемента совпадают с отверстиями на материнской плате. Сориентируйте вентилятор в сборе и поместите кабель вентилятора максимально близко к разъему вентилятора ЦП. - Page 40 2�3 Подключение охлаждающих вентиляторов Следующие штыревые соединители предназначены для охлаждающих вентиляторов, встроенных в компьютер. Кабель и разъем вентилятора могут отличаться в зависимости от производителя вентилятора. CPU_FAN1: Штыревой соединитель вентилятора ЦП Pin Assignment Ground +12V FAN RPM rate sense AI Fan Control(By Fan) SYS_FAN1: Штыревой...
- Page 41 H310MHP Шаг 1: Разблокируйте слот DIMM, нажав на фиксирующие зажимы наружу. Выровняйте модуль DIMM в слоте таким образом, чтобы выемка на модуле DIMM совпадала с разрывом в слоте. Шаг 2: Вставьте DIMM вертикально плотно в слот так, чтобы фиксирующие зажимы...
-
Page 42: Слоты Расширения
2�5 Слоты расширения PEX16_1: слот PCI-Express Gen3 x16 • Совместимость с PCI-Express 3.0. • Теоретическая максимальная пропускная способность при одновременном использованиидвух слотов составляет 16 ГБ/с для каждого слота, всего 32 ГБ/с. PEX1_1/ PEX1_2: слот PCI-Express Gen2 x1 • Совместимость с PCI-Express 2.0. • ... - Page 43 H310MHP 2�6 Настройка переключателя На рисунке показано, как установить перемычки. Когда колпачковая перемычка помещена на контакты, она «замкнута», в противном случае перемычка «разомкнута». Контакт разомкнут Контакт замкнут Контакт 1-2 замкнут JCMOS1: Перемычка очистки CMOS Перемычка позволяет пользователям восстанавливать безопасные настройки BIOS и...
- Page 44 2�7 Штыревые соединители и разъемы ATX: разъем источника питания ATX Для лучшей совместимости рекомендуется использовать для этого разъема стандартный 24-контактный источник питания ATX. Перед подключением разъема убедитесь в правильной ориентации. Pin Assignment Pin Assignment +3.3V +3.3V -12V +3.3V Ground Ground PS_ON Ground Ground...
- Page 45 H310MHP PANEL1: штыревой соединитель передней панели Этот 10-контактный штыревой соединитель включает в себя соединения включения питания, сброса, светодиода жесткого диска. Pin Assignment Function Pin Assignment Function 10 N/A Speaker Connector 11 N/A Speaker 12 Power LED (+) Power HDD LED (+) Hard drive...
- Page 46 F_USB1: штыревой соединитель для портов USB 2�0 на передней панели Этот штыревой соединитель позволяет пользователю добавлять дополнительные порты USB на переднюю панель ПК, а также может быть подключен к самым разным внешним периферийным устройствам. Pin Assignment +5V (fused) +5V (fused) USB- USB- USB+...
- Page 47 H310MHP COM1: разъем последовательного порта На материнской плате имеется штыревой соединитель последовательного порта для подключения порта RS-232. Pin Assignment Carrier detect Received data Transmitted data Data terminal ready Signal ground Data set ready Request to send Clear to send Ring indicator...
-
Page 48: Глава 3: Uefi Bios И Программное Обеспечение
BIOS 3�2 Обновление BIOS BIOS можно обновить с помощью одной из следующих утилит: • BIOSTAR BIO-Flasher: С помощью этой утилиты можно обновить BIOS из файла на жестком диске, USB-накопителе (флэш-накопителе или жестком USB-диске) или компакт-диске. • Утилита BIOSTAR BIOS Update: Она обеспечивает автоматическое обновление... - Page 49 H310MHP 6. Выберите соответствующий файл BIOS, и появится сообщение с вопросом, действительно ли вы хотите перепрограммировать файл BIOS. Нажмите «Да», чтобы начать обновление BIOS. 7. После завершения перепрограммирования BIOS появляется диалоговое окно с просьбой перезапустить систему. Нажмите кнопку <Y>, чтобы перезапустить систему.
- Page 50 изменения) и <Reset> (Сбросить), чтобы перезапуститькомпьютер. На этом обновление BIOS завершено. Утилита BIOS Update (через файл BIOS) 1. Установите утилиту BIOS Update с DVD-диска. 2. Загрузите правильную BIOS c веб-сайта http://www.biostar.com.tw/ 3. Запустите утилиту BIOS Update и нажмитекнопку «Update BIOS» (Обновить BIOS) на главном экране.
- Page 51 H310MHP 4. Появится предупреждающее сообщение с запросом вашего согласия на запуск BIOS Update. Нажмите «OK», чтобы начать процедуру обновления. 5. Выберите местоположение вашего файла BIOS в системе. Выберите нужный файл BIOS и нажмите «Open» (Открыть). Это займет несколько минут, проявите терпение.
-
Page 52: Программное Обеспечение
3�3 Программное обеспечение Установка программного обеспечения Вставьте установочный DVD-диск в оптический привод. Появится программа установки драйвера, если включена функция автозапуска. Выберите установку программного обеспечения, а затем щелкните название соответствующего программного обеспечения. Следуйте инструкциям на экране, чтобы завершить установку. Запуск программного обеспечения После... -
Page 53: Глава 4: Полезная Помощь
H310MHP Глава 4: Полезная помощь 4�1 Установка драйвера После установки операционной системы вставьте полный установочный DVD-диск в оптический привод и установите драйвер для повышения производительности системы. После того, как вы вставите DVD-диск, появится следующее окно. Руководство по установке автоматически определит вашу материнскую плату и... -
Page 54: Звуковой Код Bios Ami
4�2 Звуковой код BIOS AMI Звуковые коды загрузочного блока Количество Описание Ошибка определения размера памяти или модуль памяти не Непрерывно найден Звуковые POST-коды BIOS Количество Описание Успешная загрузка. Ошибка памяти дисплея (системный видеоадаптер) 4�3 POST-код BIOS AMI Код Описание Запущено PEI Core Запущена... - Page 55 H310MHP Код Описание Запущена инициализация DXE северного моста Запущена инициализация DXE SMM северного моста Инициализация устройств южного моста Запущена инициализация DXE SMM южного моста Инициализация устройств южного моста Инициализация DXE южного моста (зависит от модуля южного моста) Инициализация модуля ACPI Запущен...
- Page 56 4�4 Поиск и устранение неисправностей Неисправность Решение 1. В системе отсутствует питание. Светодиод 1. Убедитесь, что кабель питания надежно питанияне светится; вентилятор блока питания не подключен. работает 2. Замените кабель. 2. Индикатор на клавиатуре не светится. 3. Обратитесь в службу технической поддержки. Система...
Need help?
Do you have a question about the H310MHP and is the answer not in the manual?
Questions and answers