Advertisement
Quick Links
Please Contact Moen First
For Installation Help, Missing or
Replacement Parts
(USA)
1-800-BUY-MOEN (1-800-289-6636)
Mon - Fri 8:00 AM to 7:00 PM, Eastern
Sat. 9:00 AM to 3:00 PM Eastern
WWW.MOEN.COM
(Canada)
1-800-465-6130
Mon - Fri 7:30 AM to 7:00 PM, Eastern
WWW.MOEN.CA
Por favor, contáctese primero con Moen
Para obtener ayuda de instalación, piezas
faltantes o de recambio
01-800-718-4345
Lunes a viernes de 8:00 a 20:00 hs.
(Costa Este)
Sáb. 8:00 a 18:30 hs. (Costa Este)
WWW.MOEN.COM.MX
Veuillez d'abord contacter Moen
en cas de problèmes avec l'installation, ou pour
obtenir toute pièce manquante ou de rechange
1-800-465-6130
Du lundi au vendredi :
de 7 h 30 à 19 h, HE
WWW.MOEN.CA
HELPFUL TOOLS
For safety and ease of faucet replacement, Moen recommends the use of these helpful tools.
HERRAMIENTAS ÚTILES
Para que el cambio de la llave sea fácil y seguro, Moen le recomienda usar estas útiles herramientas.
OUTILS UTILES
Par mesure de sécurité et pour faciliter l'installation, Moen suggère l'utilisation des outils suivants.
1/4" Hex
Llave hexagonal de 1/4"
Clé hex. de 1/4 po
Installation Guide
Guía de Instalación
Guide d'installation
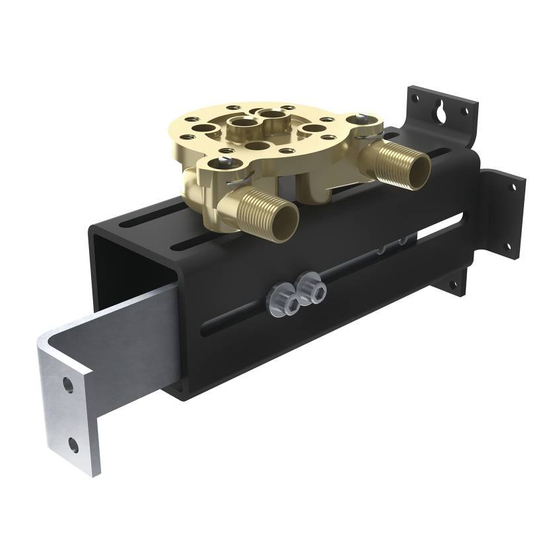
SINGLE RISER TUB FILLER ROUGH IN VALVE
Model TS50100
VÁLVULA EMPOTRADA PARA LLENADOR DE
TINA DE SUBIDA SIMPLE
Modelo TS50100
SOUPAPE DE PLOMBERIE BRUTE DE
REMPLISSEUR DE BAIGNOIRE À UNE COLONNE
Modèle TS50100
5" Hole Saw
Sierra perforadora de 5"
Scie à trous de 5 po
INS10276 - 10/14
INS10276 - 10/14
5/16" Socket Driver Bit
Broca para llave de tubo de 5/16"
Mèche de tournevis à douille de 5/16 po
Advertisement

Subscribe to Our Youtube Channel
Related Manuals for Moen TS50100


Summary of Contents for Moen TS50100
- Page 1 For safety and ease of faucet replacement, Moen recommends the use of these helpful tools. HERRAMIENTAS ÚTILES Para que el cambio de la llave sea fácil y seguro, Moen le recomienda usar estas útiles herramientas. OUTILS UTILES Par mesure de sécurité et pour faciliter l’installation, Moen suggère l’utilisation des outils suivants.
-
Page 2: Parts List
(Pre-installed) (Pre-instalado) (Préinstallée) Note: Installation can be done either from above (A) or below (B) the floor. Nota: La instalación puede llevarse a cabo por arriba (A) o por debajo (B) del piso. Remarque : L’installation peut être effectuée à partir du dessus (A) ou du dessous (B) du plancher. Parts List Liste des pièces Lista de piezas... - Page 3 INS10276 - 10/14 Standard Joists/Vigas estándar /Poutrelles standards Less than or equal to 20" Menor o igual a 20" Inférieures ou égales à 20 po I-Joists less than 20"/Vigas en I de menos de 20"/Poutrelles en I inférieures à 20 po Less than or equal to 20"...
- Page 4 Installation from above oor TUB HEIGHT CHART Instalación por arriba del piso CARTILLA DE ALTURA DE LA TINA Installation à partir du dessus du plancher TABLEAU DES HAUTEURS DE BAIGNOIRE Min. 1-1/4" (31.75mm) Max. 4-1/4" (107.95mm) Mín. 1-1/4" (31.75mm) Máx. 4-1/4" (107.95mm) Tub Height ("Y") Screw location ("X") down from top of joist 1 1/4 po (31,75mm) min.
- Page 5 INS10276 - 10/14 Installation from above oor Installation from above oor Instalación por arriba del piso Instalación por arriba del piso Installation à partir du dessus du plancher Installation à partir du dessus du plancher Using a level, ensure bracket assembly is level. Once leveled, secure Manifold Mounting Bracket (C) with Hang Manifold Mounting Bracket (C) onto Mounting Bracket Screw (D).
- Page 6 Installation from above oor Installation from above oor Instalación por arriba del piso Instalación por arriba del piso Installation à partir du dessus du plancher Installation à partir du dessus du plancher Tighten Bolts (E) on Manifold Mounting Bracket (C) with hex wrench. Apriete los pernos (E) en la ménsula de montaje del distribuidor (C) con la llave hexagonal.
- Page 7 INS10276 - 10/14 Installation from above oor Installation from above oor Instalación por arriba del piso Instalación por arriba del piso Installation à partir du dessus du plancher Installation à partir du dessus du plancher Loosen, but do not remove Manifold Mounting Plate Screws (G), and slide Mounting Plate (G) to desired 1) Attach Manifold Assembly (B) to Manifold Mounting Bracket (C).
- Page 8 Installation from below oor TUB HEIGHT CHART Instalación por debajo del piso CARTILLA DE ALTURA DE LA TINA Installation à partir du dessous du plancher TABLEAU DES HAUTEURS DE BAIGNOIRE Tub Height ("Y") Screw location ("X") down from top of joist 5"...
- Page 9 INS10276 - 10/14 Installation from below oor Installation from below oor Instalación por debajo del piso Instalación por debajo del piso Installation à partir du dessous du plancher Installation à partir du dessous du plancher 1) Attach Manifold Assembly (B) to Manifold Mounting Bracket (C). Hang Manifold Mounting Bracket (C) onto Mounting Bracket Screw (D).
- Page 10 Installation from below oor Installation from below oor Instalación por debajo del piso Instalación por debajo del piso Installation à partir du dessous du plancher Installation à partir du dessous du plancher Tighten Bolts (E) on Manifold Mounting Bracket (C) with hex wrench. Apriete los pernos (E) en la ménsula de montaje del distribuidor (C) con la llave hexagonal.
- Page 11 INS10276 - 10/14 Installation from below oor Installation from below oor Instalación por debajo del piso Instalación por debajo del piso Installation à partir du dessous du plancher Installation à partir du dessous du plancher Bañera Bañera Baignoire Baignoire Bañera Bañera Baignoire Baignoire...
- Page 12 Defects or damage caused by causés par l’utilisation de pièces non fournies par reclamación deberá ir acompañada por el the use of other than genuine Moen parts is not Moen ne sont pas couverts par cette garantie. comprobante de compra (nota de venta original).
Need help?
Do you have a question about the TS50100 and is the answer not in the manual?
Questions and answers