Table of Contents
Advertisement
Available languages
Available languages
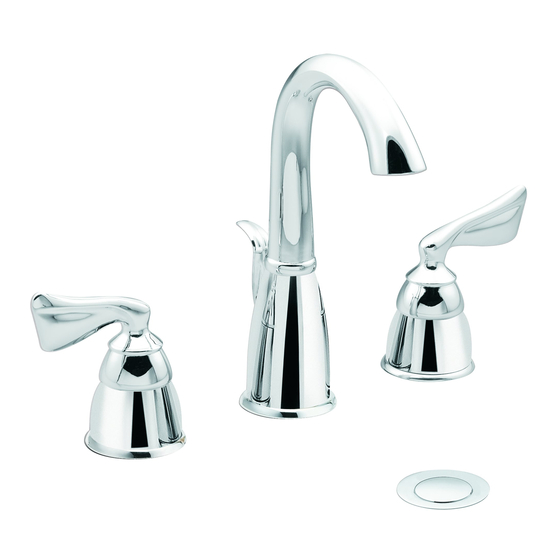
TWO-HANDLE WIDESPREAD LAVATORY
FAUCET TRIM KIT
MODELS T6515, T6515CP, T6515CPM, T6515STV, T6515CGPC,
T6515CGSA, 84824, 84824CP, 84824CPM, 84824NLBL
ROBINET DE LAVABO À DEUX POIGNÉES
ÉLOIGNÉES - TROUSSE DE GARNITURE
MODÉLES T6515, T6515CP, T6515CPM, T6515STV, T6515CGPC,
T6515CGSA, 84824, 84824CP, 84824CPM, 84824NLBL
MEZCLADORA PARA TINA LAVABO
DE DOS MANIJAS
MODELOS T6515, T6515CP, T6515CPM, T6515STV, T6515CGPC,
T6515CGSA, 84824, 84824CP, 84824CPM, 84824NLBL
HELPFUL TOOLS
SAFETY GLASSES
GAFAS DE SEGURIDAD
LUNETTES DE S CURIT
FLASHLIGHT
PHILLIPS SCREWDRIVER
LINTERNA
DESTORNILLADOR DE ESTRELLA
LAMPE DE POCHE
TOURNEVIS ¸ POINTE CRUCIFORME
ENGLISH
KEEP INSTRUCTIONS FOR
FUTURE REFERENCE
Thank you for purchasing a quality MOEN faucet.
With simple care and maintenance, it will provide
you with many years of reliable performance.
Please read all instructions before installation.
TIPS FOR REMOVAL OF OLD FAUCET:
CAUTION: Always turn water OFF before
!
removing existing faucet or disassembling
the valve. Open faucet handle to relieve
water pressure and ensure that complete
water shut-off has been accomplished.
Complies with ASME A112.18.1M and CSA B125
Complies with ASME A112.18.1M and CSA B125
INS265A March 2001
HERRAMIENTAS UTILES
FLATBLADED SCREWDRIVER
PLUMBER'S PUTTY
DESTORNILLADOR DE PALA
MASILLA DE PLOMERO
TOURNEVIS ¸ T TE PLATE
MASTIC DE PLOMBIER
PLIERS
PINZAS
PINCES
ESPAÑOL
GUARDE ESTAS INSTRUCCIONES PARA
REFERENCIA FUTURA
Gracias por haber comprado una mezcladora de
alta calidad de MOEN.
mantenimiento sencillos, le brindará muchos años
de servicio fiable.
instrucciones antes de instalar.
SUGERENCIAS PARA QUITAR LA VIEJA
MEZCLADORA:
ADVERTENCIA: Siempre cierre el agua
!
antes de remover la mezcladora existente o
desarmar la válvula. Abra las manijas de la
mezcladora para aflojar la presión del agua
y para asegurar que el cierre completo del
agua ha sido logrado.
En cumplimiento de ASME A112.18.1M y CSA B125
OUTILS UTILES
For Safety and ease of faucet
replacement, Moen recommends the
use of these helpful tools.
Para la seguridad y facilidad de
repuesto de la mezcladora, Moen
recomienda las siguientes herramientas.
Par mesure de sécurité et pour faciliter
PLIERS
l'installation, Moen suggère l'utilisation
PINZAS
des outils suivants
PINCES
Merci d'avoir acheté un robinet de qualité MOEN.
Con un cuidado y
Avec un peu de soin et d'entretien, ce robinet vous
donnera plusieurs années de rendement fiable.
Por favor lea todas las
Lire attentivement toutes les directives avant de
débuter l'installation.
SUGGESTIONS POUR ENLEVER L'ANCIEN
ROBINET :
Conformément à ASME A112.18.1M et CSA B125
FRANÇAIS
CONSERVER CES DIRECTIVES POUR
RÉFÉRENCE ULTÉRIEURE
ATTENTION : Toujours couper l'alimentation
!
en eau avant d'enlever ou de démonter le
robinet. Ouvrir la poignée du robinet pour
libérer la pression d'eau et pour s'assurer
que l'alimentation en eau a bien été coupée.
© Moen Incorporated, 2001
INS265B
Printed in U.S.A.
Advertisement
Table of Contents

Subscribe to Our Youtube Channel
Related Manuals for Moen T6515


Summary of Contents for Moen T6515
- Page 1 CONSERVER CES DIRECTIVES POUR FUTURE REFERENCE REFERENCIA FUTURA RÉFÉRENCE ULTÉRIEURE Thank you for purchasing a quality MOEN faucet. Gracias por haber comprado una mezcladora de Merci d’avoir acheté un robinet de qualité MOEN. With simple care and maintenance, it will provide alta calidad de MOEN.
-
Page 2: Parts Diagram
PARTS DIAGRAM DIÁGRAMA DE PIEZAS TABLEAU DES PIÈCES ESPAÑOL Ç Poignée a j i Jupe de poignée Faldón de manija t r i Rondelle ondulée t f i & a l l e l e i r e a l l o l l s i s s â... -
Page 3: Installation Instructions
INSTALLATION INSTRUCTIONS fully seated 1. Apply a 1/4” bead of plumber’s putty (not supplied) under bottom of 4. Tighten the spout assembly (D) to the spout skirt (13) by rotating the escutcheons (8). Center escutcheons over valve bodies. Rotate stem spout nut (11) until the spout is securely fastened to the skirt. -
Page 4: Flushing Instructions
Explain the defect and include proof of purchase and your name, address, area code and telephone number. INS265B Moen Incorporated • 25300 Al Moen Drive • North Olmsted, OH 44070-8022 U.S.A. In Canada Moen Inc. • 2816 Bristol Circle • Oakville, Ontario L6H5s7... -
Page 5: Instrucciones Para La Instalacion
INSTRUCCIONES PARA LA INSTALACION fully seated 1. Aplicar un cordón de 1/4" de masilla de plomero (no se incluye) debajo de la 3. Aplicar un cordón de 1/4" de masilla de plomero (no se incluye) debajo de parte inferior de los chapetones (8). Centrar los chapetones sobre los cuerpos la parte inferior de los chapetones (8). -
Page 6: Instrucciones De Limpieza
Los productos Moen han sido elaborados bajo los más estrictos standard de calidad y mano de obra. Moen garantiza al consumidor - comprador original por todo el tiempo que el pequeñas contidades de plomo al agua que está en contacto con el latón. La consumidor - comprador original esté... -
Page 7: Directives D'installation
DIRECTIVES D’INSTALLATION fully seated 1. Placer une bille de mastic de plombier (non fourni) de 1/4 po sous les 3. Placer une bille de mastic de plombier (non fourni) de 1/4 po sous la rosaces (8). Centrer les rosaces sur les corps de soupape. Faire pivoter les rosace (8). - Page 8 GARANTIE À VIE LIMITÉE DE MOEN INFORMATION POUR LE CONSOMMATEUR Les produits Moen sont fabriqués selon les normes les plus élevées de qualité et de main- Les robinets fabriqués à partir d’alliages de laiton et de plomb pourraient ajouter d’œuvre. Moen garantit à l'acheteur original, tant qu'il sera propriétaire de la maison (la de petites quantités de plomb à...
Need help?
Do you have a question about the T6515 and is the answer not in the manual?
Questions and answers
How do I attach the extension to the cartridge so that it falls into the grooves to open and close the cartridge?
To attach the extension to the cartridge for Moen T6515, rotate the stem to the off position—clockwise for hot (red) and counterclockwise for cold (blue). Then position the handle on the valve pointing 90° away from the spout.
This answer is automatically generated