Advertisement
OPERATION, INSPECTION and MAINTENANCE INSTRUCTIONS
© Panduit Corp. 2014
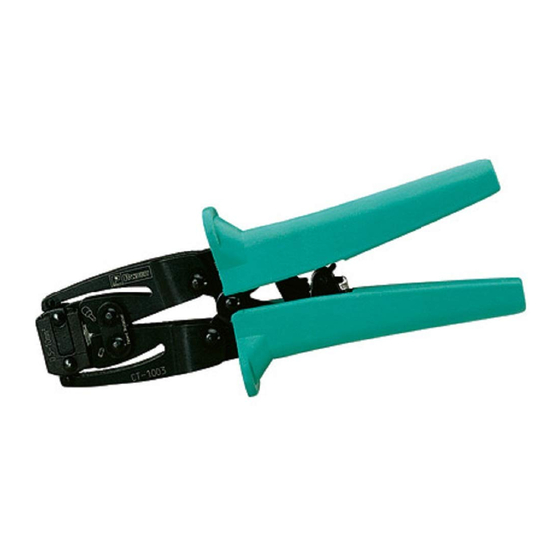
Fig. 1
Verify power is "OFF" before working
while working on live electrical circuits.
Fig. 3
E-mail:
techsupport@panduit.com
CT-1002, CT-1003, CT-1004,
CT-1005 and CT-1006
CONTROLLED CYCLE FERRULE CRIMPING TOOLS
CRIMP POCKET for Insulated
and Non-Insulated Ferrules. Part
usage dependent on wire range.
Refer to product packaging for
proper wire combination.
Controlled cycle mechanism
prevents tool from opening
before crimp cycle is complete.
Manual release lever, push
forward in the event that
controlled cycle mechanism
must be released.
Cushioned handle grips
CAUTION:
on wiring with these tools.
The plastic grips are for the user's
comfort, and are not intended
to insulate against electrical shock
Die Closure Alignment
(not a crimp pocket)
CRIMP POCKETS for Ferrule
terminals. Refer to product
packaging for wire range and
proper crimp pocket. Crimp
pockets are identified with
applicable wire range.
Controlled cycle mechanism pre-
vents tool from opening before
crimp cycle is completed.
Manual release lever, push
forward in the event that
controlled cycle mechanism
must be released.
Cushioned handle grips
CT-1002, CT-1003 and CT-1004 TOOLS
1. With the handles in
the open position,
insert the ferrule
into the opening at
the top of the tool.
Make sure that the
ferrule insulation or
flared end is up
(see Figure 2). Do
not allow insulation
to be inserted into
crimp die. Close
handles until dies
just slightly crimp
ferrule.
2. Insert the stripped wire into the ferrule until the wire
stops. Refer to product packaging for wire strip length.
3. Crimp the ferrule by closing the handles until the
controlled cycle mechanism releases. Upon release,
the handles will open automatically and the crimped
ferrule can be removed.
CT-1005 and CT-1006 TOOLS
1. With the handles in
the open position,
insert the ferrule
into
the
pocket. Make sure
that the ferrule is
inserted fully into
the crimp die (see
Figure 4).
2. Insert the stripped
wire into the ferrule
until the wire stops.
Refer to product
packaging for wire
strip length.
3. Crimp the ferrule by closing the handles until the
controlled cycle mechanism releases. Upon release,
the handles will open automatically and the crimped
ferrule can be removed.
NOTE: Crimp entire uninsulated ferrule length. This may
require additional crimps.
www.panduit.com
Page: 1 of 2
Fig. 2
Ferrule
Insulation
section
Fig. 4
Crimp Die
Stripped
crimp
Wire
Ferrule Insulated
section
Ferrule - Wire
crimp section
For Technical Support:
1-888-506-5400, ext. 83255
PA24073A01
REV: 03 10-2014
Stripped
Wire
Ferrule -
Metal crimp
section
Advertisement
Table of Contents

Related Manuals for Panduit CT-1003


Summary of Contents for Panduit CT-1003
- Page 1 REV: 03 10-2014 CT-1005 and CT-1006 CONTROLLED CYCLE FERRULE CRIMPING TOOLS OPERATION, INSPECTION and MAINTENANCE INSTRUCTIONS © Panduit Corp. 2014 CT-1002, CT-1003 and CT-1004 TOOLS CRIMP POCKET for Insulated Fig. 1 and Non-Insulated Ferrules. Part 1. With the handles in Fig.
- Page 2 CT-1002, CT-1003, CT-1004, CT-1005 and CT-1006 © Panduit Corp. 2014 OPERATION, INSPECTION and MAINTENANCE INSTRUCTIONS INSPECTION / MAINTENANCE NEW TOOLS - BEFORE PLACING INTO SERVICE: All anduit crimping tools are inspected before they are shipped from the factory. All new tools should be inspected before being used.
Need help?
Do you have a question about the CT-1003 and is the answer not in the manual?
Questions and answers