roco WLANmaus Z21 User Manual
Hide thumbs
Also See for WLANmaus Z21:
- Manual (104 pages) ,
- User manual (88 pages) ,
- Quick assembly instructions (2 pages)

Related Manuals for roco WLANmaus Z21


Summary of Contents for roco WLANmaus Z21
- Page 1 WLAN-MULTIMAUS ® ▶ Benutzerhandbuch ▶ User Manual ▶ Manuel d'utilisation 8010813920.indd 1 13.07.2017 10:27:31...
-
Page 2: Wlanmaus Kurzübersicht
Kurzübersicht / Overview / en un clin d'oeil WLANmaus Kurzübersicht / Overview / en un clin d'oeil 2. Sprache AAA (Micro) Language Langue 4. Text Fahren | Driving | Circulation Nothalt Licht Lokauswahl Emerg. Stop Light Loco selection Arrêt d'urgence Luce Sélection de locomtives Funktionen | Functions | Fonctions... - Page 3 Kurzübersicht / Overview / en un clin d'oeil LC-Display Stop-Taste LC display Stop Key Écran touche »Stop« Pfeiltaste (links) Pfeiltaste (rechts) Arrow Key (left) Arrow key (right) touche »flèche« touche »flèche« (à droite) (à gauche) Fahrregler control knob Licht / OK-Taste bouton régulateur Light / OK Key touche »feux / OK«...
-
Page 4: Table Of Contents
Inhaltsverzeichnis Inhaltsverzeichnis WLANmaus Kurzübersicht ........................2 Die Evolution der ROCO Lokmaus — die WLANmaus ................. 5 Die WLANmaus im Überblick ........................5 Teil 1 ▪ Grundlagen – Lernen Sie die WLANmaus kennen 1.1 Verbinden der WLANmaus ....................... 6 1.2 Erklärungen zur Zeicheneingabe bei der SSID- und Passworteingabe ..........7 1.3 WLANmaus: Das Display ........................ -
Page 5: Die Evolution Der Roco Lokmaus - Die Wlanmaus
Einstellung von Geschwindigkeit und Fahrtrichtung der Lokomotive über den Drehregler ▪ Rastung der 0-Stellung des Drehreglers ▪ perfekte Ergänzung zu Ihrer Z21 ▪ das ROCO Digital-System ist ausbaubar auf bis zu 31 Eingabe-Geräte wie weitere Lokmäuse / multiMÄUSE / WLANmäuse, RouteControl usw. ▪ Zukunftssicher durch updatemöglichkeiten Die Möglichkeiten ▪... -
Page 6: Verbinden Der Wlanmaus
Auf keinen Fall dürfen Sie parallel zur Digitalsteuerung einen normalen Trafo an den gleichen Stromkreis anschließen. Dadurch kann die Z21 zerstört werden! Die bisherigen ROCO-Verstärker 10761 und 10764 können nicht in Kombination mit der WLANmaus und der Z21 verwendet werden. -
Page 7: Erklärungen Zur Zeicheneingabe Bei Der Ssid- Und Passworteingabe
Grundlagen Grundlagen Taste ab. Die manuelle Netzwerkeingabe finden Sie im Kapitel 3.6.1, Seite 31 Wählen Sie mit den Pfeiltasten Ihr gewünschtes WLAN-Netz aus und bestätigen Sie mit der OK- Taste. Weiter mit OK-Taste. Display-Anzeige „PWD?“ Geben Sie das WLAN-Passwort ein Weiter mit OK-Taste. -
Page 8: Wlanmaus: Das Display
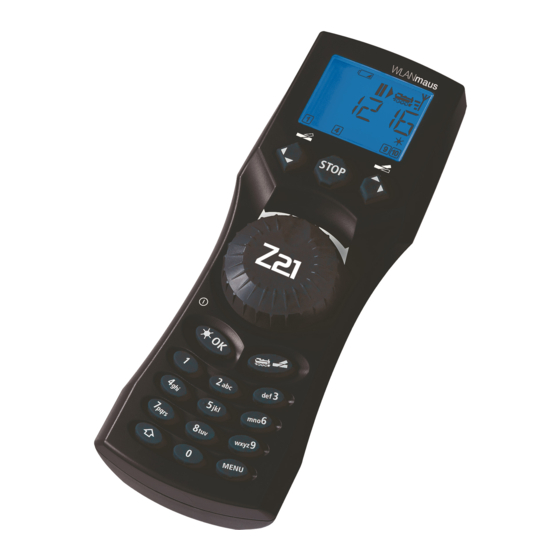
Grundlagen Grundlagen 1.3 WLANmaus: Das Display Alle Funktionen der WLANmaus können Sie über das große hintergrundbeleuchtete LC-Display kontrollieren. Wir stellen Ihnen die Symbole vor. Fahrsymbole Schraubenschlüssel Weichensymbol ▪ ▪ Pfeile zeigen Fahrtrichtung der Menüebene: Einstellungen- (Lok/Weichen-Taste) gewählten Lok an Menü ▪... -
Page 9: Wlanmaus: Die Tasten
Grundlagen Grundlagen 1.4 Die Tasten Zu dem übersichtlichen Konzept der WLANmaus gehört die Reduzierung der Tasten auf eine sinnvolle Anzahl. Alle für den Spielbetrieb notwendigen Funktionen sind überwiegend direkt über die jeweiligen Tasten abrufbar, die wir Ihnen hier vorstellen wollen. Beachten Sie dazu auch Fig. 1 auf Seite 5. Hinweise: ▪... - Page 10 Grundlagen Tasten und Bezeichnung Funktion ▪ umschalten zwischen Lok- und Weichen-Mous Lok / Weichen in Kombination mit ▪ wechseln zwischen Bibliotheks- und Lokadress-Modus Shift im Fahrbetrieb: … ▪ schaltet die Lokfunktionen F1–F10 direkt ein- oder aus. Die Lokfunktionen F11–F20 werden über die Tasten 1–10 in Verbindung mit der -Taste Funktionstasten geschaltet.
-
Page 11: Teil 2 ▪ Betrieb -Fahren Und Schalten
Trotz ihrer vielen Möglichkeiten ist die WLANmaus leicht und intuitiv bedienbar. Ein Konzept, das von ROCO schon mit den Lokmäusen der ersten, zweiten und dritten Generation erfolgreich eingeführt und mit der WLANmaus fortgesetzt wurde. Im Folgenden zeigen wir Ihnen an Hand praktischer Beispiele die Bedienung der WLANmaus. -
Page 12: Neueintragung Einer Lok
Betrieb — Fahren und Schalten Aufrufen von anderen, bereits in die Bibliothek aufgenommenen Loks („Blättern“) Die Sortierung der Loks in der Bibliothek erfolgt in der Reihenfolge der Eingabe. Sie können diese Reihe- folge selbstverständlich ändern: Lok auswählen oder Diese Tastenkombinationen (gleichzeitig drücken) verschieben die Lok in der Bibliothek nach oben oder unten. - Page 13 Betrieb — Fahren und Schalten Display Eingabe Bemerkung Bestätigen Sie mit OK-Taste. Danach wechselt die WLANmaus auf die Lok adresse. Angezeigt wird ein Vorschlags- wert, hier „3“. oder Verändern Sie den Vorschlagswert entweder mit Hilfe der -Taste und einer Pfeiltaste …...
-
Page 14: Der Lokadress-Modus
Betrieb — Fahren und Schalten 2.2.3 Der Lokadress-Modus Die WLANmaus bietet Ihnen auch die Möglichkeit, Ihre Loks einfach nur über die Decoder-Adresse zu steuern. Das Display zeigt Ihnen dabei die Lokadresse mit voran gestelltem „L“ – hier die Lokadresse 36, das Lok- symbol sowie die ausgewählten Funktionen. -
Page 15: Die Nothalt-Funktionen
Betrieb — Fahren und Schalten Welche Funktionen für Ihre Lok verfügbar sind, entnehmen Sie bitte deren Betriebsanleitung. ▪ OK-Taste ein- oder aus. Zur Bestätigung für eingeschaltetes Das Loklicht schalten Sie mit der Loklicht leuchtet der Stern „ “ rechts unten im Display. 2.4 Die Nothalt-Funktionen Wenn es mal brenzlig wird: Mit der STOP-Taste können Sie jederzeit und sofort größeres unheil verhindern. -
Page 16: Selektiver Nothalt
Betrieb — Fahren und Schalten 2.4.2 Selektiver Lokhalt Der Selektive Lokhalt stoppt nur die gerade von der WLANmaus gesteuerte Lok. Eingabe Display Bemerkung Drücken Sie die -Taste und STOP-Taste gleich- zeitig. Die Lok stoppt sofort, im Display wird das Stillstands-Symbol „II“ (und die letzte Fahrtrichtung) angezeigt. - Page 17 Betrieb — Fahren und Schalten Die Weiche wird in dem Moment umgeschaltet, in dem Sie eine der Pfeiltasten drücken. Die Einstel- lung der Weiche wird damit ebenfalls gespeichert. Zur Bestätigung werden die ersten freien Ziffern nach dem „W“ als „0“ gesetzt (natürlich nur bei 1-, 2- oder 3-stelligen Weichenadressen). Die Anzeige der Weichenstellung im Display bedeutet keinesfalls eine Rückmeldung des Weichen- antriebes.
- Page 18 Betrieb — Fahren und Schalten Drei nützliche Hilfsmittel der WLANmaus für den Weichen-Modus Toggle-Betrieb Sie können im Weichen-Modus durch Drücken der OK-Taste zwischen der aktuellen und der zuletzt aufgerufenen Weiche wechseln. So haben Sie einen schnellen Zugriff auf zwei Weichen, die z. B. hin- tereinander in einer Fahrstraße liegen.
-
Page 19: Schnellprogrammierung Von Loks Und Decodern
Betrieb — Fahren und Schalten 2.6 Schnellprogrammierung von Loks und Decodern Die für den Fahrbetrieb wichtigsten Einstellungen – Konfigurationsvariablen, genannt CVs – eines Decoders können Sie über die Kombination MENu - + Funktionstaste vornehmen. CV Funktion Tasten Adresse Hinweis: Eine Veränderung des Wertes wirkt sich direkt auf den Deco- der, aber nicht auf die Lokbibliothek aus. -
Page 20: Kurzschluss Und Überlastung
Betrieb — Fahren und Schalten So wie in diesem Beispiel gezeigt, können Sie auch neue Werte für die CVs 2, 3, 4 und 5 programmie- ren. Sie müssen dazu immer nur die MENu-Taste gleichzeitig mit der der CV entsprechenden Ziffer der Funktionstasten drücken und verfahren dann so wie in obigem Beispiel. -
Page 21: Die Menü-Funktionen Der Wlanmaus
Die Menüs ▪ Teil 3 Die Menüs Die Menü-Funktionen der WLANmaus Die WLANmaus verfügt über drei Haupt-Menüs, mit denen Sie sowohl umfangreich programmieren, als auch die Grundeinstellungen der WLANmaus verändern können. Diese Menüebene erreichen Sie durch zwei Tastenkombinationen: ca. 5 Sekunden Drücken nur der MENu-Taste (Dauer ist einstellbar im Menü „EINSTELLuNGEN“), prak- ▪... - Page 22 Die Menüs Zum Verlassen der Menü-Ebene haben Sie zwei Möglichkeiten: ▪ Drücken der STOP-Taste. Dies ist eventuell mehrmals notwendig, je nachdem, in welchem unter-Menü Sie sich befinden. Jeder Druck auf STOP bringt Sie eine Ebene weiter zurück. ▪ -Taste) bringt Sie aus allen Ebenen sofort in den Lok- oder Drücken der MENu-Taste (mit oder ohne Weichen-Modus zurück.
-
Page 23: Die Menüstruktur In Der Übersicht
Die Menüs CV AENDERN Menü 1: Menü 2: PROGRAMMIEREN LANGE ADRESSE BEARBEITEN RICHTuNG VERTAuSCHEN 28 FAHRSTuFEN LOESCHEN ANALOG FAHREN NMRA-BIDI GESCHWINDIGKEITS- TABELLE LANGE ADRESSE CVBIT AENDERN SuCHEN SENDEN MODuS EMPFANGEN ADRESSE BIBLIOTHEK 8010813920.indd 23 13.07.2017 10:27:41... - Page 24 Die Menüs HELLIGKEIT KONTRAST DISPLAy Menü 3: LICHTZEIT EINSTELLUNGEN IMMER AN SPRACHE MENuETASTENZEIT BEDIENuNG MOMENTFuNKTIONEN KINDERSICHERuNG ABBRECHEN SySTEMEINSTELLuNGEN ZuRuECKSETZEN LOKBIBLIOTHEK ALLES KALIBRIEREN STOPTASTE MAuS-VERSION (SOFTWARE) WLAN-VERSION (FuNKMODuL) SPRACHEN-VERSION BATTERIESPANNuNG SSID PASSWORT Z21-IP-ADRESSE GERAETENAME IP-MODuS IP-ADRESSE SuBNETZMASKE STD-GATEWAy MAC-ADRESSE RSSI AuSSCHALTZEIT 8010813920.indd 24 13.07.2017 10:27:42...
-
Page 25: Das „Lok" Menü
Die Menüs 1. Das „LOK“-Menü Im „Lok“-Menü werden alle Daten verwaltet, die für die Lok-Bibliothek und die Identifizierung einer Lok erforderlich sind. Auch können Sie hier die WLANmaus grundsätzlich auf Bibliotheks- oder Adress- Bedienung einstellen. „NEU“ In diesem Menüpunkt können Sie eine neue Lok in die Bibliothek aufnehmen. Der Ablauf ist ausführ- lich ab Seite 12 beschrieben und dargestellt. - Page 26 Die Menüs „SUCHEN“ Dies könnte zu einer wichtigen Funktion Ihrer WLANmaus werden. Mit diesem Menüpunkt können Sie eine Lokadresse der jeweiligen Lok in der Bibliothek zuordnen. Geben Sie einfach eine Lokadresse über die Funktionstasten ein und die WLANmaus sucht Ihnen die dazu gehörende Lok aus der Bibliothek heraus.
-
Page 27: Das „Programmieren" Menü
CVs. Mit Hilfe des Menüs „PROGRAMMIEREN“ können Sie diese Werte Ihren Bedürfnissen anpassen. Beachten Sie dazu auch die Erläuterungen zum Thema „Bits und Bytes“ im „Glossar“. Von ROCO bereits in Lokomotiven eingebaute Decoder werden üblicherweise mit praxisgerechten Ein- stellungen ausgeliefert. Daher prüfen Sie vor jeder Programmierung, ob diese tatsächlich notwendig ist. - Page 28 Decoders sicher auskennen. Prüfen Sie bitte vor der Programmierung, ob der Decoder das bitweise Programmierverfahren überhaupt unterstützt. Über die Funktionsweise und Einstellmöglich- keiten der CV29 informiert Sie die dem Decoder beiliegende Anleitung. Zur leichteren Programmierung hat ROCO die einzelnen Einstellmöglichkeiten direkt mit den dazu gehörenden Bezeichnungen versehen. ▪...
-
Page 29: Das „Einstellungen" Menü
3.2.1 Über das untermenü „SPRACHE“ kann eine andere Landessprache eingestellt werden. Wählen Sie über die Pfeiltasten Ihre Sprachversion aus. Sollte Ihre Landessprache nicht dabei sein, schauen Sie auf der ROCO-Homepage „www.roco.cc“ nach einer updatemöglichkeit. ▪ Bestätigen Sie mit der OK-Taste. Sie kommen auf die Ausgangsebene „SPRACHE“ zurück. - Page 30 Die Menüs Den gewünschten Zustand „EIN“ oder „AuS“ wählen Sie über die Pfeiltasten aus. Werkseinstellung: AuS ▪ Bestätigen Sie mit der OK-Taste. Sie kommen auf die Ausgangsebene „MOMENTFuNKTI- ONEN“ zurück. 3.2.4 Die WLANmaus verfügt über eine mehrstufig einstellbare „KINDERSICHERUNG“, die Sie nach Aufrufen des Menüpunktes über die Pfeiltasten aktivieren können.
- Page 31 Die Menüs 3.4 „STOPTASTE“ Im Falle eines Falles wird durch einen Druck auf die STOP-Taste während des Fahrbetriebes ein sofor- tiger Nothalt ausgelöst. Hier stellen Sie ein, ob bei Betätigung der STOP-Taste die gesamte Anlage von der Spannungsversor- gung getrennt wird („SPANNuNG AuS“), oder ob lediglich die Lokomotiven sofort angehalten werden („NOT-STOP“).
- Page 32 Die Menüs 3.6.4 „GERAETENAME“ Hier können Sie Ihrer WLANmaus einen Netzwerknamen zuordnen. um Namensgleichheit im Netzwerk zu verhindern wird dieser automatisch um die letzten sechs Stellen der MAC- Adresse der WLANmaus ergänzt. Beispiel: „WLANmaus_A1B2C3“ (Hexadezimal). 3.6.5 „IP-MODuS“ Auswahlmöglichkeiten: „DyNAMISCH (voreingestellt) oder „STATISCH“. Auswahl: Über die Pfeiltasten, Bestätigung durch OK-Taste Abbruch durch STOP-Taste.
-
Page 33: Teil 4 ▪ Anhang
(jedes Bit aktiviert, d.h. „1“), wobei wir wieder im Dezimalsystem angelangt sind. Der minimale Wert ist „0“, alle Bits sind auf „0“ gesetzt. ROCO hat in der WLANmaus die Programmierung der einzelnen Bits deutlich vereinfacht. Wenn es der Decoder unterstützt, müssen Sie dazu nicht mehr bestimmte Werte ausrechnen, sondern entscheiden im Menü... -
Page 34: Tipps, Hinweise Und Kurzhilfe
Anhang aus „Nullen“ und „Einsen“ bestehen, sind sie abgestuft. Je kleiner die Stufen – Fahrstufen – sind, umso feiner lässt sich die Lok regeln. Die NMRA /DCC-Norm, nach der WLANmaus und der Z21 arbeiten, kennt 14, 27, 28 oder 128 Fahrstufen. Decoder etwa seit dem Jahr 2000 sind mindestens über 28 Fahrstufen steuerbar. - Page 35 Anhang POM-Modus: Programmierung wird bestä- ▪ Decoder benötigt einen Reset: Schalten Sie die tigt, der Decoder reagiert aber nicht auf Gleisspannung mit der STOP-Taste (Nothalt) ab und einen geänderten Wert. wieder ein. Beachten Sie dazu auch die Decoder- Anleitung. Ein „Zurücksetzen“ (Teil 3, Kapitel 3.3, Seite ▪...
-
Page 36: Programmierhilfe Lokmaus 2 /R3 - Wlanmaus
Anhang 4.3.1 Programmierhilfe Lokmaus 2 /R3 – WLANmaus In den bisher ausgelieferten Anleitungen zu ROCO-Digitalartikeln (wie z. B. dem Weichenantrieb 42624) wurde nur der Standardprogrammiermodus mit der Lokmaus 2 /R3 beschrieben. Im folgenden finden Sie eine Tabelle, die die Programmierprozedur der Lokmaus 2 /R3 mit der Schnellprogrammierung (siehe Kapi- tel 2.6 auf Seite 19) der WLANmaus gegenüberstellt. - Page 37 Table of Content Table of Content WLANmaus Overview ..........................2 The evolution of the ROCO Lokmaus — the WLANmaus ..............38 An overview of the WLANmaus ......................38 Section 1 ▪ Basics – Get to know the WLANmaus 1.1 Connecting the WLANmaus ......................39 1.2 How to enter the characters when entering the SSID and the password ........
-
Page 38: The Evolution Of The Roco Lokmaus - The Wlanmaus
Rotary knob with zero locking position ▪ perfect addition to your Z21 ▪ The ROCO digital system is expandable to include up to 31 input devices such as extra Lokmaus/ ▪ multiMAUS units orWLANmaus, route controller units, etc. Future–proof update options ▪... -
Page 39: Connecting The Wlanmaus
Doing so may destroy the Z21! Previous ROCO amplifiers model 10761 and 10764 cannot be used together with the WLANmaus and Z21. The WLANmaus is supplied with electricity by 3 AAA batteries (micro) each with 1.5 V or 3 rechargeable batteries of the same type (1.2 V each). -
Page 40: How To Enter The Characters When Entering The Ssid And The Password
Basic Display screen “PWD?“ continue with the OK-key. continue with the OK-key. Enter the WLAN password The WLANmaus restarts and connects itself to your WLAN router. Information: The WLAN information can be changed at all times (see Chapter 3.6, page 64) 1.2 Explanations concerning the entering of characters when entering the SSID and password: The characters are entered using the keyboard similar to when writing a text message on a mobile telephone. -
Page 41: Wlanmaus: The Display Screen
Basic 1.3 WLANmaus: The Display Screen All the functions of the WLANmaus can be checked on the large LCD with backlight. The symbols are as follows: Drive symbols Wrench Turnout symbol ▪ Arrows shows the direction of ▪ the WLANmaus is in the (locomotive /turnout key) ▪... -
Page 42: Wlanmaus: The Keys
Basic 1.4 The Keys The clear concept of the WLANmaus reduces the number of the keys to an expedient quantity. Functions needed for ordinary playing can mostly be called by the particular keys. These keys will be shown here. Please also note fig. 1 on page 5. Notes: ▪... - Page 43 Basic Keys Function ▪ Toggling between locomotive and turnout mode Loco / Turnout key in combination with ▪ Switching between library and locomotive address mode Shift In drive mode: … ▪ Activates and deactivates the locomotive functions F1–F10 direct. The loco- motive functions F11–F20 are activated using keys 1–10 together with Function keys -key.
-
Page 44: Section 2 ▪ Operation - Driving And Switching
Operation - Driving and Switching ▪ Part 2 Operation – Driving and Switching Despite its numerous options, operation of the WLANmaus is simple and intuitive. A concept which had already been successfully introduced for the Lokmaus models of the first and second generation. The fol- lowing shows you how to operate the WLANmaus based on practical examples. -
Page 45: Entering A New Locomotive
Operation - Driving and Switching Calling up other locomotives already entered in the library (“scrolling” Locomotives in the library are sorted in the order in which they were entered. you can of course change this order: Select locomotive These key combinations (press keys together) move the locomotive up or down in the library. you can check the new order for the library with the arrow keys. - Page 46 Operation - Driving and Switching Display Input Comment Confirm by pressing OK-key. The WLANmaus then switches to the loco- motive address. The suggested value is dis- played, in this case “3.” Change the suggested value by either using -key and one of the arrow keys or by …...
-
Page 47: Locomotive Address Mode
Operation - Driving and Switching 2.2.3 Locomotive Address Mode The WLANmaus also gives you the option of controlling your locomotives using the decoder address only. The display screen shows the locomotive address with the letter “L” before it (in this case, locomotive address 36), the locomotive symbol and all the selected functions. -
Page 48: The Emergency Stop Functions
Operation - Driving and Switching See the operating manual for the functions which are available for your locomotive ▪ you switch the locomotive light on or off using the OK-key The star “ ” at the bottom right of the display lights up to confirm that the locomotive lighting is switched on. 2.4 The Emergency Stop Functions When a situation becomes dangerous: you can use the STOP-key. -
Page 49: Selective Locomotive Stop
Operation - Driving and Switching 2.4.2 Selective Locomotive Stop The selective locomotive stop only stops the locomotive currently being controlled by the WLANmaus Input Display message Comment Press the -key and STOP-key at the same time. The locomotive stops immediately, the standstill symbol “II”... - Page 50 Operation - Driving and Switching Straight-on Branch-on The turnouts are switched over the moment you press on of the arrow keys. This also saves the turn- out setting. The first free numbers after the “T” are set as “0” as confirmation (of course, for 1, 2 or 3 digit turnout addresses only).
- Page 51 Operation - Driving and Switching Three useful WLANmaus aids for the turnout mode Toggle mode you can switch between the current turnout and the turnout last called up by pressing the OK-key. This provides you with quick access to two sets of turnouts which, for instance, are next to each other on a stretch of track.
-
Page 52: Quick Programming Of Locomotives And Decoders
Operation - Driving and Switching 2.6 Quick programming The most important decoder settings for drive mode, known as configuration variables CVs, can be made using the combination of MENu-key + function key. CV Function keys Locomotive address Note: A change to this value has a direct effect on the decoder but not on the locomotive library. -
Page 53: Short Circuit And Overload
Operation - Driving and Switching you can also program new values for CV 2, 3, 4 and 5 as shown in this example. To do so, you simply press the MENu-key together with the function key with the number corresponding to the CV and then proceed as in the above example. -
Page 54: The Menu Functions Of The Wlanmaus
Menus ▪ Part 3 Menus The Menu Functions of the WLANmaus The WLANmaus has three main menus with which you can both perform comprehensive programming and change the basic settings of the WLANmaus. This menu level can be accessed using two simple key combinations: Press the MENu-key alone for approximately 5 seconds (the duration can be set in the “SETTINGS”... - Page 55 Menus There are two ways to exit the menu level: ▪ Press the STOP-key. you may need to do this several times depending on the submenu which you are currently in. Each time you press STOP-key you go back one level. ▪...
-
Page 56: Overview Of The Menu Structure
Menus Menu 1: Menu 2: MODIFICATION LOCO PROGRAM LONG ADDRESS EDIT REVERSE DIRECTION 28 SPEED STEPS DELETE ANALOG DRIVING NMRA-BIDI SPEED TABLE LONG ADDRESS CVBIT AENDERN SAERCH SEND MODuS RECEIVE ADDRESS LIBRARy 8010813920.indd 56 13.07.2017 10:27:48... - Page 57 Menus BACKLIGHT CONTRAST DISPLAy Menu 3: ON TIME ALWAyS ON SETTINGS LANGuAGE MENu-KEy-TIME uSERINTERFACE FuNCTION KEyS CHILD LOCK ABORT SETTINGS RESET LOCO-LIBRARy EVERyTHING CALIBRATION STOPKEy MAuS VERSION (SOFTWARE) WLAN-VERSION (RADIO MODuLE) LANGuAGE BATTERy VOLTAGE SSID PASSWORD Z21-IP-ADDRESS DEVICE NAME IP-MODE IP-ADDRESS SuBNETZMASK STD-GATEWAy...
-
Page 58: The "Loco" Menu
Menus 1. The “LOCO” Menu The WLANmaus uses the “LOCO” menu to manage all data which is required for the locomotive library and for identification of a locomotive. You can also use this menu to set the WLANmaus to library or address mode. - Page 59 Menus “SEARCH“ This could be one of the most important functions of your WLANmaus you can use this menu item to assign a locomotive address to the corresponding locomotive in the library. Simply enter a locomotive address using the function keys and the WLANmaus will find the corre- sponding locomotive in the library.
-
Page 60: The "Programming" Menu
CVs. using the “PROGRAM” menu you can adjust these values to your needs. Please consult the expla- nations about “bits and bytes” listed in the glossary. ROCO decoders already installed in locomotives are usually delivered with suitable settings. Check before performing programming whether it is really necessary. See the instruction manual for your decoder or locomotive. - Page 61 Please consult the decoder manual for details about the function and configuration options of the CV 29. To simplify programming, ROCO has labeled the individual configuration options. ▪ The first image of the display depicts “C 29” and then immediately switches to the first configura- tion option “REVERSE DIRECTION”...
-
Page 62: The "Settings" Menu
3.2.1 Another language for the menu navigation is selected using the “LANGuAGE” submenu. Select your language using the arrow keys. If your national language is not included, visit the ROCO website “www.roco.cc” for an update. ▪ To confirm, press the OK-key. you return to the start level “LANGuAGE.”... - Page 63 Menus 3.2.4 The WLANmaus has “CHILD LOCK” which can be set tomultiple levels and can be activated after calling up the menu item using the arrow keys. To block an area, you will need to enter a code which is comprised of 4 numbers (no letters!). The password is then always requested when you wish to call up a protected area of the WLANmaus.
- Page 64 Menus “STOPMODE“ In the event of an emergency, press the STOP-key during drive mode to trigger an immediate emer- gency stop. you determine the exact effect of the emergency stop in menu item “STOPMODE.” Use this menu option to define whether pressing the STOP-key disconnects the entire .system from the mains power supply (“DISABLE VOLTAGE”) or whether this only stops the locomotives (“EMER- GENCY STOP”).
- Page 65 Menus 3.6.4 „DEVICE NAME“ you can allocate a network name to your WLANmaus here. In order to prevent the same na- mes in the network, this is automatically supplemented with the last six figures or the MAC address of the WLANmaus. For example: “WLANmaus_A1B2C3“ (Hexadecimal). 3.6.5 „IP-MODE“...
-
Page 66: Section ▪ Appendix 4.1 Updating The Wlanmaus
The min. value is 0, all bits are set to 0. ROCO has significantly simplified programming individual bits in the WLANmaus. If supported by the decoder, you no longer need to calculate certain values but simply select whether to set or not to set a bit in the “PROGRAMMING”... -
Page 67: Tips, Information, And Shortcuts
Appendix switch to the number of speed steps set in the locomotive controller (i.e. the WLANmaus and Z21) so that you do not need to make the setting in the decoder yourself. See the respective operating manual to determine whether your decoder is compatible with automatic speed step setting and which speed steps your decoder accepts. -
Page 68: Programming Help For Wlanmaus
4.3.1 Programming Help for Lokmaus 2 / R3 – WLANmaus Previous operating manuals for digital ROCO articles (e.g. 42624 turnout drive) only describe the standard programming mode for Lokmaus 2 /R3. The following includes a table which compares the programming procedure for the Lokmaus 2 /R3 and quick programming (see chapter 2.6 on page 52) on the WLANmaus. - Page 69 Table des matières Table des matières L’évolution de la loco-souris de ROCO — WLANmaus ................70 La WLANmaus en un clin d’oeil ......................70 Chapitre 1 ▪ Les bases – Faites connaissance avec la WLANmaus 1.1 Raccordement de la WLANmaus ...................... 71 1.2 Explications pour la saisie de caractères en entrant de mot de passe et SSID .........
-
Page 70: L'évolution De La Loco-Souris De Roco - Wlanmaus
▪ le parfait complément pour votre Z21 ▪ permet l’intégration au système ROCO de commande numérique de 31 autres appareils de com- mande tels que d’autres locomäuse et multiMÄUSE / WLANmäuse, claviers numériques »appareils de voie« ou »Route Control«, etc. -
Page 71: Raccordement De La Wlanmaus
En aucun cas, ne pas raccorder en parallèle un transformateur classique et une commande numérique au même réseau. Les composants numériques de la Z21 risquent alors d‘être détruits ! Les actuels amplificateurs ROCO 10761 et 10764 ne peuvent pas être utilisés avec la WLANmaus et la Z21. -
Page 72: Explications Pour La Saisie De Caractères En Entrant De Mot De Passe Et Ssid
Les bases Continuez en cliquant sur « OK». affiche „PWD?“ Entrez le mot de passe WLAN Continuez en cliquant sur « OK». La WLANmaus redémarre et se connecte avec votre routeur WLAN.. Info : les informations WLAN peuvent être modifiées à tout moment (voir chapitre 3.6, page 94) 1.2 Explications pour la saisie de caractères en entrant de mot de passe et SSID La saisie de caractères par le clavier s’effectue comme la saisie de SMS sur les portables. -
Page 73: Wlanmaus: L'écran D'affichage
Les bases 1.3 WLANmaus: l‘écran d‘affichage Toutes les fonctions activées de la WLANmaus sont visualisées sur le grand écran à cristaux liquides avec éclairage translucide et vous permettent ainsi un contrôle aisé. Ci-dessous nous vous présentons les symboles : Symboles de circulation clé... -
Page 74: Wlanmaus: Les Touches
Les bases 1.4 Les touches La conception claire de la WLANmaus se manifeste par la réduction des touches à un nombre raisonnable. Toutes les fonctions indispensables pour une exploitation normale sont presque toujours directement accessibles par les touches correspondantes que nous vous présentons ci-après. Voir aussi l’illustration n°... - Page 75 Les bases Touche[s] Fonction en régime «exploitation» : … ▪ Connecte ou déconnecte directement les fonctions locomotive F1–F10. Les fonctions locomotive fonctions F11–F20 sont activées sont activées par les touches 1–10 en association avec la touche « ». Les fonctions locomotive F21-F28 sont activées par les touches 1-8, une fois que le niveau F21-F28 a été...
-
Page 76: Chapitre 2 ▪ Exploitation - Marche Et Connexion
Dotée de nombreuses possibilités, la WLANmaus est néanmoins d’un maniement facile et intuitif. Cet esprit fut déjà appliqué par ROCO lors de la réalisation des loco-souris de première, deuxième et troisième générations. Les exemples suivants vous montrent et expliquent le maniement de la WLANmaus. -
Page 77: Nouvel Enregistrement D'une Locomotive
Exploitation —Marche et connexion Appeler d’autres machines déjà mémorisées dans la bibliothèque («parcourir») : Le classement des machines dans la bibliothèque est fait dans l’ordre de leur enregistrement dans la base de données. Naturellement il y a possibilité de modifier cet ordre : Sélectionner la machine voulue Presser cette combinaison de touches simultanément, la machine se déplace dans la bibliothèque vers le... - Page 78 Exploitation —Marche et connexion Affichage correspon- Touches actionnées Remarque dant à l’écran pour saisir les données Une fois le nom composé et vérifié, confirmer par la touche « OK». Le nom confirmé, la WLANmaus passe à l’adresse de la machine. L’écran affiche alors une adresse «proposée», dans notre cas c’est oder l’adresse «3».
-
Page 79: Le Mode Adresse Locomotive
Exploitation —Marche et connexion 2.2.3 Le mode adresse locomotive La WLANmaus vous propose également la possibilité de commander vos machines par leurs adresses. Dans ce mode, l’écran affiche le numéro du décodeur, devancé par la lettre «L» – sur notre exemple l’adresse «36», complétée par le symbole «locomotive»... -
Page 80: Les Fonctions D'arrêt D'urgence
Exploitation —Marche et connexion Pour connaître les fonctions effectivement disponibles sur votre locomotive et son décodeur se référer à leur mode d’emploi. ▪ Les feux de la machine s’allument et se coupent par la touche « OK». L’écran confirme l’état al- lumé... -
Page 81: Arrêt D'urgence Sélectif
Exploitation —Marche et connexion 2.4.2 Arrêt d‘urgence sélectif L’arrêt d’urgence sélectif ne s’adresse qu’à la machine directement commandée par la WLANmaus. Touches à actionner L’écran affiche Remarque Pressez simultanément les touches « » et «STOP». La machine s’arrête immédiatement, l’écran affiche le symbole «II» (et le dernier sens de marche). - Page 82 Exploitation —Marche et connexion Les aiguilles changent de position au moment ou vous pressez une des deux touches «flèches». En même temps, la nouvelle position des aiguilles est mémorisée par la WLANmaus et confirmée par la mise à «0» des premiers chiffres libres suivant la lettre «A», si l’adresse du moteur n’a que trois chiffres maxi.
-
Page 83: Programmation Rapide De Locomotives Et Décodeurs
Exploitation —Marche et connexion Trois petits »plus« bien utiles de la multiMAUS sur mode «aiguillages» : La bascule En pressant la touche « OK» vous passez de l’aiguillage actuellement affiché à l’écran à l’aiguillage commandé précédemment et vice-versa. C’est ainsi que vous avez un accès rapide à deux aiguillages; par exemple : deux aiguillages se suivant dans un itinéraire. -
Page 84: Court-Circuit Et Surcharge
2.7 Court-circuit et surcharge S‘il se produit un court-circuit ou une surcharge au niveau de l‘installa- tion, le système numérique ROCO l‘affiche deux fois. Sur l‘écran d‘affi- chage de la WLANmaus deux symboles clignotent : un éclair et le signe STOP. -
Page 85: Les Menus De La Wlanmaus Et Leurs Fonctions
Les menus Si l‘erreur ne vient pas d‘un court-circuit, la cause peut être une surcharge de l‘installation due au fait par ex. que plusieurs locomotives fonctionnent en même temps. Si cela se produit fréquemment, l‘alimentation en courant de votre installation ne suffit pas. Câblez un (autre) amplificateur complé- mentaire. - Page 86 Les menus Pour quitter le mode «MENU» vous avez également deux possibilités : ▪ Soit vous pressez la touche «STOP». Il sera peut-être nécessaire de la presser plusieurs fois, cela dépend du niveau actuel hiérarchique sur lequel vous vous trouvez à ce moment. Chaque action sur la touche «STOP»...
-
Page 87: La Structure Des Menus De La Wlanmaus En Un Coup D'oeil
Les menus MODIFIER VARIABLE NOuVELLE Le menu 1: Le menu 2: LOCO PROGRAMMER ADRESSE LONGuE MODIFIER CHANGEMENT DE DIRECTION 28 CRANS DE EFFACER MARCHE MARCHE ANALOGIQuE NMRA-BIDI TABLEAu DES VITESSES CVBIT CHERCHER ADRESSE LONGuE VARIABLE PROGRAMMER EN LIGNE MODE-LECTuRE ENVOyER RECEVOIR ADRESSE BIBLIOTHEQuE... - Page 88 Les menus ECLAIRAGE CONTRASTE ECRAN Le menu 3: TEMPS ECLAIRAGE REGLAGES TOuJOuRS ALLuME LANGuE FONCTION TOuCHE MANIEMENT VERROuILLAGE ANNuLATION VALEuRS D ORIGINE REINITIALISER LOCO-BIBLIOTHEQuE TOuT CALIBRAGE MODE TOuCHE STOP VERSION MAuS (SOFTWARE) VERSION WIFI (MODuLE RADIO) VERSION LANGuE TENSION BATTERIE SSID MOT DE PASSE ADRESSE Z21-IP...
-
Page 89: Le Menu "Loco
Les menus 1. Le menu «LOCO» Le menu «LOCO» vous permet de faire gérer par votre WLANmaus toutes les données indispensables pour la bibliothèque »matériel moteur« et pour l’identification d’un engin moteur. Ce menu vous permet également de préenclencher la WLANmaus aux modes »bibliothèque« ou «adresses machines». «NOUVELLE»... - Page 90 Les menus «CHERCHER» Il est possible que ce menu secondaire devienne pour vous, à la longue, une des fonctions les plus importantes de la WLANmaus. Ce menu secondaire vous permet de retrouver une machine dans la bibliothèque en ne connaissant que l’adresse. Composez tout simplement l’adresse de la machine par les touches des fonctions «1»...
-
Page 91: Le Menu "Programmer
à vos besoins. Tenez également compte des explications sur le thème »Bits et Bytes (octets)» dans le «Glossaire» de ce manuel. Les décodeurs déjà installés dans des locomotives ROCO par l‘usine sont habituellement livrés avec des réglages adaptés aux caractéristiques individuelles des machines. Par conséquent, contrôlez avant toute programmation, si elle est vraiment nécessaire. - Page 92 à bit. Le mode d‘emploi joint au décodeur vous informe de la manière de fonctionner et des possibilités de réglage de CV29. Pour faciliter la programmation, ROCO a attribué directement des désignations associées à chaque possibilité de réglage.
-
Page 93: Le Menu "Reglages
3.2.1 Par le menu secondaire «LANGuE» on peut activer une autre langue. Sélectionner la langue souhaitée par les touches »flèches«. Si votre langue préférée n’est pas mémorisée, consulter le site «www.roco.cc» (actuellement ce site n’existe qu’en langues allemande et anglaise) pour y trouver une possibilité éventuelle de mise à jour. - Page 94 Les menus ▪ Confirmer la valeur choisie par la touche « OK». La WLANmaus retourne au départ du menu secondaire «DELAI TOuCHE MENu». 3.2.3 Le menu «FONCTION TOuCHE» détermine le caractère des fonctions «F1» à «F28» des ma- chines (le sifflet d’une locomotive sonorisée, par exemple, ou la commande d’un attelage à télécommande).
- Page 95 Les menus si la WLANmaus a subie des variations extrêmes de température il peut arriver qu’il faille recalibrer le bouton régulateur de vitesse, surtout lorsque le bouton est en position neutre et que la machine roule encore. Dans ce cas procédez comme suit : ▪...
- Page 96 Les menus „CHERCHER“ : affiche jusqu’à 8 des plus puissants réseaux dans l’environnement de la WLAN- maus. La sélection du réseau souhaité s’effectue par la touche « OK». „ENTRER“ : Si le réseau souhaité n’est pas affiché pour „CHERCHER“, vous pouvez entrer ici le réseau manuellement.
-
Page 97: Chapitre 4 ▪ Annexe
«0», tous les bits sont mis sur «0». ROCO a nettement simplifié la programmation des bits dans la WLANmaus. Si le décodeur l‘accepte, vous ne devez plus calculé des valeurs déterminées, mais décider dans le menu «PROGRAMMER» en pressant simplement une touche, si un bit est mis ou pas. - Page 98 Annexe guration Variable» = variable de configuration. Comme la WLANmaus et la Z21 sont compatibles avec le standard NMRA /DCC, des variables CV de 1 à – 1023 peuvent être lues et écrites. Les valeurs des «CV» varient fortement et ont une plage de «0» à «255». Il est donc compréhensible qu’il faille de l’expérience pour modifier ces valeurs car des variables «CV»...
-
Page 99: Astuces, Renseignements Et Petits Dépannages Rapides
Annexe 4.3 Astuces, renseignements et petits dépannages rapides La WLANmaus ne peut pas être connectée. ▪ vérifier les batteries et év. les remplacer. ▪ La WLANmaus est connectée, mais les sym- un court-circuit s‘est produit dans l‘installation (la boles court-circuit et STOP s‘allument. DEL rouge de la Z21 clignote). -
Page 100: Programmation De La Wlanmaus
4.3.1 Programmation de la WLANmaus par rapport aux «Lokmaus 2» et «R3» Les modes d’emploi des composants de la commande numérique ROCO commercialisés avant la WLAN- maus (le moteur d’aiguilles réf. 42624 avec décodeur intégré, par exemple) ne décrivent que le mode standard de programmation par les «Lokmaus 2»... - Page 101 Notizen / Notes 8010813920.indd 101 13.07.2017 10:27:59...
- Page 102 Notizen / Notes 8010813920.indd 102 13.07.2017 10:27:59...
- Page 103 Notizen / Notes 8010813920.indd 103 13.07.2017 10:27:59...
- Page 104 We reserve the right to change the construction and design! Bitte diese Beschreibung zum späteren Gebrauch aufbewahren! Please retain these instructions for further reference! Modelleisenbahn GmbH 5101 Bergheim Austria • • www.roco.cc 8010813920 VII / 2017 8010813920.indd 104 13.07.2017 10:28:00...
Need help?
Do you have a question about the WLANmaus Z21 and is the answer not in the manual?
Questions and answers