Table of Contents
Advertisement
Quick Links
Advertisement
Table of Contents
Troubleshooting

Related Manuals for Geo Knight Digital Combo DC16


Summary of Contents for Geo Knight Digital Combo DC16
- Page 1 Digital Combo Multi-Purpose Press Version 3-14...
-
Page 2: Table Of Contents
Contents Introduction...........................3 Setup.&.Suggestions......................4 Normal.Operation.........................5 Normal.Operating.Mode....................5 Setting.Temperature......................5 Setting.Time........................6 Pre-Press.Timer.......................6 Setting.Pressure.......................7 Digital.Pressure.Bar.Graph....................7 Guidelines.&.Standard.Settings..................8 ERR.Mode........................9 Over-Temp.Alarm......................9 Using.Attachments......................10 Removing.a.Heat.Platen....................10 Attaching.a.heat.platen....................11 Cap.Hold-down.Device.(For.Cap.Attachment.Only)............12 Aligning.the.Pedestal.....................12 Optional.Forms./.Custom.Pedestals................12 How.to.use.the.Cap.Attachment..................13 How.to.use.the.Mug.Attachment...................13 How.to.use.the.Plate.Attachment...................14 Pressing.Ceramic.Tile. -
Page 3: Introduction
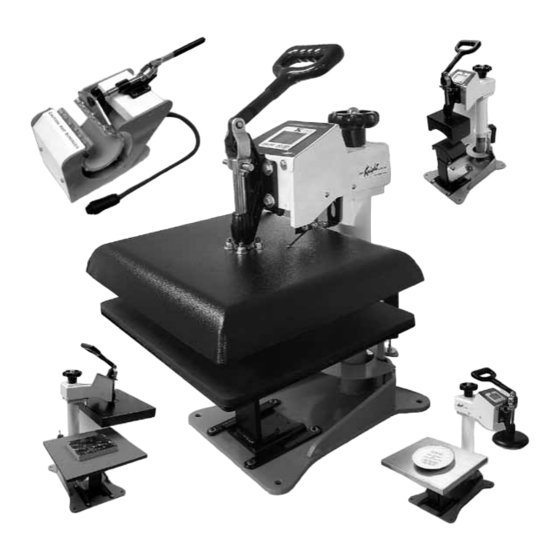
Introduction Congratulations.on.your.purchase.of.the.DC16.Digital.Combo.press!. This. heat. press. machine. has. many. exciting. features,. all. of. which. are. meant.to.help.make.your.heat.transfer.pressing.endeavors.as.successful. and.easy.as.possible..Please.take.the.time.now.to.thoroughly.read.through. this.manual.to.become.acquainted.with.them..It.will.explain.some.key. features,.concepts.and.methods.that.will.save.much.time.and.effort.in. using.this.press.and.in.your.heat.pressing.applications. Throughout.this.manual,.many.areas.and.components.of.this.machine. will. be. referred. to. by. specific. names.. Please. refer. to. the. illustrations. below.in.order.to.become.familiar.with.some.of.the.terminology.used. in.this.manual. Handle Pressure.Knob Top.Head Clamp/Linkage. Pwr.Inlet/On-Off Heat.Platen Stop.Collar Lower.Table Silicone.Pad... -
Page 4: Setup.&.Suggestions
Setup & Suggestions •. Locate.the.press.on.a.firm,.sturdy.work.surface...It.is.recommended.but. not.necessary.to.bolt.the.press.to.a.workbench.using.the.rear.mounting. holes.on.the.base.frame. •. A.stand.on.lockable.casters.is.available.from.Geo.Knight.&.Co.or.your. distributor. •. The.height.of.the.bench/work.space.the.press.is.located.on.would.be. ideally. 25”. to. 30”. high..The. higher. the. press,. the. more. difficult. to. close/lock. •. Attach.the.power.cord.from.the.rear.to.the.underside.of.the.top.head.. There.is.a.power.inlet.under.the.top.head.that.the.modular.cord.will. plug.into.. •. It.is.HIGHLY.RECOMMENDED.that.the.cord.be.strapped.or.tied.to. the.back.white.post.of.the.press,.so.that.the.cord.is.not.pulled.on.and. tugged.out.of.the.power.inlet.where.it.plugs.into.the.press..TEST.and. make.sure.the.cord.travels.freely.when.swinging.the.press,.and.that. there.is.no.tension.or.pulling.on.the.inlet.socket.where.the.power.cord. plugs. into. the. head.. Make. sure. the. cord. can. not. be. pressed. by. the. heater. -
Page 5: Normal.operation
Normal Operation Normal Operating Mode The normal operating mode of the press will display the current actual Temperature at the top of the screen and the time setting elapsed time below temperature. The right side the screen will indicate the heating status by stating HEATING, READY, both of those words, or none at all, depending on if it is cooling down or heating up to the set temperature. -
Page 6: Setting.time
Setting Time From the normal operating mode, simply use the Arrow Keys ONLY to set the time. Do not touch the PRG key. Hold down either the Up or Down arrow key for more than 2 seconds and the time will increase rapidly. -
Page 7: Setting.pressure
Setting Pressure Pressure is set manually using the large black Pressure Adjustment Knob. There is one important rule of thumb when setting pressure: The press MUST LOCK IN PLACE when lowering and clamping the press. Do not simply let the platen rest on the pad. A good solid two-handed locking force is recommended when first doing transfers to insure good results. -
Page 8: Guidelines.&.Standard.settings
Guidelines & Standard Settings The.following.information.covers.some.basic.guidelines.for.pressing,. as.well.as.some.generic.parameters.for.basic.heat.transfer.applications.. •. When.pressing.shirts,.it.is.often.recommended.that.the.shirts.be.quickly. pressed.for.2.to.4.seconds.before.transferring.to.remove.wrinkles.and.water. content. •. When.pressing.two.sides.of.a.garment,.pull.the.garment.over.the.table.so. that.the.printed.side.drapes.underneath.the.table..This.will.avoid.reheating. previously.transferred.designs.on.opposite.sides.of.garments..It.will.also. avoid.any.bleed-through.of.inks.on.lighter.fabrics. •. Avoid. laying. collars,. cuffs,. zippers,. and. other. bulky. parts. of. garments. on.the.lower.table,.as.these.can.adversely.affect.pressing.conditions,.and. reduce.the.life.of.the.silicone.pad. •. When.pressing.rigid.substrates.(plastics,.metals,.woods,.etc.),.be.sure.that. any.protective.films.or.laminates.are.removed.before.heating. •. Always.check.that.the.transfer.image.is.face.down.against.the.material,.to. avoid.sealing.the.image.against.the.heat.platen.instead.of.the.substrate.. Always. follow. the. transfer. media. suppliers. instructions. when. pressing..The.information.below.is.for.general.reference.only,.and.may. -
Page 9: Err.mode
ERR Mode During operation of the press, if there is a loss of signal from the temperature sensor wire, the ERR display will appear. This is a safety feature that will shut off the relay so the press will not overheat aimlessly without a temperature signal. -
Page 10: Using.attachments
Using Attachments The main feature that makes the Digital Combo so versatile is the interchangeability of the heat platens. Because the heat platens are modular in their method of connection, one platen can be unplugged and another attached, in its place. These platens are “Hot Swappable”. You do not need to wait for the platens to cool off to remove. -
Page 11: Attaching.a.heat.platen
Attaching a heat platen The heat platen can be safely connected with the machine on. However, thermal gloves or oven mitts must be used when handling hot heat platens. •. Lift.the.heat.platen.into.the.clamp.linkage..Make. sure.the.rear.guide.fork.holds.onto.the.guide.pin. in.the.back.post.of.the.frame..This.holds.the.heat. platen. in. a. straight. position. and. keeps. it. from. rotating. -
Page 12: Cap.hold-Down.device.(For.cap.attachment.only)
Cap Hold-down Device (For Cap Attachment Only) There is a curved 1/2-moon cap holddown device for stretching the cap over the curved bottom table. Simply pull the back strap of the cap behind the pedestal and under the 1/2-moon shaped bracket. This will hold the cap in place for proper printing. -
Page 13: How.to.use.the.cap.attachment
How to use the Cap Attachment The cap attachment works the same as a cap press. The only difference is that the swing-away style Digital Combo press allows complete access to the cap when the heat platen is swung out, as opposed to typical stand-alone clamshell cap presses. -
Page 14: How.to.use.the.plate.attachment
How to use the Plate Attachment The plate attachment allows the operator to press down inside a dish or other indented object. Here are some tips for using the plate attachment: Use the large T-Shirt flat bottom table. Place the 3-sided aluminum tray on top of the T-Shirt table. -
Page 15: Programmable.presets
Programmable Presets How Presets Work There are 70 programmable presets in the controller. The operator can store a Temperature, Time, Prepress Time, and Pressure setting in each preset. When a preset program is loaded by the operator, the Current Temperature Setting, Time and Prepress Settings (if there is a Prepress setting in that preset) are updated in the normal operating mode. -
Page 16: Editing/Programming.a.preset
Editing/Programming a Preset To edit a preset and change it’s values to your own desired settings, you simply use the TEMP key while in the SET preset mode. From the normal operating mode, press the PRG key. SET displays on the screen. Use the Arrow Keys to select the preset # you wish to edit. -
Page 17: A.walkthrough.tutorial.for.using.presets
A Walkthrough Tutorial for using Presets Here is a tutorial of programming 2 different presets, and then an example of using them in normal daily operations. Do this walkthrough to practice using presets. Part 1: Programming 2 different presets. From the normal operating mode, press PRG. SET appears. Use the arrow keys to select SET 01. -
Page 18: User.menus
User Menus Entering the user menus & options There are many useful features beyond simply setting time & temperature, and storing presets. All of these additional features are available to the operator in the User Menus. To access the user menus, simply press TEMP & PRG at the same time from the normal operating mode and let go. -
Page 19: Recorded.pressings.odometer
Recorded Pressings Odometer There is an “odometer” that records pressing cycles done. This can be cleared and reset to 0 at any time when needed. The figure scrolls and it’s beginning and end are separated by a “-” sign. After entering the user menus (see top of page 19), Press PRG until REC displays. -
Page 20: Pressure.minimum
Pressure Minimum To reset and redefine “0” for the pressure bar graph, use this calibration menu. Do NOT adjust this setting unless you are sure adjustments are necessary. Adjust the pressure of the machine so there is barely any locking pressure when clamping and locking the press. -
Page 21: Temperature.drop.sense
Temperature Drop Sense The press can be set to alarm if the temperature drops a certain range below the set temperature. This is useful to warn the operator if the press is too far out of temperature range during excessive use. After entering the user menus (see top of page 18), Press PRG until DRP displays. -
Page 22: Alarms
Alarms The timer alarm can be adjusted for different beeping patterns. This can differentiate between multiple presses, and allow the operator to have a short beep or a continuously repeating beep. After entering the user menus (see top of page 18), Press PRG until ALR displays. -
Page 23: Finished.warning.beep
Finished Warning Beep The press can sound a beep on the last 3 seconds of the timer or Prepress timer countdown. This is useful if the press is automatic and the operator needs a warning that the press is about to finish, open, or pop-up dramatically. -
Page 24: Prepress.alarms
Prepress Alarms The Prepress timer alarm can be adjusted for different beeping patterns. This allows for differentiating from the normal timer, and can allow the operator to have a short beep or a continuously repeating beep. After entering the user menus (see top of page 18), Press PRG until AL2 displays. -
Page 25: Parts./.Maintenance./.Misc
Parts / Maintenance / Misc Interchangeable Tables The lower table on the machine is interchangeable. Different sized optional tables can be obtained for various materials & handling requirements. The tables simply fit right onto the bottom pedestal. There are two steel pins that look like “bullets”... -
Page 26: Replacement.parts
Replacement Parts Here is a list of current replaceable parts on the DC16 Digital Combo as of the writing of this manual: MEN-DCCLP....DC.CLAMP.ASBLY.W/HANDLE.&.PIN DKA-CTRLC....DIGITAL.KNIGHT.PROCESSOR.BOARD DKA-CTRLP....DIGITAL.KNIGHT.POWER.BOARD ELN-KM0227A2....DIGITAL.COMBO.MEMBRANE.KEYPAD RPK-DKPWR....DK.POWER.INLET/SWITCH/CORD.KIT ELN-VS10N031C.....TIMER.LEVER.MICRO.SWITCH DC16-HBA120....DC16.14X16.HEATER.BLOCK.ASBLY.120V RPK-DCPSKIT....DC.PRESSURE.SENSOR.KIT CAN-DKKNOB....DK/DC.BLACK.KNOB FAS-EM5818....5/8-18.HEX.ACORN.NUT MEN-DKPVBLT....DK/DC.PIVOT.BOLT FAS-NTA1018....THRUST.BEARING.(2.req) -
Page 27: Wiring.diagram
Wiring Diagram... -
Page 28: Troubleshooting
Troubleshooting The following information attempts to address the most probable mechanical and user issues with the press. Most issues with heat transfer presses are application related. That is, they have to do with the results of a particular transfer application. For technical support on problems having to do with the final results of a particular transfer paper or media, please contact the supplier of that transfer media. -
Page 29: Troubleshooting.(Cont.)
Troubleshooting (cont.) I press the keys on the keypad, and there is no sound or response from the controller. Check the connection of the keypad to the controller. This is inside the top panel. Unplug the power cord. Remove the two screws in between the clamp/linkage that hold down the top panel, and carefully lift the panel up and look inside at the digital controller. -
Page 30: Limited.warranty
If a press covered by the one year limited warranty must be returned to the factory for repairs, Geo Knight & Co shall make every effort to repair buyer’s press. However, Geo Knight & Co reserves the exclusive right to determine whether to repair or replace a defective press. If Geo Knight & Co authorizes a replacement press, the warranty of the replacement press shall expire on the anniversary date of the original machine’s invoice to the buyer. There are no warranties which extend beyond the description on the face hereof. Seller disclaims any implied warranty of merchantability and/or any implied warranty of fitness for a particular purpose, and buyer agrees that the goods are sold “as is”. Geo Knight & Co does not warrant that the functions of the press will meet the buyers requirements or expectations. The entire risk as to use, quality and performance of the press lies with the buyer. In no event will Geo Knight & Co be liable for any damages, including loss of profits, destruction of goods or any other special, incidental, consequential or indirect damages arising from the use of the press or accompanying materials. This limitation will apply even if Geo Knight & Co or its authorized agent has been advised of the possibility of such damage. Geo Knight & Co Inc 52 Perkins St, Brockton MA 02302 USA (508)588-0186 - Fax (508) 587-5108 info@heatpress.com - www.heatpress.com...
Need help?
Do you have a question about the Digital Combo DC16 and is the answer not in the manual?
Questions and answers