Sign In
Upload
Download
Table of Contents
Contents
Add to my manuals
Delete from my manuals
Share
URL of this page:
HTML Link:
Bookmark this page
Add
Manual will be automatically added to "My Manuals"
Print this page
×
Bookmark added
×
Added to my manuals
Manuals
Brands
Baldwin Boxall Manuals
Emergency Phone
C2CFPE
Installation instructions manual
Baldwin Boxall C2CFPE Installation Instructions Manual
Hide thumbs
1
Table Of Contents
2
3
4
5
6
7
8
9
10
11
12
13
14
15
16
17
18
19
20
21
22
23
24
25
26
27
28
29
30
31
32
33
34
35
36
37
38
39
40
41
42
43
44
45
46
47
48
49
50
51
52
53
54
55
56
57
58
59
60
61
62
63
64
65
66
67
68
69
70
71
72
73
74
75
76
77
78
79
80
81
82
83
84
85
86
87
88
89
90
91
92
93
page
of
93
Go
/
93
Contents
Table of Contents
Bookmarks
Table of Contents
Table of Contents
Amendment Record
Proprietary Notice
Precautions and Safety Information
Environmental Conditions
General Safety Precautions
Care2 Introduction
Description
Technical Specifications
Master & Slave Consoles
Network Expansion Panel
Disabled Refuge Remote
Fire & Emergency Telephones
Disabled Toilet Alarm (DTA Kit)
Telephone Handset Enclosure
Roaming Telephone Sockets
Simplified Schematic Diagrams
Installation
Consoles
Mounting Details
C2CEK4 Line Card Connection Details
Adding C2CEK4 Line Cards
Installing C2CFPE Interface Card
Installing C2CN Network Card
Setting Network Address
Network Cable Connections
Fire Panel Connections on C2CN
External Call Output
External Call Settings Using BVOCCA
DRS Refuge Remote
Mounting Details
Connection Details
Fire / Stewards Telephones
Mounting Details
Connection Details
DTAKIT (Disabled Toilet Alarm)
Mounting Details
Connection Details
Jack Sockets
Mounting Details
Connection Details
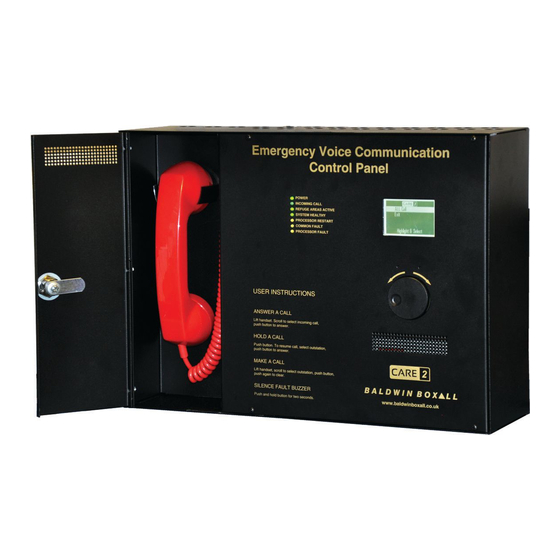
Controls & Indicators
LCD Display & Multi-Function Encoder
Front Panel LED Indicators
Internal Reset Buttons
Battery Connect (if Mains Power Unavailable)
DRS Remote Controls & Indicators
Fire / Emergency Telephone
Roaming Handset Enclosure
Commissioning
Basic Hardware Commissioning Procedure
Master / Slave / NEP Indicator
Master" (or Non-Networked) Console
Slave" Console
NEP" Console
Software Commissioning Procedures
Initial Commissioning Using SD CARD
Commissioning Using Ethernet (IP) Method
Internal Device Detection Procedure
Auto Assign Outstations
Manually Specify Outstation Type
Manually Rename Remote Units
ASCII Character Set
Roaming Telephone Enclosure Specific Parameters
System Menu Structure
System Parameters
Line Parameters
RTC (Real Time Clock) Adjustment
Real Time Clock PEC (Processor Error Correction)
RTC Power Requirements
SD and IP Configuration
Configuration Overview
SD Card Configurator
SD Card "Consoleconfig" Page
SD Card "Linesetups" Page
To Enter Handset / Outstation Data
Setting the SD Card Data Path
Loading Configuration from an SD Card
Saving Configuration to an SD Card
SD Card "Logs" Page
Outstationsummary" Page
IP Configurator
Setting Alternate IP Configuration on PC
Setting Alternate TCP/IP Configuration - Windows XP
Setting Alternate TCP/IP Configuration - Windows 7
IP Configuration "Consoleconfig" Page
IP Configuration Linesetups Page
IP Configuration Logs Page
IP Configuration Outstationsummary Page
Accept a Single Incoming Call
Multiple Incoming Calls
Selecting a Single Call
Selecting All Incoming Calls
Place Current Call on "Hold
End a Call
Answer a Disabled Toilet Alarm
Make a Call
Call a Single Outstation
Call All Outstations
Make a Call When the Current Call Is on "Hold
Accept a Fault & Silence the Sounder
Re-Announcing Faults
Automatic Fault Clearance
Faults Announced While "In Call
View Fault History Log
Maintenance Menu Structure
Fault Codes & Basic Faultfinding
Battery Charger" - Local Console Fault
Power Supply" - Local Console Fault
System Restart XX" - Local Console Fault
Local Loop" - Local Console Fault
Lo Z" - Line Fault - Local Console Fault
Hi Z" - Line Fault - Local Console Fault
NW Audio Loop" - Network Audio Fault
NW Loop" - Network Data Fault
Deep Discharge (Low Voltage) Protection
Routine Maintenance Requirements
Appointment of a "Responsible Person
Routine Testing
Daily Check - Fault Indicators
Weekly Functional Test
Six Monthly Inspection by a "Competent Person
Advertisement
Quick Links
Download this manual
www.acornfiresecurity.com
Care2
Installation Instructions
Firmware version: MCCNTPNL V 03.04
Manual name: Care2
Issue: 7
ECR: 2853
Date of issue: July 2014
www.acornfiresecurity.com
Table of
Contents
Previous
Page
Next
Page
1
2
3
4
5
Advertisement
Table of Contents
Need help?
Do you have a question about the C2CFPE and is the answer not in the manual?
Ask a question
Questions and answers
Related Manuals for Baldwin Boxall C2CFPE
Emergency Phone Baldwin Boxall Care2 Installation Instructions Manual
Emergency voice communication system (94 pages)
Remote Control Baldwin Boxall Care2 Quick Start Manual
(2 pages)
Emergency Phone Baldwin Boxall C2CB4 Installation Instructions Manual
(93 pages)
Emergency Phone Baldwin Boxall OmniCarePLUS Multi-Exchange EVC Installation Instructions Manual
(54 pages)
This manual is also suitable for:
Care2
C2cek4
C2cn
C2rteb
C2rtes
C2cbnep
...
Show all
C2rth
C2cs4
C2rtjuk
C2cb4
C2rtja
Table of Contents
Print
Rename the bookmark
Delete bookmark?
Delete from my manuals?
Login
Sign In
OR
Sign in with Facebook
Sign in with Google
Upload manual
Upload from disk
Upload from URL


Need help?
Do you have a question about the C2CFPE and is the answer not in the manual?
Questions and answers