
Related Manuals for LG ARX5500


Summary of Contents for LG ARX5500
- Page 1 OWNER’S MANUAL HIGH PERFORMANCE 3D A/V RECEIVER SYSTEM Please read this manual carefully before operating your set and retain it for future reference. ARX5500 (ARX5500, S72P2-F/W) www.lg.com...
- Page 2 Getting Started Getting Started Safety information CAUTION concerning the Power Cord Most appliances recommend they be placed upon a dedicated circuit; CAUTION That is, a single outlet circuit which powers only that appliance and has no additional outlets or RISK OF ELECTRIC SHOCK DO NOT OPEN branch circuits.
- Page 3 MODEL 525p AND 625p UNIT, PLEASE CONTACT OUR CUSTOMER SERVICE CENTER. You have to set the disc format option to [Mastered] in order to make the discs compatible with the LG players when formatting rewritable discs. When setting the option to Live File System, you cannot use it on LG players.
- Page 4 Getting Started LG Electronics hereby declares that this/these product(s) is/are in compliance with the essential requirements and other relevant provisions of Directive 2004/108/EC, 2006/95/EC, 2009/125/EC and 2011/65/EU. Contact office for compliance of this product: LG Electronics (Levant) - Jordan Abdali Project, Rafik Al-Hariri Avenue, The Boulevard,...
-
Page 5: Table Of Contents
Table of Contents Table of Contents Getting Started Operating Safety information Basic operations Unique features – Selecting the input source Accessories – Adjusting the speaker levels – Enjoying various sound mode Introduction Radio Operations – Symbols Used in this Manual –... -
Page 6: Getting Started
Getting Started Unique features Introduction Full HD up-scaling Symbols Used in this Manual Views Full HD picture quality with simple setup. Note Indicates special notes and operating features. 3D pass through > Caution Enjoys 3D contents such as 3D movie, game, etc. Indicates cautions for preventing possible damages from abuse. -
Page 7: Required Cables
Getting Started Required cables y Coaxial digital audio cable The hookup diagrams on the subsequent pages assume the use of the following connection cables. You must purchase the connection cables separately if necessary. y USB cable y Analog audio cable White (L) Red (R) y HDMI cable... -
Page 8: Remote Control
• • • • • • • • • • a • • • • • • • • • 1 : Switches the unit ON or OFF. TV control buttons : Controls the TV. (LG TV only) - 1 : Turns the TV on or off. - Page 9 Getting Started • • • • • • • • • • b • • • • • • • • • • • • • • • • • • • d • • • • • • • • • C/V (SKIP) : Goes to the next or previous SETUP : Displays or exits the [SETUP] menu.
-
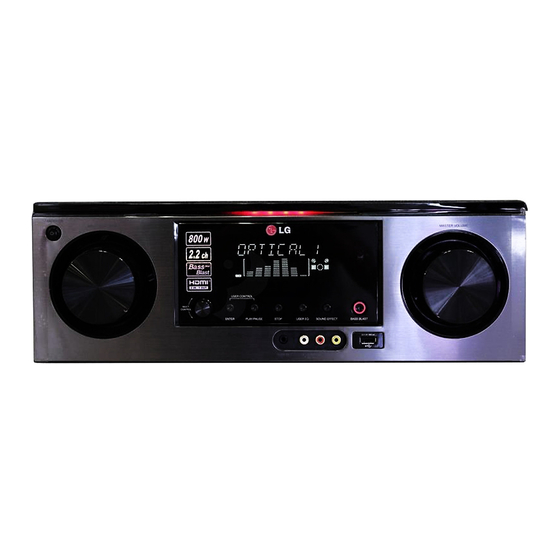
Page 10: Front Panel
Getting Started Front panel A STANDBY/ON (1/!) STOP Switches the unit ON or OFF. Stops playback. B INPUT SELECTION USER EQ Selects the input source. Sets the USER EQ mode (BASS, MIDDLE and TREBLE). (page 24) (page 24) C Display window SOUND EFFECT Shows the current status of the unit. -
Page 11: Rear Panel
Getting Started Rear panel F G H A Speakers connectors E HDMI IN 1/2 Connects the speaker cables. Connects the component with HDMI output. B DIGITAL AUDIO IN 1/2 F HDMI OUT TO TV COAXIAL 1/2 G AV IN 1 (VIDEO IN, L-AUDIO-R) Connects other components with a coaxial Connects the components with analog audio/ digital audio output. -
Page 12: Connecting
Connecting Before connecting Front speaker (L/R) Place the front speakers to the sides of the monitor or screen and as flush with the screen surface as Please make sure to disconnect the AC power cord possible. before making any connection between the unit and any other device. -
Page 13: Connecting Speakers
Connecting Connecting speakers 2. Connect the wires to the speakers. Connect the other end of each wire to the correct speaker according to the color coding. Front speaker (L) Color Speaker Position Orange Subwoofer Any front position Black White Front Front right White Front... -
Page 14: Connecting Video Devices
Connecting Connecting video 1. Connect the HDMI IN 1/2 jack on AV Receiver System to your video device with HDMI OUT devices jack using HDMI cable. 2. Connect the HDMI OUT TO TV jack on AV Receiver System to the HDMI IN jack on your TV. You can watch the input image from your video 3. - Page 15 Connecting Note Resolution Setting y HDMI is the abbreviated name for High The unit provides several display resolutions Definition Multimedia Interface. It is an for HDMI OUT TO TV jack. You can change the interface which transmits video and audio resolution by using [Setup] menu.
-
Page 16: Using A Composite Video Cable
Connecting Using a composite video cable 1. Connect the VIDEO IN jack on AV Receiver System to the VIDEO OUT jack on your video To enjoy both sounds and pictures from your device using a composite video cable. device, you have to connect analog audio cable as 2. -
Page 17: Connecting Audio Devices
Connecting Connecting audio 1. Connect AV IN 1, COAXIAL 1/2 or OPTICAL 1/2 jack on AV Receiver System to your audio devices device’s OUTPUT jack you want. 2. Set the input source to AV IN 1, COAXIAL 1/2 or OPTICAL 1/2 you connect (page 23). You can hear the sound from your TV, DVD player, Note Blu-ray player, CD player, etc. -
Page 18: Connecting Other Devices
Connecting Connecting other 1. Connect the VIDEO IN jack on the front panel of AV Receiver System to the VIDEO OUT jack on devices your device using a video cable. 2. Connect the left and right AUDIO IN jacks on the front of AV Receiver System to the audio left You can easily connect other devices (camcorder, and right OUT jacks on your device using an... -
Page 19: Connecting The Antenna
Connecting Connecting the Connecting portable antenna devices 1. Connect the FM wire antenna to the FM 1. Connect the PORT. IN jack on AV Receiver antenna connector. System to the head phone or LINE OUT jack on your portable device (MP3 player, etc.) using a portable cable ( 3.5 mm stereo plug). -
Page 20: System Setting
System Setting Settings [Language] Menu Menu Language Adjusting the Setup Settings Select a language for the [Setup] menu and on- screen display. You can change the settings of the unit in the [Setup] menu. [Display] Menu 1. Press SETUP. The [Setup] menu appears. TV Aspect Select which screen aspect to use based on the shape of your TV screen. -
Page 21: [Audio] Menu
System Setting [Audio] Menu Resolution Sets the output resolution of the HDMI video signal. Refer to “Resolution Setting” for details about the Speaker Setup resolution (page 15). Make the following settings for the built-in 2.2 channel surround speaker. [Auto] 1. Select [Speaker Setup] on the [Audio] menu. If the HDMI OUT jack is connected to 2. -
Page 22: [Others] Menu
System Setting [Others] Menu [Distance] Adjust the distance between each speaker DivX(R) VOD and the listening position. ABOUT DIVX VIDEO : DivX® is a digital video [Speaker Test Start] / [Speaker Test Stop] format created by DivX, LLC, a subsidiary of Rovi Select [Speaker Test Start] by using Corporation. -
Page 23: Operating
Operating Operating Basic operations By using the remote control 1. Press 1 on the remote control. 2. Select a source by pressing the button on the Selecting the input source remote control once or twice. This section explains how to select the input source To select Button (i.e., the AV component that you want to listen to or... -
Page 24: Adjusting The Speaker Levels
Operating Adjusting the speaker levels Enjoying various sound mode You can adjust the level of each speaker. These You can enjoy various sound mode. For details, refer settings are applied to all sound fields. You can to Setting the USER EQ, Sound effect and Bass Blast. adjust from -5 to +5 in 1 step. - Page 25 Operating Note Sound effect y In some of surround modes, some speakers, This system has a number of preset sound effects. there’s no sound or low sound. It depends You can select a suitable sound effect. Press on the mode of surround and the source of SOUND EFFECT on the remote control repeatedly audio, it is not defective.
-
Page 26: Radio Operations
Operating Radio Operations Presetting the Radio Stations You can preset 50 stations for FM. Be sure that FM aerial is connected. Before tuning, make sure to turn down the volume. 1. Tune in to a radio station. Listening to FM radio 2. -
Page 27: Playing The Usb Device
Operating Playing the USB To stop playback device MUSIC MOVIE PHOTO Press Z during playback. This unit can play movie, music and photo files To pause playback contained in the USB device. MUSIC MOVIE Basic operation Press M during playback. Press d to resume playback. -
Page 28: Mp3/Wma Music File Requirement
Operating Compatible USB Devices To slow down the playing speed MOVIE y MP3 Player : Flash type MP3 player. y USB Flash Drive : Devices that support USB 2.0 or While the playback is paused, press v repeatedly USB 1.1. to play various speeds of slow motion. -
Page 29: Listening To Music
Operating Listening to music Playing your favorite music It enables you to listen to music by marking your You can play music files contained in a USB device. favorite files. 1. Select [Music] by using A/D on the [USB] 1. During playback, select your favorite files by menu. -
Page 30: Playing A Movie File
Operating Playing a movie file Playing repeatedly or randomly During playback, press REPEAT repeatedly to You can play movie files contained in a USB device. select a desired mode. 1. Select [Movie] using A/D on the [USB] menu. 2. Select a file using W/S/A/D, and press d Display Description or ENTER ( ) to play the file. - Page 31 Operating Playing from selected time Movie file requirement 1. Press INFO/DISPLAY ( ) during playback. The Movie file compatibility with this unit is limited as follows. time search box shows the elapsed playing time. y Available resolution: within 720 x 576 (W x H) pixels.
-
Page 32: Viewing A Photo
Operating Viewing a photo To stop a slide show Press Z during slide show. You can view photo files contained in a USB device. 1. Select [Photo] using A/D on the [USB] menu. To pause a slide show The [PHOTO] menu appears. Press M during slide show. -
Page 33: Other Operations
Operating Using the Sleep Timer Photo file requirement Photo file compatibility with this unit is limited as You can set the unit to turn off automatically at a follows : specified time. Press SLEEP repeatedly. y Max pixel in width : 2760 x 2048 pixel The indicator changes cyclically in the display window as follows. -
Page 34: Troubleshooting
Troubleshooting Troubleshooting Troubleshooting PROBLEM CAUSE & CORRECTION y The power cord is unpluged. Plug in the power cord. No Power y Check the condition by operating other electronic devices. y The speaker wires are disconnected. Check the speaker connections. y The volume is set to minimum. Adjust the volume level. y Incorrect input source is selected. -
Page 35: Appendix
Appendix Appendix Trademarks and Maintenance licenses Handling the unit When shipping the unit Please save the original shipping carton and HDMI, the HDMI logo and High-Definition packing materials. If you need to ship the unit, for Multimedia Interface are trademarks or registered maximum protection, re-pack the unit as it was trademarks of HDMI licensing LLC. -
Page 36: Specifications
Appendix Specifications General (ARX8500) Power requirements Refer to the mail label on the unit. Power consumption Refer to the mail label on the unit. Dimensions (W x H x D) (430 x 144.5 x 330) mm Net Weight (Approx.) 4.2 kg Operating temperature 41 °F to 95 °F (5 °C to 35 °C) Operating humidity... - Page 37 Appendix Front speakers (S72P2-F) Type 2 Way 2 Speaker Impedance 4 Ω Rated Input Power 185 W Max. Input Power 370 W Dimensions (WxHxD) (274 x 941 x 277) mm Net Weight(1EA) 13.8 kg Subwoofer (S72P2-W) Type 1 Way 1 Speaker Impedance 3 Ω...
Need help?
Do you have a question about the ARX5500 and is the answer not in the manual?
Questions and answers