Table of Contents
Advertisement
Advertisement
Table of Contents

Related Manuals for LG ARX10


Summary of Contents for LG ARX10
-
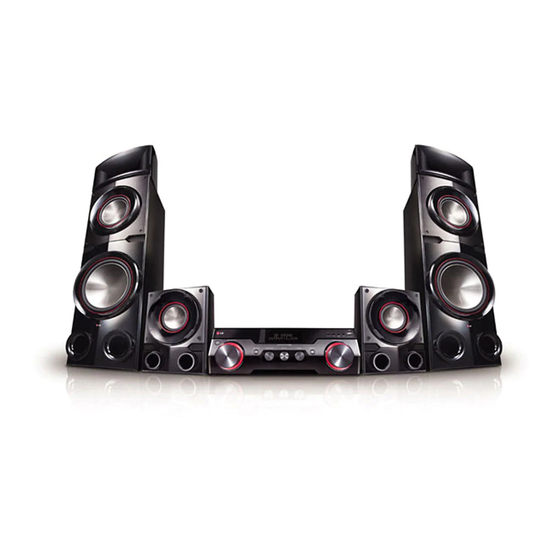
Page 1: Speaker System
OWNER’S MANUAL High Power A/V Receiver with Giant Tallboy Speaker System Please read this manual carefully before operating your set and retain it for future reference. ARX10 (ARX10, S94P2-F, S94P2-S) www.lg.com NA9640P-FE.DAGOILK_ENG_5426.indd 1 2014-04-04 5:04:16... -
Page 2: Safety Information
Getting Started Safety information CAUTION: Do not block any ventilation openings. Install in accordance with the manufacturer’s instructions. Slots and openings in the cabinet are provided for CAUTION ventilation and to ensure reliable operation of the RISK OF ELECTRIC SHOCK product and to protect it from over heating. - Page 3 Getting Started This device is equipped with a portable battery or accumulator. Safety way to remove the battery or the battery from the equipment: Remove the old battery or battery pack, follow the steps in reverse order than the assembly. To prevent contamination of the environment and bring on possible threat to human and animal health, the old battery or the battery put it in the appropriate...
-
Page 4: Table Of Contents
Table of Contents Table of Contents Getting Started Connecting Safety information Before connecting Unique features Positioning the system Accessories Connecting to speakers Introduction Connecting TV with other devices – Using an HDMI cable – Symbols Used in this Manual – Required cables –... - Page 5 – Setting the USER EQ Using a Bluetooth wireless technology – Listening to music stored on the Bluetooth devices – Using Bluetooth App – Activate Bluetooth with “LG Bluetooth Remote” App Radio Operations – Listening to FM radio – Improving poor FM reception –...
-
Page 6: Unique Features
USB Direct Recording Records music to your USB device. (analog sources only.) LG Bluetooth Remote LG Bluetooth Remote is an App designed to let you FM antenna (1) HDMI cable (1) take control of some of LG’s latest Audio devices. -
Page 7: Required Cables
Getting Started Required cables y Coaxial digital audio cable The hookup diagrams on the subsequent pages assume the use of the following connection cables. You must purchase the connection cables separately if necessary. y HDMI cable y Analog audio cable White (L) Red (R) y Portable cable (... -
Page 8: Remote Control
• • • • • • • • • • a • • • • • • • • • 1 : Switches the unit ON or OFF. TV control buttons : Controls the TV. (LG TV only) - 1 : Turns the TV on or off. - Page 9 Getting Started • • • • • • • • • • b • • • • • • • • • • • • • • • • • • • d • • • • • • • • • C/V (SKIP) : Goes to the next or previous file.
-
Page 10: Front Panel
Getting Started Front panel a STANDBY/ON (1/!) g USB port (5 V 0 500 mA) Switches the unit ON or OFF. Connects an USB device to USB port. b BASS BLAST h MASTER VOLUME Selects the BASS BLAST sound mode directly. Adjusts the speaker volume. -
Page 11: Rear Panel
Getting Started Rear panel a Speakers connectors j DIGITAL AUDIO IN 2 Connects the speaker cables. COAXIAL b Cooling fan Connects other components with a coaxial digital audio output. c AUX IN 1/2 (L/R) OPTICAL 2 Connects to external source with 2 channel audio outputs Connects other components with an optical digital audio output. -
Page 12: Connecting
Connecting Before connecting Front speaker with built in subwoofer (L) Front speaker with built in subwoofer (R) Please make sure to disconnect the AC power cord Place the front speakers to the sides of the monitor before making any connection between the unit or screen and as flush with the screen surface as and any other device. -
Page 13: Connecting To Speakers
Connecting > Caution Connecting to y Do not try to lift the speaker alone. It needs speakers two persons to lift the speaker. Otherwise it may result in the speaker malfunction and cause personal injury and/or property Connect the speaker cable plugs to the SPEAKERS damage. -
Page 14: Connecting Tv With Other Devices
Connecting Connecting TV with 1. Connect the HDMI IN 1/2/3 jack on AV Receiver System to your video device with HDMI OUT other devices jack using HDMI cable. 2. Connect the HDMI OUT TO TV jack on AV Receiver System to the HDMI IN jack on your TV. You can watch the input image from your video 3. - Page 15 Connecting Note y HDMI is the abbreviated name for High Definition Multimedia Interface. It is an interface which transmits video and audio signals in digital format. If a connected HDMI device does not accept the audio output of the unit, the HDMI device’s audio sound may be distorted or may not output.
-
Page 16: Using A Composite Video Cable
Connecting Using a composite video cable 1. Connect the VIDEO IN jack on AV Receiver System to the VIDEO OUT jack on your video To enjoy both sounds and pictures from your device using a composite video cable. device, you have to connect analog audio cable as 2. -
Page 17: Connecting Audio Devices
Connecting Connecting audio 1. Connect AUX1/2 IN (L/R), COAXIAL or OPTICAL 1/2 jack on AV Receiver System to devices your audio device’s OUTPUT jack you want. 2. Set the input source to AUX 1/2, COAXIAL or OPTICAL 1/2 you connect (Refer to the page You can hear the sound from your TV, DVD player, 23). -
Page 18: Connecting Other Devices
Connecting Connecting other 1. Connect the LINE OUT jacks on AV Receiver System to your device's INPUT jack you want devices 2. Set the input source to FM, PORT.IN or AUX1/2 you connect (Refer to the page 23). Refer to "Connecting audio devices" and You can connect various devices (TV, recorder, etc) "Connecting portable device"... -
Page 19: Connecting The Antenna
Connecting Connecting the Connecting portable antenna devices 1. Connect the PORT. IN jack on the rear panel 1. Connect the FM wire antenna to the FM antenna connector. of AV Receiver System to LINE OUT jack on your portable device (MP3 player, etc.) using a portable cable ( 3.5 mm stereo plug). -
Page 20: System Setting
System Setting Settings and TESTTONE menu adjustments using the You can adjust the speaker levels while listening to the test tone from your listening position. SETUP menu 1. Press SETUP. "1 TESTTONE" appears on the display window. By using the SETUP menus, you can make various 2. -
Page 21: Level Menu
System Setting LEVEL menu DISTANCE menu You can adjust the level of each speaker to suit your You can set the distance of the speakers connected preference. to this unit. 1. Press SETUP. 1. Press SETUP. "1 TESTTONE" appears on the display window. "1 TESTTONE"... -
Page 22: A/V Sync Menu (Adjusting The Audio Delay)
System Setting A/V SYNC menu (Adjusting RESET menu the audio delay) This allows you to initialize settings you have made in the SETUP menu. You can delay the sound output using this function 1. Press SETUP. when the image is slower than the sound. "1 TESTTONE"... -
Page 23: Operating
Operating Operating Selecting the input By using the remote control source 1. Press 1 on the remote control. 2. Select a source by pressing the button on the remote control once or repeatedly. This section explains how to select the input source (i.e., the AUX component that you want to listen.). -
Page 24: Usb Operation
Operating USB Operation Selecting a folder and an MP3/WMA file 1. Press W/S repeatedly until a desired folder Basic Operations appears. 2. Press d to play it. The first file of folder will play. 1. Connect the USB device to the USB port. Note y USB Folders/Files are recognized as below. -
Page 25: Deleting An Mp3/Wma File
Operating Deleting an MP3/WMA file Playing repeatedly or randomly REPEAT repeatedly to You can delete file, folder or format by pressing During playback, press DELETE. This function is supported only in stop select a desired mode. status. (USB only) Display Description 1. -
Page 26: Playable File Requirement
Operating Playable file Requirement Compatible USB Devices y MP3 Player : Flash type MP3 player. Music file requirement y USB Flash Drive : Devices that support USB2.0 or USB1.1. MP3/WMA file compatibility with this unit is limited as follows. y The USB function of this unit does not support all USB devices. -
Page 27: Playback Effect
Operating Note Playback effect y Find sound and playback effects below. The unit supports various sound and playback effects : SMART DJ, AUTO DJ, DJ EFFECT, and JUKE Effect Description BOX playback. Auto effect Auto effect blends various sound effects SMART DJ playback to fit the mood SMART DJ plays music with various sound and... - Page 28 Operating DJ effect AUTO DJ playback It allows you to enjoy DJ effect such as scratch Auto DJ blends the end of one song into the sound and several kinds of voices yourself. This beginning of another for seamless playback. It function is supported on all sources.
-
Page 29: Program Play
Operating Note JUKE BOX Playback y To check the status of JUKE BOX, press JUKE (Program play) BOX once. You can also check it by the word JUKE BOX function enables you to make a playlist of “PROG. ” on the display window. your favorite files from a USB device. -
Page 30: Enjoying Various Sound Mode
Operating Enjoying various sound mode Display Description NATURAL You can enjoy comfortable and natural sound. You can enjoy various sound mode. For details, refer to "Setting the USER EQ", "Sound effect" and "Bass NATURAL PLUS You can enjoy the natural Blast". -
Page 31: Bass Blast
Operating Note y In some of surround modes, some speakers, there’s no sound or low sound. It depends on the mode of surround and the source of audio, it is not defective. y You may need to reset the surround mode, after switching the input, sometimes even after the sound track changed. -
Page 32: Using A Bluetooth Wireless Technology
Bluetooth device can be operated via the Cascade if the connection display depending on the type of Bluetooth was made via Bluetooth® wireless technology. device. Your unit appears as “LG AVR (XX:XX)”. Available Devices : Mobile phone, MP3, Laptop, PDA. Note... - Page 33 Operating Note 3. When this unit is successfully connected with your Bluetooth device, “PAIRED” will appear on y When using Bluetooth® technology, you the display window and bluetooth indicator will have to make a connection between the be lit up. unit and the bluetooth device as close as possible and keep the distance.
-
Page 34: Using Bluetooth App
1. Tap the “Google Android Market (Google Play Bluetooth Remote” app with this unit. Store)” icon. 2. In the search bar, type in the “LG Bluetooth Remote” and search it. About “LG Bluetooth Remote” App 3. In the search result list, find and tap “LG Bluetooth Remote”... -
Page 35: Activate Bluetooth With "Lg Bluetooth Remote" App
Bluetooth Remote” App “LG Bluetooth Remote” app helps to connect your bluetooth device to this unit. 1. Tap “LG Bluetooth Remote” app icon on the home screen to open “LG Bluetooth Remote” app, and go to the main menu. 2. Tap [Setting] and select the unit you want. -
Page 36: Radio Operations
Operating Radio Operations Presetting the Radio Stations You can preset 50 stations for FM. Be sure that FM antenna is connected.(Refer to the Before tuning, make sure to turn down the volume. page 19.) 1. Tune in to a radio station. 2. -
Page 37: Other Operations
Operating Other Operations Displaying file and input source You can display various information of the input Dimmer source by pressing INFO.. Press SLEEP once. The display window is darkened Function Description by half and the lighting is turned off. To cancel it, press SLEEP repeatedly until dim off. -
Page 38: Advanced Operations
Operating Note Advanced Operations y It is not supported to record music stored on bluetooth, HDMI IN , COAXIAL and OPTICAL IN sources. Recording to USB y When you stop recording during playback, the file that has been recorded at that time You can record a various sound source to USB. -
Page 39: Troubleshooting
Troubleshooting Troubleshooting PROBLEM CAUSE & CORRECTION y The power cord is unpluged. Plug in the power cord. No Power y Check the condition by operating other electronic devices. y The speaker wires are disconnected. Check the speaker connections. y The volume is set to minimum. Adjust the volume level. y Incorrect input source is selected. -
Page 40: Appendix
Bluetooth® wireless technology. The Bluetooth® word mark and logos are owned by the Bluetooth® SIG, Inc. and any use of such marks by LG Electronics is under license. Other trademarks and trade names are those of their respective owners. NA9640P-FE.DAGOILK_ENG_5426.indd 40... -
Page 41: Specifications
Appendix Specifications General Power requirements Refer to the main label. Power consumption Refer to the main label. Dimensions (W x H x D) (430 x 147.5 x 368) mm Net Weight (Approx.) 4.7 kg Operating temperature 5 °C to 35 °C Operating humidity 5 % to 90 % Bus Power Supply... - Page 42 Appendix Front speakers/Subwoofers Front Speaker 2 Way 2 Speaker Type Subwoofer 1 Way 1 Speaker Front Speaker 6 Ω Impedance Subwoofer 6 Ω Front Speaker 460 W x 2 Rated Input Power Subwoofer 460 W x 2 Front Speaker 920 W x 2 Max.
- Page 43 NA9640P-FE.DAGOILK_ENG_5426.indd 43 2014-04-04 5:04:31...
- Page 44 NA9640P-FE.DAGOILK_ENG_5426.indd 44 2014-04-04 5:04:31...
Need help?
Do you have a question about the ARX10 and is the answer not in the manual?
Questions and answers
I need assistance regarding my lg ARX10 I **** struggling to enable the ARC hdmi option