Advertisement
Quick Links
Installa on Instruc ons and
Use & Care Guide
with the Flammable Vapor Igni on Resistant Safety System
Read this manual and the labels on the water heater before you install,
operate, or service it. If you have diffi culty following the direc ons, or
aren't sure you can safely and properly do any of this work yourself:
•
Call our Technical Assistance Hotline at 1-800-722-2101 or visit h p://www.
lochinvar.com. We can help you with installa on, opera ons, troubleshoo ng, or
maintenance. Before you call, write down the model and serial number from the
water heater's data plate.
Incorrect installa on, opera on, or service can damage the water heater, your house
and other property, and present risks including fi re, scalding, electric shock, and
explosion, causing serious injury or death.
Table of Contents Page
IMPORTANT SAFETY INFORMATION ............................................. 3
GETTING STARTED ........................................................................ 7
INSTALLATION ............................................................................. 14
OPERATION ................................................................................. 23
TROUBLESHOOTING ................................................................... 25
MAINTENANCE ........................................................................... 28
NOTES ......................................................................................... 31
REPAIR PARTS ............................................................................. 35
Keep this manual in the pocket on heater for future reference whenever maintenance, adjustment or service is required.
Residential Gas
Water Heater
Residen al Atmospheric Gas Water Heater
Retain your original receipt as proof of purchase.
WARNING: If the informa on in
these instruc ons is not followed
exactly, a fi re or explosion may
result causing property damage,
personal injury or death.
Do not store or use gasoline or other
fl ammable vapors and liquids in the
vicinity of this or any other appliance.
WHAT TO DO IF YOU SMELL GAS
• Do not try to light any appliance.
• Do not touch any electrical switch;
do not use any phone in your build-
ing.
• Immediately call your gas supplier
from a neighbor's phone. Follow the
gas supplier's instruc ons.
• If you cannot reach your gas sup-
plier, call the fi re department.
Installa on and service must be per-
formed by a qualifi ed installer, service
agency or the gas supplier.
LOW LEAD
CONTENT
100299883_ 2000553643_ Rev. A
February 2018
Advertisement

Subscribe to Our Youtube Channel
Related Manuals for Lochinvar GSL050-40


Summary of Contents for Lochinvar GSL050-40
-
Page 1: Table Of Contents
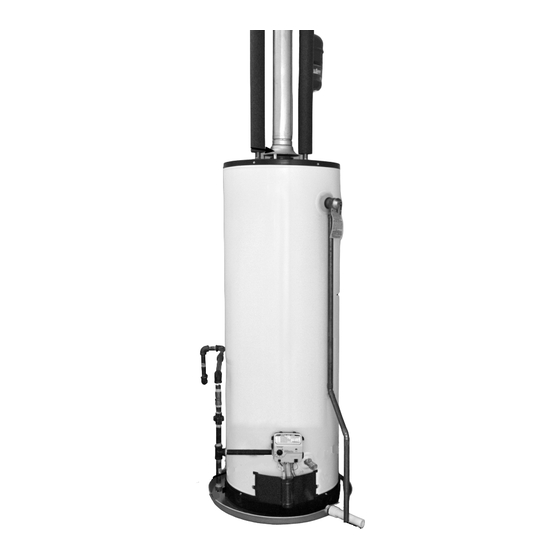
• Call our Technical Assistance Hotline at 1-800-722-2101 or visit h p://www. lochinvar.com. We can help you with installa on, opera ons, troubleshoo ng, or Do not store or use gasoline or other maintenance. Before you call, write down the model and serial number from the fl... - Page 2 COMPLETED INSTALLATION TYPICAL Vent pipe Cold water shut off Expansion tank (Connect to cold water water supply) line Cold water line Dra hood T&P relief valve T&P discharge pipe Gas supply shut off Drain valve Gas supply Drain pan discharge pipe Gas control valve/thermostat...
-
Page 3: Important Safety Information
IMPORTANT SAFETY INFORMATION Read and follow all safety messages and instruc ons in Important informa on to keep this manual. Fill out this sec on and keep this manual in the pocket of the water This is the safety alert symbol. It is used to alert you to heater for reference. - Page 4 IMPORTANT SAFETY INFORMATION o reduce the risk of property Gas Pressure Table 1 damage, serious injury or death, WARNING! The gas supply pressure Time to Produce read and follow the precau ons below, must not exceed the maximum supply Temperature a Serious Burn all labels on the water heater, and pressure as stated on the water...
- Page 5 IMPORTANT SAFETY INFORMATION • If the water supplied to the water Fire Risk • Keep the water heater from becom- heater is pre-heated (for example, ing wet. Immediately shut the water This water heater is by a solar system) the temperature heater off...
- Page 6 IMPORTANT SAFETY INFORMATION if the T&P Relief Valve or discharge instruc ons. When the installa on is Installa on Accessories pipe is blocked. Do not cap or plug the complete, check the vent’s dra using T&P Relief Valve or discharge pipe. the instruc ons on pages 23-24.
-
Page 7: Getting Started
GETTING STARTED Review all of the instruc ons codes applicable to the installa on of Combus on and before you begin work. this water heater. Ven la on Air Supply Improper installa on can Before you start, be sure you damage the water heater, your home Before installing the water heater, you have the following tools and... - Page 8 GETTING STARTED Example: Op on A: Installa on without Check for Chemicals: outside ven la on (not recom- Installa ons where corrosive chemi- Gas Burning Appliance BTU/HR Ra ng mended) cals may be present require outside Gas Water Heater 40,000 Ven la on with outside air is recom- air.
- Page 9 GETTING STARTED A2: Calculate required air volume mum free area is sized according to Table may be adequate). 3. Two openings must be used when B3: Determine minimum free A water heater installed in an unconfi ned ven la ng with air from another room. area required for each vent a c or garage requires that the space opening...
- Page 10 GETTING STARTED covering (in decimals – e.g., 60% = .6) B5: Check that air source is clean and free of chemicals For example, an installa on area that requires openings with 100 square Air for combus on and ven la on inches of free area would need 134 must be clean and free of corrosive square inch openings if using metal...
- Page 11 GETTING STARTED Ven ng Installing a New Vent System upward slope of at least ¼ inch per foot. Install pipe avoiding unnecessary WARNING! Carbon Monoxide The vent pipe must meet the following bends. Pipe joints must be fastened by Hazard. This water heater must be specifi...
- Page 12 GETTING STARTED • The vent pipe must be fi rmly at- Install a readily accessible manual tached and sealed to prevent it shut-off valve in the gas supply line from falling out. as recommended by the local u l- ity. Know the loca on of this valve •...
- Page 13 GETTING STARTED Space Hea ng con nuous fl ow of water through the air handler circuit during the off cycle. TYPICAL MIXING VALVE INSTALLATION • The domes c hot water line from the COMBINATION SPACE HEATING / POTABLE WATER HEATING SYSTEM water heater should be ver cal past EXPANSION TANK COLD WATER INLET...
-
Page 14: Installation
INSTALLATION ✓ pressure gauge to an outside faucet Water pressure Step 1: and measure the maximum water increase caused pressure experienced throughout a ✓ by thermal expansion Verify that your 24-hour period (highest water pres- Verify that you have a properly sized sures o en occur at night). - Page 15 INSTALLATION increases in water pressure (despite • Install an automa c leak detec on the use of a Pressure Reducing Valve and shutoff device (available at in the home’s main water supply line). your local plumbing supplier). These The Safe Drinking Water Act of 1974 devices can detect water leaks and requires the use of backfl...
- Page 16 INSTALLATION bedroom, or any occupied room in accordance with this manual’s Step 2: normally kept closed. instruc ons. Install a metal drain • If the water heater is installed di- Verify that the loca on pan under the water heater piped rectly on carpe ng, it shall be in- to an adequate drain.
- Page 17 INSTALLATION Turn the manual gas valve for valve. Sediment build up in the bo om the water heater’s supply line of the water heater may hinder or OFF. prevent draining. Open a hot water faucet and let the hot water run un l it is cool (This may take 10 min utes or longer).
- Page 18 INSTALLATION sure you can safely complete the Verify that the water heater is installa on, seek assistance from any of set in place properly. Check the following sources: that: • Schedule an appointment with • There is adequate space to install a qualifi...
- Page 19 INSTALLATION Check the filter at least every came with your water heater. Do not T&P Relief Valve. Do not cap, three months and clean as reuse an old T&P Relief Valve. block, plug, or insert any valve necessary. After installation, •...
- Page 20 INSTALLATION IF YOU HAVE COPPER PIPES: connec ons contain non-metallic parts For water heaters that are fed which could be damaged. The proper by a solar water hea ng If your home has copper water pipes, way to connect the water heater to system (or any other pre- you can solder the water pipe connec- copper water pipes is as follows:...
- Page 21 INSTALLATION NOTICE: Most water heater models Check inlet and outlet connec- contain energy saving heat traps in the ons and water pipes for leaks. inlet and outlet connec ons. Do not Dry pipes connec ons so that remove the heat traps. any drips or leaks will be apparent.
- Page 22 INSTALLATION surfaces maintained and suffi cient Z223.1(NFPA 54)-current edi on. Step 11: ✓ room to service the water heater. Check exis ng vent system for rust, ✓ Not installed directly on a carpeted restric ons/obstruc ons. Make Gas Connec ons fl...
-
Page 23: Operation
OPERATION Ligh ng Instruc ons Press the gas control knob in water heater. You may hear drips or a fully and hold it in. While sizzling sound when the water heater is WARNING! Explosion Hazard – holding in the gas control fi... - Page 24 OPERATION Temperature Control • “B” 138°F Allow the water heater’s main • “C” 147°F burner to operate for fi ve System minutes. Pass a newly ex n- • “VERY HOT” 160°F guished match approximately one inch NOTICE: The temperatures above are Adjus ng the Temperature from the dra hood’s relief opening.
-
Page 25: Troubleshooting
TROUBLESHOOTING keeps the tank from freezing during Checking the Pilot Light hot water is simply not warm enough, cold weather but can cause a Hydrogen make sure the faucet you are checking Check the spark igniter. Dim gas build up. See cau on on page 6. doesn’t have a defec ve Thermosta c the room lights and look through the Mixing Valve. - Page 26 TROUBLESHOOTING plumbing system can make it appear Drips from T&P Relief allowing small quan es of water to that the water heater is producing fl ush out the debris. See the label on Valve Discharge Pipe li le to no hot water. In this case, the the T&P Relief Valve for instruc ons.
- Page 27 TROUBLESHOOTING Residen al Standard Gas Water Heater Use and Care Guide • 27 Residen al Standard Gas Water Heater Use and Care Guide • 27...
-
Page 28: Maintenance
MAINTENANCE Rou ne Maintenance Open a hot water faucet and Remove and inspect the let the hot water run un l it is anode rod and replace if Rou ne maintenance will help your cool (This may take 10 min depleted. - Page 29 MAINTENANCE Refi ll the tank by opening the discharge pipe, turn the gas control cold water supply valve. Make knob to the OFF posi on and call a sure a hot water faucet is open qualifi ed person to determine the and the drain valve is closed.
- Page 30 MAINTENANCE Removing and Replacing the gas control valve/thermostat. NOTE: L.P. Gas systems use reverse (le -hand) Gas Control Valve/Thermostat threads on the manifold tube. IMPORTANT: The gas control valve/ thermostat is a standard valve with wire leads that connect to a thermal switch.
-
Page 31: Notes
NOTES Residen al Standard Gas Water Heater Use and Care Guide • 31... - Page 32 NOTES 32 • Residen al Standard Gas Water Heater Use and Care Guide...
- Page 33 NOTES Residen al Standard Gas Water Heater Use and Care Guide • 33...
- Page 34 NOTES 34 • Residen al Standard Gas Water Heater Use and Care Guide...
-
Page 35: Repair Parts
REPAIR PARTS REPAIR PARTS LIST Replacement parts may be ordered through your plumber or the local distributor. Parts will be shipped at prevailing prices DRAFT HOOD and billed accordingly. REDUCER RING - SOME MODELS NOTICE: When ordering replacement parts, have the following FLUE BAFFLE informa on ready: COMBINATION DIP TUBE/HEAT TRAP NIPPLE... - Page 36 Item #13 (Natural Burner) Item #13 (L.P. Burner) Item #14 Lochinvar Water Heaters. All Rights Reserved. Limited Warranty provided by Manufacturer. 36 • Residen al Standard Gas Water Heater Use and Care Guide 36 • Residen al Standard Gas Water Heater Use and Care Guide...
Need help?
Do you have a question about the GSL050-40 and is the answer not in the manual?
Questions and answers