Table of Contents
Advertisement
Quick Links
Advertisement
Table of Contents

Related Manuals for Beale Street Audio A220

Summary of Contents for Beale Street Audio A220
- Page 1 Beale Street Audio A220 Class D 220W Subwoofer Amplifier User Guide...
-
Page 2: Important Safety Instructions
Important Safety Instructions RISK OF ELECTRIC SHOCK DO NOT OPEN APPLICABLE FOR USA, CANADA OR WHERE RISQUE DE CHOQUE ÉLECTRIQUE N'OUVREZ PAS APPROVED FOR USAGE CAUTION: TO PREVENT ELECTRIC SHOCK, CAUTION: To reduce the risk of electric shock, do not remove cover (or back). MATCH WIDE BLADE PLUG TO WIDE SLOT, No user-serviceable parts inside. -
Page 3: Table Of Contents
Table of Contents Important Safety Instructions ............2 Table of Contents ................3 Introduction ..................4 Features ................... 5 What’s Included ................5 Front Panel Features ..............6 Rear Panel Features ................ 7 Installation ..................8 Connections ..................9 Operation ..................13 Specifications ................ -
Page 4: Introduction
Congratulations and thank you for purchasing the Vanco Beale Street Audio A220 Subwoofer Amplifier! The A220 may be small in physical appearance but its got all the muscle you need to drive even the most demanding subwoofers to house thumping levels. -
Page 5: Features
Stereo Speaker Level Input and Passthrough • Adjustable Subwoofer Crossover Frequency • Adjustable Phase Settings • Audio Sensing • 12/24VDC On/Off Trigger Input • 110/220V What’s Included 1 - A220 Amplifier 1 - AC Power Cord 1 - User Guide... -
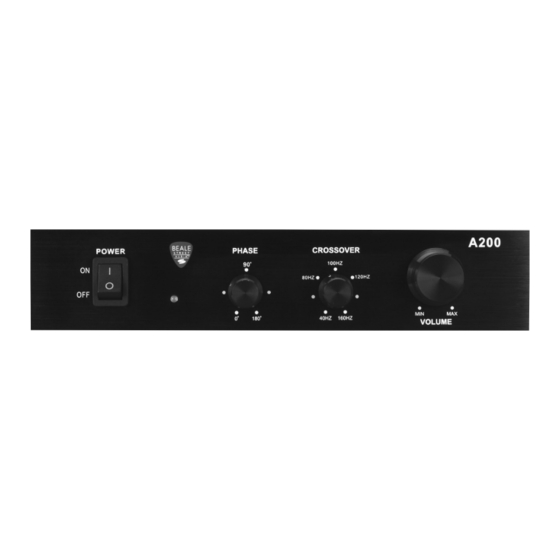
Page 6: Front Panel Features
1. POWER - One, switch. Set to the ON position to turn power to the amp ON. Set to the OFF position to turn power to the amp OFF. 2. POWER LED - One, green LED. Green LED illuminates when the A220 is connected to AC power and turned ON. -
Page 7: Rear Panel Features
This is the stuff on the rear panel... 1. INPUT - Two, RCA jacks. Stereo or mono audio sensing line level audio input. The A220 will turn ON when a line level audio signal is present on either jack. Amp will turn OFF after 15 minutes of no audio signal. -
Page 8: Installation
Installation SHELF MOUNT The A220 can be conveniently mounted on a shelf top as shown. Leave room for wires. Allow adequate space for airflow. Do not set objects on top of the amp. A220 Shelf VENTILATION Even though the A220 will typically run cool, the top and bottom vents allow air to circulate through the chassis allowing optimum performance, and besides...they just look cool...get it... -
Page 9: Connections
The Line Level Input Illustration shows the A220 connected to the Sub OUT on a Vanco Beale Street Audio D2.1. Though we’d prefer that you use a Beale D2.1, you can also use the Sub OUT, LFE OUT or L&R Line Level OUT on just about any appropriately featured audio device. - Page 10 3. While observing proper wire polarity, insert the stripped and twisted ends of the speaker wire into the appropriate + and - terminals on the A220. Be sure there are no loose strands that can cause shorts.
- Page 11 The amplified signal from the distribution amp connects to the A220 and gets passed through to the connected stereo speakers at full bandwidth. The signal also gets processed by the A220 Crossover and Phase settings before getting amplified to the level set by the A220 Volume Control.
- Page 12 3. While observing proper wire polarity, connect the Speaker Level OUT of the Audio Amp/ Receiver to the appropriate Speaker Level IN + and - terminals on the A220. Be sure there are no loose strands that can cause shorts.
-
Page 13: Operation
Operation Once installed and setup, the A220 doesn’t typically need a whole lot of attention. But just in case you need to tweak something, here’s what you’ll want to do... ON/OFF The A220 is audio-sensing, so typically once the system is installed and setup, the power will automatically turn ON with the presence of an audio signal on either the L &... -
Page 14: Specifications
Specifications AUDIO Maximum Output Power ....................120W/8Ω; 220W/4Ω THD ...................................<1% Frequency Response ....................20Hz-160Hz +/-1dB Signal to Noise ............................95dB Input Sensitivity ......................... 2mV @ 50Hz Crossover ............................40-160Hz Phase................................. 0-180° GENERAL Trigger Input ........................+12VDC to +24VDC Line Voltage Range ....................110-120/220-240 VAC Standby Power ............................ -
Page 15: Limited Warranty
Limited Warranty With the exceptions noted in the next paragraph, Vanco warrants to the original purchaser that the equipment it manufactures or sells will be free from defects in materials and workmanship for a period of two years from the date of purchase. Should this product, in Vanco’s opinion, prove defective within this warranty period, Vanco, at its option, will repair or replace this product without charge. - Page 16 A BRAND OF Vanco International, LLC 506 Kingsland Drive Batavia, IL 60510 Phone: 800.626.6445 Fax: 630.879.9189 www.getbeale.com www.vanco1.com A220UG042318 Rev 1 ©2018...
Need help?
Do you have a question about the A220 and is the answer not in the manual?
Questions and answers