
Related Manuals for D-Link DP-311U


Summary of Contents for D-Link DP-311U
- Page 1 DP-311U DP-311U DP-311U D-Link DP-311U DP-311U Wireless Print Server Manual Building Networks for People...
-
Page 2: Table Of Contents
Unix/Linux Printing (See PS Admin Manual on CD-ROM) ....49 Setting up AppleTalk or LPR Printing in MAC OSX ......50 Setting up AppleTalk Printing in MAC OS9 ..........55 Networking Basics ................58 Technical Specifications ..............70 Contacting Technical Support ..............71 Warranty and Registration ..............72 Appendix: DP-311U Printer Compatibility List ........75... -
Page 3: Package Contents
Package Contents Contents of Package: D-Link DP-311U Fast Ethernet Print Server Manual and Warranty on CD Printed Quick Installation Guide If any of the above items are missing, please contact your reseller. System Requirements: A computer with an installed Ethernet adapter... -
Page 4: Introduction
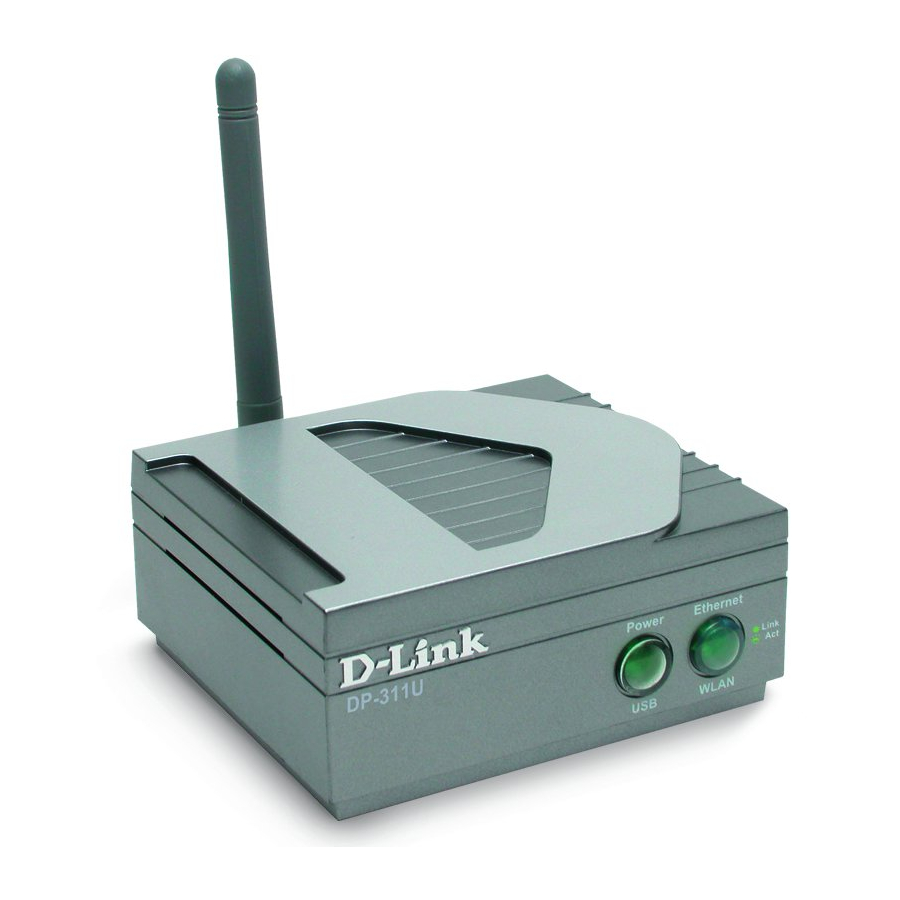
PC acting as a print server can. With one USB (v1.1) port, the DP-311U can connect to almost any printer with a USB port. - Page 5 External Features Port Connectors The DP-311U’s USB port is located on its rear panel. The USB can be configured using the PS Admin program or the print server’s Telnet interface. (See the PS Admin User’s Guide, available on the CD that came with the DP-311U, for information about configuring the print server’s ports.) The Print Server also...
- Page 6 Front Panel LED Indicators Power / USB Steady or flashing green light confirms that the Print Server is powered ON. The LED indicator lights up to show that the Print Server is transferring print data through the USB port. Ethernet/WLAN Steady or flashing green light confirms that the Print Server has a good connection to the Ethernet or Fast Ethernet network.
- Page 7 Rear Panel Connectors Network Cable Connector The Print Server’s rear panel features an RJ-45 connector for connection to 10Base-T Ethernet cabling or 100Base-TX Fast Ethernet cabling (which should be Category 5 twisted-pair cable). The port supports the NWay protocol, allowing the Print Server to automatically detect or negotiate the transmission speed of the network.
-
Page 8: Wireless Basics
D-Link wireless products are based on industry standards to provide easy-to-use and compatible high-speed wireless connectivity within your home, business or public access wireless networks. D-Link wireless products will allow you access to the data you want, when and where you want it. You will be able to enjoy the freedom that wireless networking brings. - Page 9 D-Link AirPlus devices. Installation Considerations The D-Link AirPlus DP-311U lets you print through your network, using a wireless connection, from virtually anywhere within its operating range. Keep in mind, however, that the number, thickness and location of walls, ceilings, or other objects that the wireless signals must pass through, may limit the range.
-
Page 10: Setting Up The Dp-311U
Follow this procedure to avoid complications at the configuration stage. Confirm proper operation of the printer to be connected to the DP-311U, When you have confirmed proper operation of the USB printer, switch it the power OFF. - Page 11 Power ON Self-Test Every DP-311U has been factory-tested to operate properly. When the DP-311U is powered ON, it also automatically performs a Self-Test on each of its major components. The final result of the Self-Test is signaled by the state of the USB LED indicator following the Self-Test. Preliminary to the actual component tests, the LED indicators are tested to confirm their steady and flashing operation.
-
Page 12: Getting Started
TCP/IP. Warning! Only a USB printer may be connected to the USB port of the DP-311U. Do not connect any other USB devices to the USB port of the DP-301U; to do so, may damage the unit and will void the warranty for this product. -
Page 13: Using The Web Configuration
Using the Web Configuration Open your web browser and type http://192.168.0.10 in the address box, and press <Enter>. This set of numbers is the default IP Address of your Print Server. Please note that the PC’s IP Address must correspond with the Print Server’s IP Address in the same segment for the two devices to communicate. - Page 14 Home Click on Home tab from the tools bar of the main screen to display information of the DP-311U’s System Status and Printer Status. System Status and Printer Status When you choose and enter the Home tab, it will show you the system information (see below), providing general information regarding the Print Server.
- Page 15 Port Setting System Device and Port Setting This option will show you settings required to configure the DP-311U Print Server. Consult your printers owner manual for the PJL(Printer Job Language) and print speed supported on your printer. Click the <Save> button on the bottom of the...
- Page 16 Admin Contact: (Optional) Administrator name for the Print Server. Password: By default the DP-311U does not have a password. This is a security risk; it is recommended that you enter a password for the Print Server. Port Name: This is the assigned name for the USB port.
- Page 17 The TCP/IP Protocol section will show you the settings required to configure the DP-311U Print Server for TCP/IP printing. If you forget your IP Address, you can use the PS Admin program to configure the DP-311U Print Server. The default IP Ad- dress is 192.168.0.10.
- Page 18 Network...
- Page 19 Tools Click on the Tools link from the tools bar of the main screen to enter the Tools Page; it provides the control options that include Print Test and Reset. Print Test Print Test section will allow you to send an ASCII text page from the print server to your printer.
- Page 20 Click on the Help link from the tools bar of the main screen to enter the Help Page, it provides a link to D-Link’s support website. D-Link’s support website will provide the most up to date information on your DP-311U Print Server. Please check the website regularly for product and firmware updates.
-
Page 21: Tcp/Ip Printing For Windows Xp
TCP/IP Printing for Windows XP Open the web browser, and type in the IP Address of the DP-311U. For example, type http://192.168.0.10 into the Location or Address field. Press the Enter or (Return) Key. Note: The PC’s IP Address must be in the same subnet as the Print Server’s IP Address for the two devices to communicate. - Page 22 TCP/IP Printing for Windows XP (continued) At the Configuration window, write down the Port Name for future reference. You will need this information later in the configuration process. Select your Connection Mode Enter the ESS-ID of the remote access point or wireless router you wish to connect to.
- Page 23 TCP/IP Printing for Windows XP (continued) When you select TCP/IP Protocol at the Network window, the screen below appears. (We recommend that you keep the default settings as shown.) If you need to make changes, make sure to click Save after you have made the changes.
- Page 24 TCP/IP Printing for Windows XP (continued) Go to Start > Settings > Printers and Faxes > Add a Printer Click Next...
- Page 25 TCP/IP Printing for Windows XP (continued) Select Local Printer Deselect Automatically detect and install my Plug and Play printer. Click Next Select Create a new port. At the pull-down menu, highlight Standard TCP/IP Port. Click Next Click Next...
- Page 26 TCP/IP Printing for Windows XP (continued) Type in the IP address of the Print Server (i.e. 192.168.0.10). The Port Name will automatically be filled in. Select “Custom” Then click on Settings. Select “LPR” Input the port name of the port being used by the printer Click...
- Page 27 TCP/IP Printing for Windows XP (continued) Click Next Click Finish Highlight the printer, as shown. If the desired printer is not on the list, click Have Disk and insert the printer driver disk that came with your printer to install the printer drivers.
- Page 28 TCP/IP Printing for Windows XP (continued) At this screen, you can input a name for the printer. Click Next Click Next Click Finish...
-
Page 29: Tcp/Ip Printing For Windows 2000
TCP/IP Printing for Windows 2000 Open the web browser, and type in the IP Address of the DP-311U. For example, type http://192.168.0.10 into the Location or Address field. Press the Enter or (Return) Key. Note: The PC’s IP Address must be in the same subnet as the Print Server’s IP Address for the two devices to communicate. - Page 30 TCP/IP Printing for Windows 2000 (continued) At the Configuration window, write down the Port Names for future reference. You will need this information later in the configuration process. Select your Connection Mode Enter the ESS-ID of the remote access point or wireless router you wish to connect to.
- Page 31 TCP/IP Printing for Windows 2000 (continued) When you select TCP/IP Protocol at the Network window, the screen below appears. (We recommend that you keep the default settings as shown.) If you need to make changes, make sure to click Save after you have made the changes.
- Page 32 TCP/IP Printing for Windows 2000 (continued) Go to Start > Settings > Printers Double-click on the Add Printer icon. Click Next...
- Page 33 TCP/IP Printing for Windows 2000 (continued) Select Local Printer Click Next Select Create a new port at the pull-down menu, highlight Standard TCP/IP Port. Click Next...
- Page 34 TCP/IP Printing for Windows 2000 (continued) Click Next Type in the IP Address of the Print Server in the Printer Name or IP Address field. The Port Name field will automatically be filled in. Click Next Select “Custom” Then click on Settings.
- Page 35 TCP/IP Printing for Windows 2000 (continued) Select “LPR” Input the port name of the port being used by the printer Click Click Next Click Finish...
- Page 36 TCP/IP Printing for Windows 2000 (continued) Highlight the printer, as shown. If the desired printer is not on the list, click Have Disk and insert the printer driver disk that came with your printer to install the printer drivers. Click Next At this screen, you can input a name for the printer.
- Page 37 TCP/IP Printing for Windows 2000 (continued) Select Do not share this printer Click Next Select Yes to print a test page Click Next Click Finish The printer is now ready for printing with Windows 2000 on your network.
-
Page 38: Tcp/Ip Printing For Windows 98Se/Me
TCP/IP Printing for Windows 98SE/Me Open the web browser, and type in the IP Address of the DP-311U. For example, type http://192.168.0.10 into the Location or Address field. Press the Enter or (Return) Key. Note: The PC’s IP Address must be in the same subnet as the Print Server’s IP Address for the two devices to communicate. - Page 39 TCP/IP Printing for Windows 98SE/Me (continued) At the Configuration window, write down the Port Name for future reference. You will need this information later in the configuration process. The Port Name shown here is only an example. Select your Connection Mode Enter the ESS-ID of the remote access point or wireless router you wish to connect to.
- Page 40 TCP/IP Printing for Windows 98SE/Me(continued) When you select TCP/IP Protocol at the Network window, the screen below appears. (We recommend that you keep the default settings as shown.) If you need to make changes, make sure to click Save after you have made the changes.
- Page 41 TCP/IP Printing for Windows 98SE/Me (continued) Go to Start > Settings > Control Panel Double-click on Network Click Add Highlight Client Click Add...
- Page 42 TCP/IP Printing for Windows 98SE/Me (continued) At this window, click Have Disk. Insert the DP-311U CD-ROM into your CD-ROM drive. Select the letter representing the CD-ROM drive on your computer from 4 4 4 4 4 the pull-down menu. 2 2 2 2 2...
- Page 43 TCP/IP Printing for Windows 98SE/Me (continued) Click OK You should now be back to the Network Properties Page. Highlight LPR for TCP/IP Printing. Click Properties...
- Page 44 TCP/IP Printing for Windows 98SE/Me (continued) Click Add Port Type in the IP Address of the DP-301U. Make sure the Port Name is accu- rate. (The Port Name at right is just an example.) Click OK The Port name and IP Address will be displayed.
- Page 45 TCP/IP Printing for Windows 98SE/Me (continued) Click OK Windows will ask for a restart. Click...
- Page 46 TCP/IP Printing for Windows 98SE/Me continued) Once your computer has rebooted, click on Start > Settings > Printers > Add Printer When the Add Printer Wizard screen appears, Click Next. Select Network Printer. Click Next Type in the path if you know it, or Click Browse.
- Page 47 Name in this window is just an example.) Click OK If the network path is not specified, type in the IP Address of the DP-311U and the Port Name. (The Port Name shown at right is just an example.) Select Yes or No, to answer the question:...
- Page 48 TCP/IP Printing for Windows 98SE/Me (continued) Select Yes to print a test page. Click Finish Go to Start > Settings > Printers Check to see that your printer is installed.
Need help?
Do you have a question about the DP-311U and is the answer not in the manual?
Questions and answers