Table of Contents
Advertisement
Quick Links
Ambient Weather WS-3000-X8 Thermo-Hygrometer, Dew
Point, Heat Index Wireless Monitor with Alarming, and
Radio Controlled Clock User Manual
Table of Contents
1
Introduction ..................................................................................................................................... 3
2
Getting Started ................................................................................................................................ 3
2.1
Parts List ................................................................................................................................. 3
2.2
Recommend Tools .................................................................................................................. 3
2.3
Thermo-Hygrometer Sensor Set Up ....................................................................................... 3
2.4
Display Console Set Up ......................................................................................................... 5
2.4.1 Display Console Layout ......................................................................................................... 6
2.4.2
Sensor Operation Verification ............................................................................................ 6
3
Remote Sensor Installation ............................................................................................................. 7
4
Console Operation........................................................................................................................... 7
4.1
Setup Mode ............................................................................................................................ 8
4.1.1
Display Selection ............................................................................................................... 9
4.1.2
Time Format ..................................................................................................................... 10
4.1.3
Date Format ...................................................................................................................... 10
4.1.4
Date and Time Format ...................................................................................................... 10
4.1.5
Temperature Units of Measure ......................................................................................... 11
4.2
Calibration ............................................................................................................................ 11
4.2.1
Notes about Calibration .................................................................................................... 13
4.2.2
Humidity Calibration Methods ......................................................................................... 13
4.2.3 Temperature Calibration Methods ........................................................................................ 14
4.3
Min / Max and Alarm Mode ................................................................................................. 14
4.3.1
Min / Max ......................................................................................................................... 14
4.3.2
Alarms .............................................................................................................................. 15
4.4
Factory Settings .................................................................................................................... 18
4.4.1
Factory Reset .................................................................................................................... 18
4.4.2
Clear Max/Min Values ..................................................................................................... 19
4.4.3
Re-register Sensors ........................................................................................................... 19
4.4.4
About ................................................................................................................................ 19
4.4.5
Language .......................................................................................................................... 20
4.4.6
Back Light ........................................................................................................................ 20
5
Other Features ............................................................................................................................... 21
5.1
Radio Controlled Clock (RCC) ............................................................................................ 21
5.2
SD Card Export and Firmware Updates ............................................................................... 21
5.2.1
SD Data Export ................................................................................................................ 22
5.2.2
Firmware Updates ............................................................................................................ 22
5.3
PC Software.......................................................................................................................... 22
5.3.1
Getting Started ................................................................................................................. 23
5.3.2
Time, Date and Display Setup .......................................................................................... 24
5.3.3
Alarm Settings .................................................................................................................. 25
5.3.4
Calibration ........................................................................................................................ 26
Version 1.2
©Copyright 2020, Ambient LLC. All Rights Reserved.
Page 1
Advertisement
Table of Contents

Subscribe to Our Youtube Channel
Related Manuals for Ambient Weather WS-3000-X8


Summary of Contents for Ambient Weather WS-3000-X8
-
Page 1: Table Of Contents
Ambient Weather WS-3000-X8 Thermo-Hygrometer, Dew Point, Heat Index Wireless Monitor with Alarming, and Radio Controlled Clock User Manual Table of Contents Introduction ............................. 3 Getting Started ..........................3 Parts List ..........................3 Recommend Tools ........................3 Thermo-Hygrometer Sensor Set Up ..................3 Display Console Set Up ...................... - Page 2 5.3.5 SDCard File ........................26 Best Practices for Wireless Communication ................. 28 Glossary of Terms ......................... 29 Accessories ........................... 29 Specifications ..........................29 Wireless Specifications ......................29 Measurement Specifications ....................29 Power Consumption ......................29 Troubleshooting Guide ......................30 Liability Disclaimer ........................31 FCC Statement..........................
-
Page 3: Introduction
1 Introduction Thank you for your purchase of the Ambient Weather WS-3000 Thermo-Hygrometer, Dew Point, Heat Index Wireless Monitor with Graphing, Alarming, and Radio Controlled Clock. The following user guide provides step by step instructions for installation, operation and troubleshooting. - Page 4 1. Remove the battery door on the back of the transmitter(s) by sliding down the battery door, as shown in Figure 1 . Figure 1 2. BEFORE inserting the batteries, locate the dip switches on the inside cover of the lid of the transmitter.
-
Page 5: Display Console Set Up
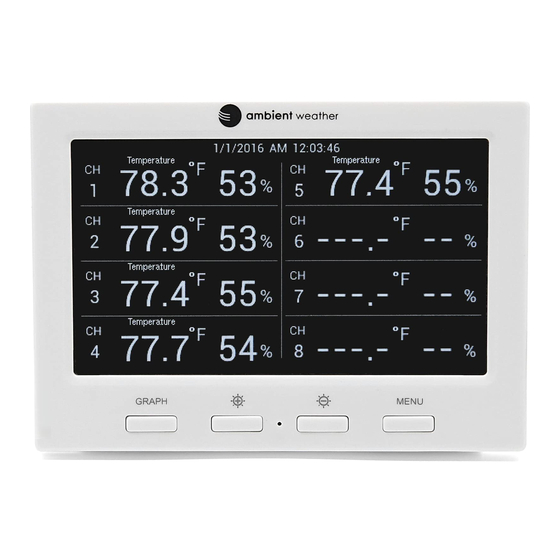
Figure 2 5. Insert two AA batteries. 6. Verify the correct channel number (CH) and temperature units of measure (°F vs. °C) are on the display, as shown in Figure 3. Figure 3 temperature (2) temperature units ( °F vs. °C) (3) channel number (4) relative humidity 7. -
Page 6: Display Console Layout
Figure 4 If the remotes do not update, please reference the troubleshooting guide in Section 10. 2.4.1 Display Console Layout Figure 5 Description Description Temperature/Dew point/heat index Alarm Icon. Radio Controlled Clock reception icon. Humidity Date and time. 2.4.2 Sensor Operation Verification Verify the humidity sensors match closely with all of the sensors in the same location (about 5 to 10’... -
Page 7: Remote Sensor Installation
apart). The sensors should agree within 10% (the accuracy is ± 5%). Allow about 30 minutes for all sensors to stabilize. The humidity can be adjusted or calibrated later to match each other a known source. Verify the temperature sensors match closely with all of the sensors in the same location (about 5 to 10’... -
Page 8: Setup Mode
Icon Description Graph key Temporarily turns on the backlight if turned off by the backlight control timer. Brightness control key Press this key to increase the brightness Brightness control key Press this key to decrease the brightness Menu Key Press this key to enter menu and scroll to different modes Figure 7 Setup Mode In the Normal mode, press the MENU key once to enter Setup Mode. -
Page 9: Display Selection
Scroll left key Press this key to scroll up/left. Mode key Press this key to enter to next mode Figure 8 4.1.1 Display Selection You can customize or even scroll between various parameters within each one of the Channel areas. Scroll to selected channel area (1-5), and press the plus key to modify the home... -
Page 10: Time Format
For example, if you wish to display Channel 1 Dew Point in the CH Area 1, highlight the Channel 1 Dewpoint field. If you wish to toggle both channel 1 temperature and channel 1 dew point, highlight both the Channel 1 Temperature and Channel 1 Dew Point (reference Figure 9),, and the screen will toggle between the channel 1 temperature and dew point on the main screen once every 3 seconds. -
Page 11: Temperature Units Of Measure
Savings Time. Adjust your time zone according to the table below: Hours from Time Zone Cities -12 IDLW: International Date Line West -11 NT: Nome Nome, AK -10 AHST: Alaska-Hawaii Standard Honolulu, HI CAT: Central Alaska HST: Hawaii Standard -9 YST: Yukon Standard Yukon Territory -8 PST: Pacific Standard Los Angeles, CA, USA... - Page 12 Figure 12 Icon Description Scroll down/right key Press this key to scroll down/right. Selection/value increase key Press this key to select parameter and enter the calibration interface. Increase the value during calibration. Value Decrease key Decrease the value during calibration. Scroll up/left key Press this key to scroll up/left.
-
Page 13: Notes About Calibration
Figure 14 4.2.1 Notes about Calibration Note: The calibrated value can only be adjusted on the console. The remote sensor(s) always displays the un-calibrated or measured value. Note: The measured humidity range is between 10 and 99%. Humidity cannot be accurately measured outside of this range. -
Page 14: Temperature Calibration Methods
4.2.3 Temperature Calibration Methods Temperature errors can occur when a sensor is placed too close to a heat source (such as a building structure, the ground or trees). To calibrate temperature, we recommend a mercury or red spirit (fluid) thermometer. Bi-metal (dial) and other digital thermometers are not a good source and have their own margin of error. -
Page 15: Alarms
Value Decrease key Decrease the value during alarm setup. Scroll up/left key Press this key to scroll up/left. Mode key Press this key to enter to next mode Return Key Back to main menu of calibration mode. Resume Key Cancel the calibration and resume. Figure 15 Scroll the temperature, humidity, dew point or heat index min/max field you wish to... - Page 16 If the measured value is less than the high alarm, an audible alert will sound and the alarm icon will flash on the alarm panel, and the alarm icon will appear on the main panel. When an alarm has been triggered, the alarm will sound for 120 second and the corresponding alarm icon will flash until the alarm condition is no longer met.
- Page 17 Version 1.2 ©Copyright 2020, Ambient LLC. All Rights Reserved. Page 17...
-
Page 18: Factory Settings
Icon Description Scroll down/right key Press this key to scroll down/right. Selection/value increase key Press this key to select parameter to set alarm thresholds and turn on the alarm icon. Red alarm icon is high alarm. Blue one is low alarm. -
Page 19: Clear Max/Min Values
4.4.2 Clear Max/Min Values To clear all of the max and min values, scroll to the Clear Max/Min field and press to clear all of the stored max and min values. Figure 20 4.4.3 Re-register Sensors If sensor communication is lost with a specific sensor, you can re-acquire. Scroll to the re-register sensors field, and press to view the re-register panel. -
Page 20: Language
Figure 21 4.4.5 Language Scroll to the Language field, and press to change the language (currently only English is only supported). 4.4.6 Back Light Scroll to the BackLight field, and press to adjust the backlight features. To turn on and off the back lit display at certain times during the day, scroll to the Backlight control field, and select the key to check the Backlight Conrol switch. -
Page 21: Other Features
SD Card Export and Firmware Updates With the use of an optional Micro SD Card (available from Ambient Weather), you can export data to a computer, save historical graphs (in the event of a power failure) and update firmware when new versions are released. -
Page 22: Sd Data Export
Figure 23 5.2.1 SD Data Export The console includes a micro SD / TF card slot on the right side, as shown in Figure 4. Backup data to micro SD / TF card (see the Accessories section of this manual for more information on micro SD / TF cards). -
Page 23: Getting Started
• Live Data Display • Program Date and Time • Program Custom Display • Set Alarms • Calibrate Temperature and Humidity • Export and Graph Data from the SD Card • Sync Date and Time from the Computer 5.3.1 Getting Started 1. -
Page 24: Time, Date And Display Setup
Figure 25 5.3.2 Time, Date and Display Setup Select Menu | Setup to set the time, date and display customization settings. From this screen you can set the graph type on the weather station screen (temperature, humidity, dew point or heat index), graph hours, time zone and daylight savings settings, time and date format, temperature units of measure, archive interval, and display preferences (temperature, humidity, dew point or heat index). -
Page 25: Alarm Settings
Figure 26 For more information on time, date and display settings, please reference Section 4.1. 5.3.3 Alarm Settings Select Menu | Alarm to set the high and low temperature and humidity alarms for each of the 8 supported channels. Figure 27 Version 1.2 ©Copyright 2020, Ambient LLC. -
Page 26: Calibration
For more information on Alarm Settings, please reference Section 4.3. 5.3.4 Calibration Select Menu | Calibration to calibrate each of the 8 supported channels. The temperature and humidity values are offsets. Example: If the actual temperature measured by a calibrated source is 70 °F, and the channel 1 temperature sensor reads 69.5 °F: CH1 Temperature Offset = 70 –... - Page 27 Select Menu | SDCard File to download and analyze data stored on the SD Card. Select the file you wish to view from the list and press Select to view the data. To graph the data: 1. Identify the data file start and end date and times (Figure 29). 2.
-
Page 28: Best Practices For Wireless Communication
Figure 30 For more information on SD Card file formats, please reference Section 5.2. 6 Best Practices for Wireless Communication Note: To insure proper communication, mount the remote sensor on a vertical surface, such as a wall. Do not lie the sensor flat. Wireless communication is susceptible to interference, distance, walls and metal barriers. -
Page 29: Glossary Of Terms
Medium RF Signal Strength Reduction Brick 10-40% Concrete 40-80% Metal 90-100% 7 Glossary of Terms Term Definition Accuracy Accuracy is defined as the ability of a measurement to match the actual value of the quantity being measured. Hygrometer A hygrometer is a device that measures relative humidity. Relative humidity is a term used to describe the amount or percentage of water vapor that exists in air. -
Page 30: Troubleshooting Guide
10 Troubleshooting Guide If your question is not answered here, you can contact us as follows: 1. Email Support: support@ambientweather.com 2. Technical Support: 480-346-3380 (M-F 8am to 3pm Arizona Time) Problem Solution Wireless remote (thermo-hygrometer) not If any of the sensor communication is lost, dashes (--.-) reporting in to console. -
Page 31: Liability Disclaimer
Problem Solution Use the calibration feature to match the indoor and outdoor humidity to a known source. Display console contrast is weak Check the backlight display settings referenced in Section Back Light. 11 Liability Disclaimer Please help in the preservation of the environment and return used batteries to an authorized depot. The electrical and electronic wastes contain hazardous substances. -
Page 32: Warranty Information
14 California Prop 65 WARNING: Use of the Ambient Weather Products can expose you to chemicals, including lead and lead compounds, which are known to the State of California to cause cancer and bisphenol A (BPA), and phthalates DINP and/or DEHP, which are known to the State of California to cause birth defects or other reproductive harm. - Page 33 Although our manufacturing process is "lead-free" and RoHS compliant, it remains possible that trace amounts of lead could be found in components or subassemblies of Ambient Weather Products. Bisphenol A (BPSA) could conceivably be present in minute amounts in our plastic housings, lenses, labels or adhesives, and DEHP &...
Need help?
Do you have a question about the WS-3000-X8 and is the answer not in the manual?
Questions and answers