Table of Contents
Advertisement
Quick Links
PROFESSIONAL
SERIES
Owner's Guide
For Models:
CASECRS
&
CA2RELCD5
Deluxe Vehicle Security and
Remote Start System
IMPORTANT NOTE: The operation of the Security and Convenience System as described in this manual is
applicable to most vehicles. However, due to the configuration of some vehicles, some functions AND/OR
SAFETY PRECAUTIONS may not apply. Please see your installing dealer for more information.
2017 Voxx Electronics Corporation. All rights reserved.
1
Advertisement
Table of Contents

Related Manuals for Code Alarm PROFESSIONAL CASECRS


Summary of Contents for Code Alarm PROFESSIONAL CASECRS
- Page 1 PROFESSIONAL SERIES Owner’s Guide For Models: CASECRS & CA2RELCD5 Deluxe Vehicle Security and Remote Start System IMPORTANT NOTE: The operation of the Security and Convenience System as described in this manual is applicable to most vehicles. However, due to the configuration of some vehicles, some functions AND/OR SAFETY PRECAUTIONS may not apply.
-
Page 2: Table Of Contents
Table of Contents Using Your Remote Control ..............3 Arming the Security System .............. 3 Passive Arming Bypass ..............3 Bypassing the Shock Sensor ............3 Hidden Alarm Function ..............3 Disarming the Security System ............3 Two Stage Door Unlock (optional) ............. 4 Activating Trunk Release (optional) ........... -
Page 3: Using Your Remote Control
Using Your Remote Control Arming the Security System To arm the system, exit the vehicle, close all doors, then press the button. The parking lights will flash 2 times, indicating the system is armed, has locked the doors (if equipped and connected) and activated the starter disable feature. The LED status indicator will blink steadily, once per second. -
Page 4: Two Stage Door Unlock (Optional)
Two Stage Door Unlock (Optional) If this feature is enabled on your system, pressing the button one time will unlock only the driver’s door. Press again within three seconds to unlock the remaining doors. Activating the Trunk Release Feature (Optional) If this feature is enabled on your system, pressing and holding the button for 3 seconds will open the vehicle’s trunk or hatch. -
Page 5: Using The Progressive Car Finder Feature
Using the Progressive Car Finder Feature Press the button to locate your vehicle. The system will flash the parking lights and sound 5 times at low volume, increasing in volume each time the button is pressed. Using the Personal Protection Alarm (Panic) Press and hold the button for 3 seconds to activate the personal protection alarm. -
Page 6: User Selectable Led
User Selectable LED This feature will control whether the LED is ON or OFF when the system is Armed/ Locked and can be toggled ON or OFF without entering the programming feature banks. Turn the ignition ON, OFF, ON, OFF. Press and release the valet/programming button 3 times. -
Page 7: Using Your Remote Vehicle Starter
Using Your Remote Starter Remote Start Ready Mode must be enabled if your vehicle is equipped with a manual transmission. Remote Start Ready Mode - Manual Transmission Vehicles Only To activate the remote start function, the system must first be in Remote Start Ready Mode. -
Page 8: Remote Starting Your Vehicle
Remote Starting Your Vehicle To activate the remote start function, press and release the button 2 times within 2 seconds. The system will sound, the parking lights will flash 1 time and the system will check the vehicle to ensure it is safe to start. If all safety parameters are correct, the vehicle will start. -
Page 9: Using The "Quick-Stop" Feature
Using the “Quick-stop” Feature If you want to make a short stop and keep your vehicle running (to keep the interior warm or cool), the quick-stop feature allows you to do this while keeping your vehicle secure and your keys with you. To engage Quick Stop: Stop the vehicle and place the transmission in PARK. -
Page 10: Preheating Or Precooling The Vehicle's Interior
Preheating or Precooling the Vehicle’s interior Before exiting the vehicle, set the temperature controls to the desired setting and operation. After the system starts the vehicle, the heater or air conditioner will activate and heat or cool the vehicle’s interior to your setting. User Programmable Run Time / Run Time Extension The system has the ability to allow the user to extend the time the vehicle will be running under control of the remote start. -
Page 11: Operating The 2 / 3 Hour Start Up Timer Mode
Operating the 2 / 3 Hour Start Up Timer Mode The system has the ability to start the vehicle every 2 or 3 hours for a 48 hour period. This feature is especially useful in cold climates where the only means to keep the engine and engine fluids warm is to periodically start the engine. -
Page 12: Operating The Daily Start Timer
Operating the Daily Start Timer The system has the ability to start your vehicle based on a 24-hour countdown timer. This feature requires a two-part activation sequence. From the remote, while in range of the vehicle, pressing both the & buttons together will activate the 24 hour countdown timer (the vehicle will start 24 hours from this time). -
Page 13: Status Led, Light Flashes And Siren/Horn Indications
Status LED, Light Flashes, and Siren/Horn Indications Status LED Flash Indications LED Flashes Function Disarmed Slow Flash Armed Fast Flash Passive Arming Countdown ON (Solid) Valet Mode 2 Flashes Zone 2 Trigger, Hood / Trunk 3 Flashes Zone 3 Trigger, Door 4 Flashes Zone 4 Trigger, Shock Sensor 5 Flashes... -
Page 14: Additional 2-Way Lcd Remote Control Functions
Additional 2-Way LCD Remote Control Functions Additional Features of the Optional 2 Way LCD Remote Control Check Vehicle Status Press and release 2 times then press within 3 seconds, the transmitter will display the current status of the vehicle. Display Illumination Press and hold the button for 1 second. - Page 15 Button Lock Press and release then press hold the for 2 seconds to toggle the button lock on or off. When the button lock is active, the remote control will beep/vibrate 2 times when a button is pressed indicating it is locked. Illumination Press and release 2 times then press and hold...
-
Page 16: Lcd Remote Control Icon's
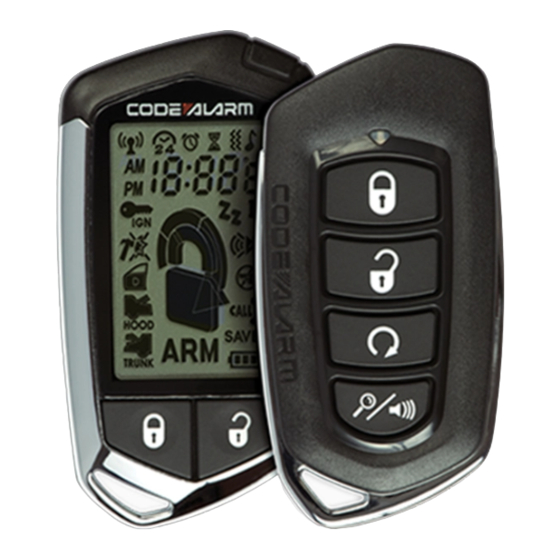
LCD Remote Control ICON’s UNLOCK LOCK VALET MODE SYSTEM ARMED IGNITION ON/TRIGGER TRANSMITTING TRUNK TRIGGER DOOR TRIGGER HOOD TRIGGER FULL SHOCK TRIGGER SYSTEM TRIGGER TIME COUNT DOWN BATTERY INDICATOR BATTERY SAVE MODE MELODY MODE VIBRATE/SILENT MODE TIME DISPLAY 2 CAR MODE ALARM CLOCK ENGINE RUNNING TIMER / TEMP. -
Page 17: Remote Control Buttons & Functions
Remote Control Buttons & Functions 4-Button Car Find / Lock Unlock Start Operation Method Transmitter Panic Lock Press and Release Unlock Press and Release 2 Step Unlock Press and Release 2 times Trunk Push and Hold (3 Sec) Car Finder Press and Release Panic Push and Hold (3 Sec) - Page 18 LCD 5-Button Car Find / Lock Unlock Start Function Operation Method Transmitter Panic Lock Press and Release Unlock Press and Release 2 Step Unlock Press and Release 2 times Trunk Push and Hold (3 Sec) Car Finder Press and Release Panic Push and Hold (3 Sec) Press and Release (1 or 2 times...
-
Page 19: Replacing Remote Control Batteries
Replacing Remote Control Batteries 4 Button Remote Control - Model CAT4M The batteries inside each remote control should last approximately 1 year under normal use. When the batteries become weak you will notice the remote control range (the distance from the vehicle the remote control will work) deteriorate and the small LED on the remote control will dim. -
Page 20: Warranty Information
LIMITED LIFETIME WARRANTY Applies to Code Alarm Series Control Modules, Sirens, Sensors, and Relays. Voxx Electronics Corporation (the Company) warrants to the original purchaser of this product that should this product or any part thereof, (other than transmitters) under nor-... - Page 21 2017 Voxx Electronics Corporation. All rights reserved.
- Page 22 caSECRS / ca2RELCD5 4280829 Owners revA...
- Page 23 2017 Voxx Electronics Corporation. All rights reserved.
- Page 24 Voxx Electronics Corporation. Customer Service 1-800-421-3209 WWW.CODE-ALARM.COM FCC COMPLIANCE This device complies with Part 15 of the FCC rules and with RSS-210 of Industry Canada. Operation is subject to the following two conditions: 1. This device may not cause harmful interference, and 2.
Need help?
Do you have a question about the PROFESSIONAL CASECRS and is the answer not in the manual?
Questions and answers