Table of Contents
Advertisement
Advertisement
Table of Contents

Related Manuals for AEG LAVAMAT 76800


Summary of Contents for AEG LAVAMAT 76800
- Page 1 LAVAMAT 76800 Washing Machine User information...
-
Page 2: Dear Customer
Dear Customer, Please read this user information carefully and keep it to refer to later. Please pass the user information on to any future owner of the appli- ance. The following symbols are used in the text: Safety instructions Warning! Information that affects your personal safety. Important! Information that prevents damage to the appliance. -
Page 3: Table Of Contents
Contents Operating Instructions Safety ............Disposal . - Page 4 Installation and connection instructions ....25 Safety information concerning installation ......25 Installing the appliance .
-
Page 5: Operating Instructions
Operating Instructions 1 Safety Prior to using the appliance for the first time • Follow the “Installation and connection instructions”. • If the appliance is delivered in the winter months when there are mi- nus temperatures: store the washing machine at room temperature for 24 hours before using for the first time. -
Page 6: Disposal
• Switch off the washing machine prior to cleaning it and carrying out maintenance. In addition, remove the power plug from the power point or – if the appliance has been hard-wired – switch off the cut- out in the fuse box or completely remove the fuse. •... -
Page 7: Description Of The Appliance
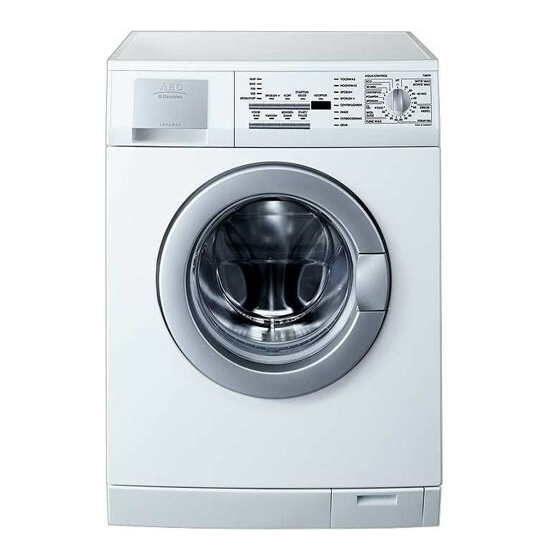
Description of the appliance Detergent drawer Rating plate (behind door) Screw feet (height adjustable) Control panel Spin/RINSE HOLD button DELAY TIMER button Additional programme buttons START/PAUSE button Multi-display Programme progress display DOOR indicator OVERDOSING indicator Control panel Plinth flap/ Drain pump Programme selector... -
Page 8: Programme Overview
Programme overview Programme ENERGY SAVING COTTONS/LINEN 95, 60, 40, 30 40-60 MIX EASY-CARES 60, 50, 40, 30 EASY IRON 40 DELICATES 40, 30 WOOL/SILK (Hand-washing) 40, 30, COLD RINSE DRAIN SPIN REFRESH 1) A 10 litre bucket contains approx. 2.5 kg dry washing (cotton) 2) Programme settings for tests in accordance with or in the style of EN 60 456 and IEC 60 456 are described in the chapter “Consumption values”. - Page 9 Energy-saving programme which washes at 60 °C for lightly to normally soiled whites or coloureds made of cotton/linen. Programme for normally to heavily soiled whites/coloureds made of cotton/linen. Programme for cottons/linen, which is indicated for various wash temperatures. Items which according to their care label are normally washed separately at 40 °C or at 60 °C, can be washed together in this programme.
-
Page 10: Before The First Wash
Before the first wash To remove any production-related residues from the drum and water tank, perform the first wash cycle without washing. Programme: COT- TONS/LINEN 60, press the TIME SAVER button, add approx. 1/4 measur- ing cup of detergent. Preparing and sorting washing Preparing washing •... -
Page 11: Running A Wash Cycle
Running a wash cycle Opening the door/loading washing 1. Open the door: pull the handle on the door. When the appliance is switched on, the DOOR and START/PAUSE indica- tors show whether the door can be opened: DOOR indicator illuminated green illuminated green During the programme the door is locked when the water level or the temperature is high. - Page 12 1. Pull out the detergent drawer as far as it will go. 2. Add the detergent/conditioner. 3. Push the detergent drawer in fully. Washing powder/tablets for the main wash cycle Conditioner/Wash-care products to preserve the shape of garments/Starch Washing powder/tablets for the main wash cycle If you are using water softener and require the right compartment for detergent for the pre-wash cycle, add the water softener on top of the detergent for the main wash cycle in the left compartment.
-
Page 13: Switching On The Appliance/Selecting A Programme
Switching on the appliance/selecting a programme Set the programme and tempera- ture using the programme selector. The appliance is switched on by se- lecting a programme. – The programme progress display shows the programme steps that the selected programme will car- ry out. -
Page 14: Selecting Additional Programmes
Selecting additional programmes If required, press additional pro- gramme button(s). The correspond- ing indicator will illuminate. If “Err” flashes in the multi-display, the selected additional programme cannot be used together with the wash programme set. RINSE + Two additional rinse cycles are carried out for the programmes ENERGY SAVING, COTTONS/LINEN, DELICATES, EASY-CARES and EASY IRON (for example in cases of over-sensitive skin). -
Page 15: Setting The Delay Timer
Setting the delay timer Using the DELAY TIMER button you can delay the start of a programme by 30 minutes (30') to a maximum of 23 hours (23h). 1. Select the programme. 2. Press the DELAY TIMER button repeatedly until the desired start delay is shown in the multi-display, e.g. -
Page 16: Interrupting A Programme/Adding Washing
Interrupting a programme/adding washing Interrupting a programme • A programme can at any time be interrupted by pressing the START/ PAUSE button and resumed by pressing START/PAUSE again. • To cancel a programme before it has ended, turn the programme se- lector to OFF. -
Page 17: Child Safety Device
Child safety device If the child safety device has been activated, the door can no longer be shut. Activating the child safety device: Use a coin to turn the knob (on the inside of the door) in a clockwise di- rection as far as it will go. -
Page 18: Cleaning And Care
Cleaning and care Important: Do not use furniture cleaning products or aggressive clean- ing agents to clean the appliance. Wipe over the control panel and housing with a damp cloth. Detergent drawer The detergent drawer should be cleaned regularly. 1. Remove the detergent drawer by pulling firmly. 2. -
Page 19: Troubleshooting
What to do if... Remedying small faults yourself If during use of the appliance one of the following error codes is shown in the multi-display: – E10 (Problems with the water inflow), – E20 (Problems with the water outflow), – E40 (door open), please consult the following table. - Page 20 Problem E10 appears. The END indicator is flashing once, and si- multaneously an acous- tic signal is sounding once. (Problems with the wa- ter inflow.) The washing machine vibrates when operating or is not stable. Water is running out from under the washing machine.
-
Page 21: If The Wash Result Is Not Satisfactory
Problem Conditioner has not been rinsed in, com- partment w for condi- tioner is filled with water. The door cannot be opened when the wash- ing machine is switched The washing is badly creased. If the wash result is not satisfactory The washing is grey and there are limescale deposits in the drum •... -
Page 22: Carrying Out An Emergency Drain
There are white residues on the washing • What can be seen here are insoluble substances which modern deter- gents contain. They are not the result of insufficient rinsing. Shake or brush the washing. If possible turn the washing inside out before washing. -
Page 23: Drain Pump
Drain pump The drain pump is maintenance-free. It is only necessary to open the pump cover if there is a malfunction and water is no longer being pumped out, e.g. if the pump wheel is blocked. Before loading the machine, please always ensure that there are no for- eign bodies present in the pockets or in between the items to be washed. -
Page 24: Technical Data
Technical data This appliance conforms with the following EU Directives: – 73/23/EEC dated 19.02.1973 Low Voltage Directive – 89/336/EEC dated 03.05.1989 EMC Directive inclusive of Amending Directive 92/31/EEC – 93/68/EEC dated 22.07.1993 CE Marking Directive Height x width x depth Depth when door is open Height adjustability Load (depending on programme) -
Page 25: Installation And Connection Instructions
Installation and connection instructions 1 Safety information concerning installa- tion • This washing machine cannot be built-in. • Before using for the first time, check the appliance for damage sus- tained while it was being transported. Do not under any circumstanc- es connect an appliance that is damaged to the mains. -
Page 26: Installing The Appliance
Installing the appliance Transporting the appliance Warning: The washing machine is very heavy. There is a risk of injury. Exercise care when lifting the appliance. • Do not lay the washing machine on its front nor on its right side (as seen from the front). -
Page 27: Where To Install
Special spanner A and sealing caps B (2 units) and C (1 unit) come with the appliance. 3. Use special spanner A to remove screw D and the compression spring. 4. Use sealing cap C to cap the hole. 5. Use special spanner A to remove the two screws E. -
Page 28: Making The Appliance Level
Making the appliance level The four feet of the appliance are pre-adjusted. Large degrees of unevenness can be compensated for by adjusting the four feet of the appliance. Use the special spanner supplied to do this. Important: Do not use pieces of wood, cardboard or such like to level out small degrees of unevenness in the floor. -
Page 29: Electrical Connection
Electrical Connection Any electrical work required to install this appliance should be carried out by a qualified electrician or competent person. WARNING – THIS APPLIANCE MUST BE EARTHED. The manufacturer declines any liability should these safety measures not be observed. Before switching on, make sure the electricity supply voltage is the same as that indicated on the appliance rating plate. -
Page 30: Connecting The Appliance To The Water Supply
The switch must not break the yellow and green earth cable at any point. This appliance complies with the requirements laid out in the EEC Di- rective 76/899. Voltage 240 V AC: Fuse rating 13amps See rating plate for further information. This appliance meets VDE requirements. -
Page 31: Water Inlet
Water inlet A 1.35m long pressure hose is supplied with the appliance. If a longer inlet hose is required, only hoses from the manufacturer are to be used. Service Force stocks hose kits of different lengths. Sealing rings are either inserted in the plastic nuts of the threaded hose fitting or are included as spare parts. -
Page 32: Water Drainage
Water Drainage The appliance drain hose should hook into a standpipe, the hook in the drain hose is formed using the plastic “U-Piece“ supplied. The standpipe should have an internal diameter of approximately 38 mm (see dia- gram) thus ensuring there is an air break between the drain hose and standpipe. - Page 33 Pumping heights of over 1 metre The washing machine’s drain pump is able to pump water to a height of 1metre, calculated from the surface on which the appliance is installed. Important! If pumping height is over 1 metre malfunctions and dam- age to the appliance may arise.
-
Page 34: Warranty Conditions
Great Britain Standard guarantee conditions We, AEG, undertake that if within 12 months of the date of the purchase this AEG appliance or any part thereof is proved to be defective by reason only of faulty workmanship or materials, we... -
Page 35: Service And Spare Parts
AEG appliance, or for further information on AEG products please contact our Customer Care Depart- ment by letter or telephone at the address below or visit our website at www.aeg.co.uk. Customer Care Department AEG Domestic Appliances 55-77 High Street... - Page 36 USD 14 billion in more than 150 countries around the world. AEG Hausgeräte GmbH Postfach 1036 D-90327 Nürnberg http://www.aeg.hausgeraete.de © Copyright by AEG 105 176 008-00-260404-01 Subject to change without notice...
Need help?
Do you have a question about the LAVAMAT 76800 and is the answer not in the manual?
Questions and answers