Table of Contents
Advertisement
Available languages
Available languages
Quick Links
Advertisement
Table of Contents

Subscribe to Our Youtube Channel
Related Manuals for Arenti AINANNY


Summary of Contents for Arenti AINANNY
- Page 1 AINANNY with Monitor USER MANUAL EN Smart baby monitor FR Babyphone intelligent ES Vigilabebés inteligente DE Intelligentes Babyphone IT Baby monitor intelligente Compatible with Amazon Alexa & Google Assistant...
-
Page 3: Packing List
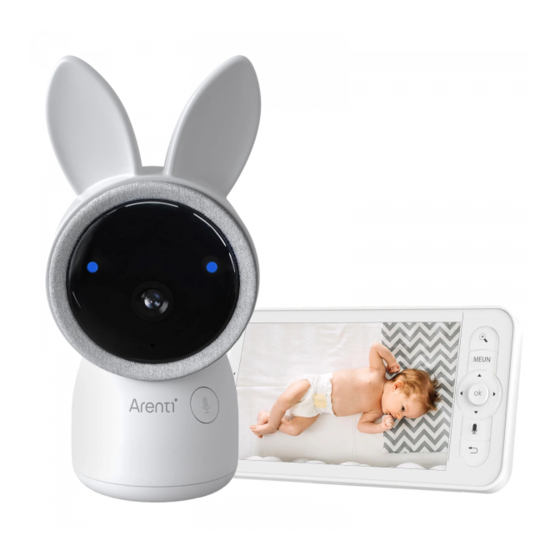
Quick start guide 1. Packing list 4. Connection of camera and App 2. Product description 5. Pairing of camera and monitor 7. FAQ 3. Installation 6. Usage 1. Packing list Camera X1 Power adaptor X2 USB cable X2 Reset pin X1 Monitor X1 Bracket X1 Headgear X1... - Page 4 Zoom in/out Microphone Menu Direction Status light of charging Status light of using Call Back Antenna ON/OFF button SD card slot Speaker Reset Micro USB Screen holder Status light Orange light: Charging Green light: Fully charged of charging Status light Yellow light: The monitor is on of using No light: The monitor is off...
-
Page 5: Installation
App Download The App is available for both iOS and Android OS. Scan the QR code or search "Arenti" at App Store and Google Play. Download and install the App at your phone.You can select the App according to needs. - Page 6 Set up router The router supports the 2.4GHz WiFi (doesn't support the 5GHz), and is connected to the WiFi network.Please set the parameters of the router before connecting the WiFi network, and record the SSID and password of your WiFi. Please keep network available 2.4GHz 5GHz...
- Page 7 6. Usage Note: If you have addded 2 cameras, the monitor screen will display 2 live views at the same time. If you want to set parameters or enable functions of one of the cameras, you need to select the camera first. The method of camera selection is as follows: Press the back key on the home page to enter the switch camera mode and the camera icon will flash.
- Page 8 Photo & video Take a photo: You can take a photo when you want to capture an interesting scene of baby. Press Menu button on the monitor screen, select and press OK to take a photo. Record a video: You can record a video when you want to capture a meaningful time of baby. Press Menu button on the monitor screen, select and press OK to record a video.
- Page 9 Feeding reminder Remind you to feed your baby, when you are too busy, or when you want to give your baby a regular diet. 1. Press Menu button on the monitor screen, and select > Feeding Reminder. 2. Press UP and DOWN direction buttons to select between 4 time options, and press OK to start time setting.
- Page 10 Temperature and humidity detection You can real-time monitor the temperature and humidity of your baby room. When the temperature and humidity are out of range, you can get the alarms immediately, and then take measures. 1. Press Menu button on the monitor screen, and select >...
- Page 11 General setting Set up brightness: 1. Press Menu button on the monitor screen, select and press OK to enter the interface. 2. Press UP and DOWN direction buttons to adjust brightness. Set up time: 1. Press Menu button on the monitor screen, and select >...
- Page 12 7. FAQ Q: The monitor cannot be previewed properly? A: Check whether the monitor has connected to the camera. If not, pair the camera and the monitor firstly. Q: Cannot find the pairing button? A: The pairing button is the call button of the camera. Long press the button for 3 seconds, and follow the step instructions of the monitor.
-
Page 13: Guide De Démarrage Rapide
Guide de démarrage rapide 4. Connexion de la caméra et de l'application 1. Liste de colisage 5. Couplage de la caméra et du moniteur 2. Description du produit 6. Utilisation 7. FAQ 3. Installation 1. Liste de colisage Caméra X1 Adaptateur secteur X2 Câble USB X2 Vis X3 Guide rapide X1... - Page 14 Zoom avant/arrière Microphone Menu Voyant d'état Direction de charge Voyant d'état Appeler d'utilisation Retour Antenne Bouton marche/arrêt fente pour carte SD Conférencier Réinitialiser Micro USB Support d'écran Voyant orange : en charge Voyant d'état de charge Feu vert : complètement chargé Voyant jaune : le moniteur est allumé...
- Page 15 Téléchargement de l'application L'application est disponible pour iOS et Android OS. Scannez le code QR ou recherchez « Arenti » sur App Store et Google Play. Téléchargez et installez l'application sur votre téléphone. Vous pouvez sélectionner l'application en fonction de vos besoins.
-
Page 16: Couplage De La Caméra Et Du Moniteur
Configurer le routeur Le routeur prend en charge le WiFi 2,4 GHz (ne prend pas en charge le 5 GHz) et est connecté au réseau WiFi. Veuillez définir les paramètres du routeur avant de connecter le réseau WiFi et enregistrer le SSID et le mot de passe de votre WiFi. - Page 17 6. Utilisation Noter: Si vous avez ajouté 2 caméras, l'écran du moniteur affichera 2 vues en direct en même temps. Si vous souhaitez définir des paramètres ou activer les fonctions de l'une des caméras, vous devez d'abord sélectionner la caméra. La méthode de sélection de la caméra est la suivante : Appuyez sur la touche retour sur la page d'accueil pour entrer dans le mode de commutation de l'appareil photo et l'icône de l'appareil photo...
- Page 18 Photo & vidéo Prendre une photo: Vous pouvez prendre une photo lorsque vous souhaitez capturer une scène intéressante de bébé. Appuyez sur le bouton Menu sur l'écran du et appuyez sur OK pour prendre une photo. moniteur, sélectionnez Enregistrer une vidéo: Vous pouvez enregistrer une vidéo lorsque vous souhaitez capturer un moment significatif de bébé.
- Page 19 Rappel d'alimentation Rappelez-vous de nourrir votre bébé, lorsque vous êtes trop occupé ou lorsque vous souhaitez donner à votre bébé un régime alimentaire régulier. 1. Appuyez sur le bouton Menu sur l'écran du moniteur et sélectionnez > Rappel d'alimentation. 2. Appuyez sur les boutons de direction HAUT et BAS pour sélectionner entre 4 options d'heure et appuyez sur OK pour commencer le réglage de l'heure.
- Page 20 Détection de température et d'humidité Vous pouvez surveiller en temps réel la température et l'humidité de la chambre de votre bébé. Lorsque la température et l'humidité sont hors de portée, vous pouvez obtenir les alarmes immédiatement, puis prendre des mesures. >...
- Page 21 Réglage général Configurer la luminosité : 1. Appuyez sur le bouton Menu sur l'écran du moniteur, sélectionnez et appuyez sur OK pour entrer dans l'interface. 2. Appuyez sur HAUT et BAS pour régler la luminosité. Temps d'installation: > 1. Appuyez sur Menu sur l'écran du moniteur et sélectionnez Réglage de l'heure.
- Page 22 7. FAQ Q : Le moniteur ne peut pas être prévisualisé correctement ? R : Vérifiez si le moniteur est connecté à la caméra. Sinon, associez d'abord la caméra et le moniteur. Q : Vous ne trouvez pas le bouton d'appairage ? R : Le bouton d'appairage est le bouton d'appel de la caméra.
-
Page 23: Guía De Inicio Rápido
Guía de inicio rápido 4. Conexión de la cámara y la aplicación 1. Lista de empaque 5. Emparejamiento de cámara y monitor 2. Descripción del producto 6. Uso 7.FAQ 3. Instalación 1. Lista de empaque Cámara X1 Adaptador de corriente X2 Cable USB X2 Tornillo X3 Guía rápida X1... - Page 24 Acercar / alejar Micrófono Menú Indicador de Dirección estado de carga Indicador de Llamar estado de uso Regreso Antena Boton de encendido / apagado ranura para tarjetas SD Altavoz Reiniciar Micro USB Soporte de pantalla Luz naranja: cargando Indicador de estado de carga Luz verde: completamente cargada Luz amarilla: el monitor está...
-
Page 25: Instalación
Descarga de la aplicación La aplicación está disponible para los sistemas operativos iOS y Android. Escanee el código QR o busque "Arenti" en App Store y Google Play. Descargue e instale la aplicación en su teléfono. Puede seleccionar la aplicación según sus necesidades. - Page 26 Configurar enrutador El enrutador admite WiFi de 2.4GHz (no admite 5GHz) y está conectado a la red WiFi. Configure los parámetros del enrutador antes de conectar la red WiFi y registre el SSID y la contraseña de su WiFi. Mantenga la red disponible 2.4GHz 5GHz 5.
- Page 27 6. Uso Nota: Si ha agregado 2 cámaras, la pantalla del monitor mostrará 2 vistas en vivo al mismo tiempo. Si desea establecer parámetros o habilitar funciones de una de las cámaras, primero debe seleccionar la cámara. El método de selección de la cámara es el siguiente: Presione la tecla de retroceso en la página de inicio para ingresar al modo de cambio de cámara y el icono de la cámara parpadeará.
- Page 28 Foto y video Toma una foto: Puede tomar una foto cuando desee capturar una escena interesante del bebé. Presione el botón Menú en la pantalla del monitor, seleccione y presione OK para tomar una foto. Grabar un video: Puede grabar un video cuando desee capturar un momento significativo del bebé.
- Page 29 Recordatorio de alimentación Recuérdele que debe alimentar a su bebé cuando esté demasiado ocupada o cuando quiera darle a su bebé una dieta regular. 1. Presione el botón Menú en la pantalla del monitor y seleccione > Recordatorio de alimentación. 2.
- Page 30 Detección de temperatura y humedad Puede controlar en tiempo real la temperatura y la humedad de la habitación de su bebé. Cuando la temperatura y la humedad están fuera de rango, puede obtener las alarmas de inmediato y luego tomar medidas. 1.
- Page 31 Ajustes generales Configurar brillo: 1. Presione el botón Menú en la pantalla del monitor, seleccione presione OK para ingresar a la interfaz. 2. Presione ARRIBA y ABAJO para ajustar el brillo. Tiempo de preparación: 1. Presione Menú y seleccione > Configuración de hora. 2.
- Page 32 7. FAQ P: ¿No se puede previsualizar correctamente el monitor? R: Compruebe si el monitor se ha conectado a la cámara. Si no es así, primero empareje la cámara y el monitor. P: ¿No puede encontrar el botón de emparejamiento? R: El botón de emparejamiento es el botón de llamada de la cámara.
- Page 33 Schnellstartanleitung 4. Verbindung von Kamera und App 1. Packliste 5. Koppeln von Kamera und Monitor 2. Produktbeschreibung 6. Verwendung 7. FAQ 3. Installation 1. Packliste Kamera X1 Netzteil X2 USB-Kabel X2 Schraube X3 Monitor X1 Silikonhülle X1 Kopfbedeckung X1 Kurzanleitung X1 Warnaufkleber X2 Reset-Pin X1 2.
- Page 34 Rein/rauszoomen Mikrofon Speisekarte Statusanzeige Richtung des Ladens Okay Statusleuchte der Anrufen Verwendung Zurückkehren Antenne An/aus Schalter SD-Karten- steckplatz Lautsprecher Zurücksetzen Micro-USB Bildschirmunterstützung Oranges Licht: Aufladen Statusanzeige des Ladens Grünes Licht: Vollständig aufgeladen Gelbes Licht: Der Monitor ist eingeschaltet Statusleuchte der Verwendung Kein Licht: Der Monitor ist aus Antenne...
- Page 35 Die App ist sowohl für iOS- als auch für Android-Betriebssysteme verfügbar. Scannen Sie den QR-Code oder suchen Sie im App Store und bei Google Play nach "Arenti". Laden Sie die App herunter und installieren Sie sie auf Ihrem Telefon. Sie können die App nach Bedarf auswählen.
- Page 36 Router einrichten Der Router unterstützt 2,4 GHz WiFi (unterstützt nicht 5 GHz) und ist mit dem WiFi-Netzwerk verbunden. Bitte stellen Sie die Parameter des Routers ein, bevor Sie das WiFi-Netzwerk verbinden, und notieren Sie die SSID und das Passwort Ihres WiFi. Bitte Netzwerk verfügbar halten 2.4GHz 5GHz...
- Page 37 6. Verwendung Notiz: Wenn Sie 2 Kameras hinzugefügt haben, zeigt der Monitorbildschirm 2 Live-Ansichten gleichzeitig an. Wenn Sie eine der Kameras parametrieren oder Funktionen aktivieren möchten, müssen Sie zuerst die Kamera auswählen. Die Methode der Kameraauswahl ist wie folgt: Drücken Zurück-Taste Startseite, Kamerawechselmodus zu wechseln, und das Kamerasymbol blinkt.
- Page 38 Foto & Video Mach ein Foto: Sie können ein Foto aufnehmen, wenn Sie eine interessante Szene mit einem Baby festhalten möchten. Drücken Sie die Menütaste auf dem Monitor- bildschirm, wählen Sie und drücken Sie OK, um ein Foto aufzunehmen. Nehmen Sie ein Video auf: Sie können ein Video aufnehmen, wenn Sie eine sinnvolle Zeit des Babys festhalten möchten.
- Page 39 Fütterungserinnerung Erinnern Sie Sie daran, Ihr Baby zu füttern, wenn Sie zu beschäftigt sind oder wenn Sie Ihrem Baby eine regelmäßige Ernährung geben möchten. 1. Drücken Sie auf dem Monitorbildschirm die Menütaste und wählen Sie > Fütterungserinnerung. 2. Drücken Sie AUF und AB, um zwischen 4 Zeitoptionen auszuwählen, und drücken Sie OK, um die Zeiteinstellung zu starten.
- Page 40 Temperatur- und Feuchtigkeitserkennung Sie können die Temperatur und Luftfeuchtigkeit Ihres Babyzimmers in Echtzeit überwachen. Wenn Temperatur und Luftfeuchtigkeit außerhalb des zulässigen Bereichs liegen, können Sie die Alarme erhalten und dann Maßnahmen ergreifen. 1. Drücken Sie Menü und wählen Sie > Temperature and humidity. 2.
- Page 41 Allgemeine Einstellung Helligkeit einstellen: 1. Drücken Sie die Menütaste auf dem Monitorbildschirm, wählen Sie und drücken Sie OK, um die Schnittstelle zu öffnen. 2. Drücken Sie UP und DOWN, um die Helligkeit einzustellen. Vorbereitungszeit: 1. Drücken Sie Menü und wählen Sie >...
- Page 42 7. FAQ F: Der Monitor kann nicht richtig in der Vorschau angezeigt werden? A: Überprüfen Sie, ob der Monitor mit der Kamera verbunden ist. Wenn nicht, koppeln Sie zuerst die Kamera und den Monitor. F: Kann die Pairing-Schaltfläche nicht finden? A: Die Pairing-Taste ist die Anruftaste der Kamera.
-
Page 43: Guida Rapida
Guida Rapida 4. Collegamento della fotocamera e dell'app 1. Lista di imballaggio 5. Associazione di fotocamera e monitor 2. Descrizione del prodotto 6. Utilizzo 7. FAQ 3. Installazione 1. Lista di imballaggio Fotocamera X1 Adattatore di Cavo USB X2 Vite X3 alimentazione X2 Monitor X1 Copricapo X1... - Page 44 Zoom avanti/indietro Microfono Menù Indicatore di stato Direzione della ricarica Indicatore di stato di utilizzo Chiamata Ritorno Antenna Pulsante di accensione/ spegnimento Slot per scheda SD Altoparlante Ripristina Micro USB Supporto dello schermo Luce arancione: in carica Indicatore di stato della ricarica Luce verde: completamente carica Luce gialla: il monitor è...
-
Page 45: Installazione
Download dell'app L'App è disponibile sia per iOS che per Android OS. Scansiona il codice QR o cerca "Arenti" su App Store e Google Play. Scarica e installa l'app sul tuo telefono. Puoi selezionare l'app in base alle esigenze. · Supporto... - Page 46 Configurare il router Il router supporta il Wi-Fi a 2,4 GHz (non supporta il 5 GHz) ed è connesso alla rete Wi-Fi. Impostare i parametri del router prima di connettere la rete Wi-Fi e registrare l'SSID e la password del Wi-Fi. Si prega di mantenere la rete disponibile 2.4GHz 5GHz...
- Page 47 6. Utilizzo Nota: Se sono state aggiunte 2 telecamere, lo schermo del monitor visualizzerà 2 viste live contemporaneamente. Se si desidera impostare i parametri o abilitare le funzioni di una delle telecamere, è necessario selezionare prima la telecamera. Il metodo di selezione della telecamera è il seguente: Premere il tasto Indietro nella home page per accedere alla modalità...
- Page 48 Foto e video Scattare una foto: Puoi scattare una foto quando vuoi catturare una scena interessante del bambino. Premere il pulsante Menu sullo schermo del monitor, selezionare e premere OK per scattare una foto. Registra un video: Puoi registrare un video quando vuoi catturare un momento significativo del bambino.
- Page 49 Promemoria alimentazione Ricordati di allattare il tuo bambino, quando sei troppo occupato o quando vuoi dare al tuo bambino una dieta regolare. 1. Premere il pulsante Menu sullo schermo del monitor e selezionare > Promemoria alimentazione. 2. Premere SU e GI per selezionare tra 4 opzioni orarie e premere OK per avviare l'impostazione dell'ora.
- Page 50 Rilevamento di temperatura e umidità Puoi monitorare in tempo reale la temperatura e l'umidità della tua stanza del bambino. Quando la temperatura e l'umidità sono fuori portata, è possibile ottenere gli allarmi e quindi prendere le misure. 1. Premere Menu e selezionare >...
- Page 51 Impostazioni generali Imposta la luminosità: 1. Premere il pulsante Menu sullo schermo del monitor, selezionare premere OK per accedere all'interfaccia. 2. Premere SU e GI per regolare la luminosità. Tempo di preparazione: 1. Premere Menu e selezionare > Impostazione ora. 2.
- Page 52 7. FAQ D: Il monitor non può essere visualizzato correttamente in anteprima? A: Verificare se il monitor è collegato alla fotocamera. In caso contrario, associare prima la fotocamera e il monitor. D: Non riesci a trovare il pulsante di associazione? A: Il pulsante di associazione è...
-
Page 53: Declaration Of Conformity
AC Adapters. Only use the AC Adapters provided. Declaration of Conformity Hereby, Arenti declares that this device is in compliance with the essential requirements and other relevant provisions of Directive 2014/53/EU. For the declaration of conformity, visit the Web site: www.arenti.com This product can be used across EU member states. -
Page 54: Fcc Radiation Exposure Statement
The charger output voltage / current is 5Vdc / 1A.The plug considered as disconnect device of adapter. If you use a third-party charger, the recommended output voltage / current of the adapter is 5Vdc / 1A,and the adapter shall be CE approval type. CAUTION RISK OF EXPLOSION IF BATTERY IS REPLACED BY AN INCORRECT TYPE.
Need help?
Do you have a question about the AINANNY and is the answer not in the manual?
Questions and answers