Table of Contents
Advertisement
Quick Links
Barkmate BM4200 Dog Training System
Operation Guide
SAFETY INFORMATION
Aggressive Dogs
DogMaster Trainers highly recommends consulting a dog trainer when using an E collar on aggressive dogs.
Do no use this product to correct dogs that are aggressive towards other dogs or people. If you are unsure
if this product is appropriate for your dog, please consult your veterinarian or certified trainer.
Proper Fitting of the Collar
It is important to have a tight-fitting collar. A loose-fitting collar can move around on a dog's neck. The dog
may not feel the stimulation when the collar is loose and the contact probes could rub on the dog's skin
and cause irritation.
Duration of Wear
Do not allow the dog to wear the collar for more than 10 hours a day. Leaving the collar on the dog in same
spot for an extended period can cause skin irritation. If the dog is wearing the collar for long periods,
occasionally move the contact area a little bit so that the probes are not staying in the same spot all the
time.
Finding the Best Stimulation Level
Every dog reacts to the stimulation differently. It is important to find out the right level of stimulation for
your dog. Always start from the lowest setting (1) and increase slowly until you can see that the dog reacts
to the stimulation.
Advertisement
Table of Contents

Related Manuals for Barkmate BM4200


Summary of Contents for Barkmate BM4200
- Page 1 Barkmate BM4200 Dog Training System Operation Guide SAFETY INFORMATION Aggressive Dogs DogMaster Trainers highly recommends consulting a dog trainer when using an E collar on aggressive dogs. Do no use this product to correct dogs that are aggressive towards other dogs or people. If you are unsure if this product is appropriate for your dog, please consult your veterinarian or certified trainer.
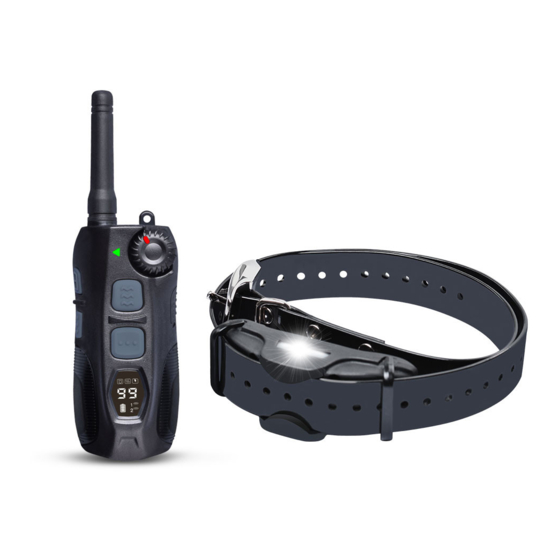
- Page 2 COMPONENTS Probe Spanner Tool Longer Probes Test Light Receiver Collar Car Charger Collar Strap Transmitter Features - Range up to 1,200 metres - Train up to 2 dogs from the one transmitter - 99 levels of static correction - Momentary and Continuous stimulation mode - Tone and Vibration warning - High visibility beacon light - Rheostat intensity dial to change output...
-
Page 3: Transmitter Button Functions
TRANSMITTER BUTTON FUNCTIONS Antenna LED Indicator Intensity Dial Vibration Button Momentary Stim Dog Selector Button Continuous Stim Tone Button LED display Beacon Light On/Off Button Charging Point On/Off button To turn the remote transmitter on hold down the On/Off button for 2 seconds. The LED will start with “01”... - Page 4 Beacon Light Press once - the collar will flash once every 2 seconds. Press again - the light will stay on. Press again - the light will turn off. Momentary Stimulation Button Delivers a quick, 1 second static stimulation. Continuous Stimulation Button: Delivers continuous static stimulation for a maximum 8 seconds.
-
Page 5: Setting Up Multi Dog System
SETTING UP MULTI DOG SYSTEM Pair a receiver collar Only Turn 1 collar In at a Time to Connect. 1. Turn on the Receiver Collar. Press and hold the On/Off Button for a few seconds. The Receiver Collar Indicator Light will come on and you should hear 2 beeps. (The indicator light should flash green rapidly, if not, unpair the collar then repeat step 1) Turn on the Handheld Transmitter. - Page 6 3. Allow the dog to wear the collar for several minutes, and then recheck the fitment. FINDING THE CORRECT STIMULATION LEVEL The Barkmate BM4200 has 99 levels of stimulation output. The rheostat intensity dial controls the stimulation level. Always start from the lowest level and work your way up. The appropriate level can be found when your dog starts looking around.
-
Page 7: General Training Tips
The Green LED light is on = Fully Charged (Charger still connected) GENERAL TRAINING TIPS 1. Make training sessions short and positive (between 10-15 minutes long for each session.) 2. Train one dog at a time. 3. During the initial training sessions work with the dog in a familiar outdoors environment. 4. - Page 8 • Adjust the intensity level. • Check the battery indicator, if the battery is low, the collar would not have enough output. The training collar doesn’t have range, or the range is significantly reduced • Check if there is a big metal structure around – colourbond fence, tinted roof, electric cables etc. Operate the system away from these structures.
Need help?
Do you have a question about the BM4200 and is the answer not in the manual?
Questions and answers