
Related Manuals for Sapphire Audio 370 SS


Summary of Contents for Sapphire Audio 370 SS
- Page 1 370 SS Operation and Service Manual Manual P/N 118189 (49-038) Revision L, June 2022 From Serial Number 3975...
- Page 3 UNIT DATA LABEL Congratulations on the purchase of your Mobile Cleaning Unit. This instruction manual is a guide for operating and servicing your equipment. Read this manual completely before installing or operating this unit. Proper operation and service are necessary to ensure the outstanding performance of this unit. When properly maintained, your truck-mount will have a long and trouble-free life.
- Page 4 LEGEND BRANDS LIMITED WARRANTY Legend Brands Model 370 SS What Does This Warranty Cover? This warranty covers the Legend Brands Model 370 SS and is provided to the original purchaser only. How Long Does This Warranty Last? This warranty runs for: Two (2) years from the date of installation on parts and labor (Excluding normal maintenance items.) Factory installed original belts...
-
Page 5: Table Of Contents
TABLE OF CONTENTS SECTION ONE: GENERAL INFORMATION HOW TO USE THIS MANUAL ...............1 SAFETY WARNINGS AND CAUTIONS ............2 SPECIFICATIONS ..................6 OVERALL DIMENSIONS ................7 FUEL REQUIREMENTS .................10 ENGINE REQUIREMENTS ................10 CHEMICAL REQUIREMENTS ................10 WATER REQUIREMENTS ................10 RECEIVING YOUR TRUCKMOUNT ..............11 SECTION TWO: INSTALLATION INSTALLATION ...................13 INSTALLATION OF FUEL LINES ..............16 CONSOLE TO WASTE TANK CONNECTIONS ..........21... -
Page 6: Section One: General Information
SECTION ONE: GENERAL INFORMATION HOW TO USE THIS MANUAL This manual contains the following sections: • How to Use This Manual • Safety • Installation • Operation • Maintenance & Service • Reference Diagrams The HOW TO USE THIS MANUAL section will tell you how to find important information for ordering correct repair parts. -
Page 7: Safety Warnings And Cautions
SECTION ONE: GENERAL INFORMATION SAFETY The following warning labels are on your mobile cleaning unit. These labels point out important WARNINGS and CAUTIONS, which must be followed at ALL times. Failure to follow these warnings could result in injury or fatality to yourself and/or others or property damage. - Page 8 SECTION ONE: GENERAL INFORMATION Read the operator’s manual before starting this unit. Failure to adhere to instructions could result in severe personal injury or could be fatal. Operate your vehicle and equipment in a well-ventilated area. Exhaust fumes contain carbon monoxide, which is an odorless and deadly poison that can cause severe injury or death. DO NOT run the vehicle in an enclosed area.
- Page 9 SECTION ONE: GENERAL INFORMATION DO NOT smoke around the vehicle. Gas fumes could accumulate and ignite. Battery gasses are extremely flammable. This will prevent possible explosions. NEVER cut or splice any of the vehicle fuel lines during fuel line installation. This will result in fuel leaks and potentially dangerous conditions.
- Page 10 SECTION ONE: GENERAL INFORMATION DO NOT damage the vehicle in any way during the installation. Avoid component or hose contact with moving parts, hot surfaces, brake lines, fuel lines, catalytic converters, exhaust pipes, mufflers, rotating parts or sharp objects. DO NOT exceed the vehicle’s payload capacity. This will prevent unsafe or hazardous driving conditions. Before installing any components into the vehicle, check with the vehicle manufacturer for the Gross Vehicle Weight Rating (GVWR).
-
Page 11: Specifications
SECTION ONE: GENERAL INFORMATION SPECIFICATIONS Engine Speed 3000 RPM (High Speed/No Load) 1550 RPM (Idle/No Load) Water Pump RPM 1579 RPM (High Speed/No Load) Water Pump Flow Rate 3.5 GPM (Maximum) Solution Pump Pressure 1500 PSI (Maximum) Vacuum Pump 3000 RPM (High Speed/No Load) Vacuum Relief Valve 13 in. -
Page 12: Overall Dimensions
SECTION ONE: GENERAL INFORMATION LAYOUT WITH 90 GALLON WASTE TANK P a g e 118189/49-038 Rev L LEGEND BRANDS MODEL 370... - Page 13 SECTION ONE: GENERAL INFORMATION LAYOUT WITH 120 GALLON WASTE TANK P a g e 118189/49-038 Rev L LEGEND BRANDS MODEL 370...
- Page 14 SECTION ONE: GENERAL INFORMATION LAYOUT WITH OPTIONAL SUBMOUNT WATER TANK P a g e 118189/49-038 Rev L LEGEND BRANDS MODEL 370...
-
Page 15: Fuel Requirements
SECTION ONE: GENERAL INFORMATION FUEL REQUIREMENTS Use unleaded fuel ONLY. Use only fresh, clean unleaded gasoline with a minimum octane rating of 87. Do Not use high octane gasoline. Gasoline with up to, not exceeding, 10% ethanol is acceptable. NOTE: Using other gasoline/alcohol blends including E20 and E85 will cause damage to engine components and will void warranty. -
Page 16: Receiving Your Truckmount
SECTION ONE: GENERAL INFORMATION RECEIVING YOUR TRUCK-MOUNT UNIT DEALER RESPONSIBILITIES The Legend Brands authorized dealer that you purchased this unit from is responsible for: 1. Correctly installing and properly securing equipment with proper hardware and underside mounting plates. 2. Checking the components and oil levels prior to starting the unit. 3. - Page 17 SECTION ONE: GENERAL INFORMATION FUEL HOOK-UP KITS BY VEHICLE • Chevy 2004+ Hook-Up Kit ..107439 • Chevy Box Truck 2004+ ....117802 • Ford 2011+ ......... 108605 • Ford Transit 2014+ ..... 107279 • Nissan NV ........107363 • Dodge ProMaster .......
-
Page 18: Section Two: Installation
SECTION TWO: INSTALLATION SECTION TWO: INSTALLATION This unit must be installed in the vehicle by an authorized Legend Brands distributor. Prior to beginning the installation, read the ENTIRE Installation section of this manual. VEHICLE REQUIREMENTS Because of the overall weight of the console and tanks, this unit should NOT be installed in any motor vehicle rated less than 3/4 ton capacity. -
Page 19: Installation
SECTION TWO: INSTALLATION POSITIONING THE UNIT INTO THE VEHICLE Vehicles vary in size and openings. Owners have different preferences on where in the vehicle they want their units positioned. Legend Brands strongly recommends a side door installation. We DO NOT recommend a rear door installation. - Page 20 SECTION TWO: INSTALLATION FASTENING DOWN THE UNIT AND WASTE TANK Prior to drilling any holes in the vehicle floor, ensure that while drilling, you will not damage the fuel tank, fuel lines, or any other vital components which could affect the safety or operation of the vehicle. A.
-
Page 21: Installation Of Fuel Lines
SECTION TWO: INSTALLATION INSTALLATION OF FUEL LINES The Vehicle fuel lines should NOT be spliced under ANY circumstances. Severe injury or fatality could result. • When routing fuel lines, DO NOT configure the hoses in any location where the hoses, or vehicle could be damaged. - Page 22 SECTION TWO: INSTALLATION FUEL LINE BULKHEAD INSTALLATION DIAGRAM P a g e | 17 118189/49-038 Rev L LEGEND BRANDS MODEL 370...
- Page 23 SECTION TWO: INSTALLATION FUEL PUMP ASSEMBLY INSTALLATION Locate an appropriate location for the fuel pump assembly housing to mount underneath the vehicle that will not cause damage to the vehicle or compromise the fuel line routing or components. Remove the housing lid from the fuel pump assembly. Use the supplied Tek screws to install the lid of the fuel pump housing to the vehicle.
- Page 24 SECTION TWO: INSTALLATION FUEL SUPPLY & RETURN LINE INSTALLATION Refer to the transfer flow kit instructions found with the appropriate kit for your vehicle. 1. Connect the fuel line from the transfer flow kit to the inlet side of the fuel pump. 2.
- Page 25 SECTION TWO: INSTALLATION 5. Attach the 90 degree elbow and hose barb fittings to the bulkhead connector underneath the vehicle. 6. Connect a segment of hose between the outlet side of the fuel bypass filter to the hose barb fitting. 7.
-
Page 26: Console To Waste Tank Connections
SECTION TWO: INSTALLATION CONSOLE TO WASTE TANK CONNECTIONS P a g e | 21 118189/49-038 Rev L LEGEND BRANDS MODEL 370... -
Page 27: Battery Connection
SECTION TWO: INSTALLATION BATTERY CONNECTION Explosive gases, Dangerous gases! Batteries contain sulfuric acid. To prevent acid burns, avoid contact with skin, eyes and clothing. Batteries also produce explosive hydrogen gases while charging. To prevent fire or explosion, charge batteries in a well-ventilated area only. Keep sparks, open flames, as well as any other sources of ignition away from batteries at all times. -
Page 28: Section Three: Operation
SECTION THREE: OPERATION SECTION THREE: OPERATION UNDERSTANDING THE SYSTEMS NOTE: Read and understand this section of the manual entirely before proceeding. This portion of the manual divides the unit up into systems and describes how each system works. Prior to proceeding into the operations and maintenance sections of this manual it is recommended that you acquire a basic understanding of how the unit functions. - Page 29 SECTION THREE: OPERATION WATER HEATING SYSTEM The water reservoir is a pressurized vessel. Cold water enters the console through the water inlet connection located on the lower left corner of the lower front panel. The water then flows through the Inlet Pressure Regulator (where incoming water pressure is reduced to 18-20 psi) and into the water box.
- Page 30 SECTION THREE: OPERATION VACUUM SYSTEM The engine turning a vacuum pump generates the vacuum. The air is channeled in one side of the vacuum pump, compressed and discharged on the opposite side, creating airflow. This airflow is used to do the work necessary for the extraction process.
- Page 31 SECTION THREE: OPERATION CHEMICAL PUMPING SYSTEM The chemicals are drawn from the chemical container through a strainer into the flow meter mounted on the control panel. The flow meter indicates the rate of chemical flow. The chemicals then flow through the stainless steel chemical pump, the chemical is then injected into a three way selector valve located on the front panel.
-
Page 32: Preparation And Operation
SECTION THREE: OPERATION PREPARATION AND OPERATION This section of the operator’s manual explains how to prepare, start, operate, shut down and maintain your mobile cleaning unit. This unit is easy to operate, however only trained operators should proceed. Operate this unit and equipment only in a well-ventilated area. Exhaust fumes contain carbon monoxide, which is an odorless and deadly poison that can cause severe injury or death. - Page 33 SECTION THREE: OPERATION CHECK YOUR CHEMICAL LEVELS Check your chemical container to make sure you have enough chemical mixed to finish the job. NOTE: See Section One in this manual for chemical requirements. CHECK FILTERS Inspect the vacuum inlet filter and strainer basket in the waste tank. Inspect the strainer basket inside the pre-filter box. See the Shut Down and Daily Maintenance section below for more information.
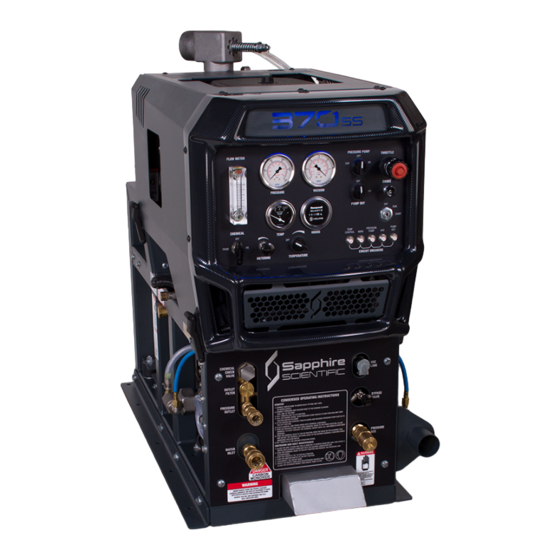
- Page 34 SECTION THREE: OPERATION COMPONENTS P a g e | 29 118189/49-038 Rev L LEGEND BRANDS MODEL 370...
- Page 35 SECTION THREE: OPERATION COMPONENTS 1. VACUUM GAUGE This gauge indicates in inches of mercury how much vacuum the system is producing at any given time. 2. SOLUTION PRESSURE GAUGE This gauge registers the amount of pressure in the system. 3. HOUR METER The hour meter records the operating time of the machine.
- Page 36 SECTION THREE: OPERATION 13. IGNITION SWITCH The engine ignition switch provides ignition to start the engine when the key is inserted and turned. To turn the unit on, turn the Solution Pump Switch counterclockwise to the override position and hold while turning the ignition key clockwise to the start position.
- Page 37 SECTION THREE: OPERATION STARTING THE UNIT NOTE: Be sure to read and comply with the preparation section of this manual entirely before starting the unit. 1. Set throttle control, pull out engine choke, hold Solution Pump switch in override and turn ignition key to start. 2.
- Page 38 SECTION THREE: OPERATION AUTOMATIC WASTE PUMP If the unit is equipped with an optional automatic waste pump, connect one end of the 5/8 in. or larger garden hose to the pump-out connection and the other end to an acceptable waste disposal. 2.
- Page 39 SECTION THREE: OPERATION UPHOLSTERY AND STAIR TOOL CLEANING Upholstery and stair tools have a lower flow rate and smaller orifices. Run the engine at approximately 50% of full speed. Open the Solution Temperature Control valve on the lower front panel to reduce water temperature before cleaning sensitive upholstery fabrics.
- Page 40 SECTION THREE: OPERATION SHUT DOWN AND DAILY MAINTENANCE 1. Flush out the chemical system with fresh water to remove any chemical residue. 2. Remove as much moisture from the vacuum hose as possible to prevent spillage of wastewater in the vehicle when returning hoses.
-
Page 41: Freeze Protection
SECTION THREE: OPERATION FREEZE PROTECTION If the unit is exposed to freezing weather conditions, the water inside of the unit may freeze, resulting in SERIOUS DAMAGE to the unit. The following is recommended to prevent this from occurring during the cold weather season: 1. - Page 42 SECTION THREE: OPERATION 6. Prime the chemical injection system with a minimum dilution of 50/50 or 100% glycol based antifreeze. Insert the chemical inlet and prime tube into the anti-freeze container. Turn the chemical valve to PRIME until anti- freeze comes out of the prime hose. Turn the chemical valve to the ON (chemical) position. Ensure that the flow meter indicates flow while the attached tools solution valves are opened.
- Page 43 SECTION THREE: OPERATION REMOVING ANTI-FREEZE FROM THE UNIT Connect the solution hoses to the unit, with a tool attached to the opposite end. Start the unit. Turn the water pump on. Open the tool valve and ensure that the anti-freeze goes into an approved container. Allow the anti- freeze to flow into the container until all anti-freeze has been drained.
-
Page 44: Section Four: Service And Maintenance
SECTION FOUR – SERVICE AND MAINTENANCE 370 MAINTENANCE CHART DAILY MAINTENANCE Engine Check engine oil level. (2) Fill to proper level. Vacuum Pump Check vacuum pump oil level. Fill to proper level. Do not overfill. (1) Vacuum Pump Spray silicone or Teflon/PTFE based lubricant into the lubrication cup for 10 seconds. Water Pump Check water pump oil level. -
Page 45: Service Intervals Chart
SECTION FOUR – SERVICE AND MAINTENANCE 370 SERVICE INTERVAL CHART SERVICE INTERVALS – EVERY 25 HOURS High Pressure Hoses Inspect hoses for wear, damage or impending rupture. Replace if damaged. SERVICE INTERVALS – EVERY 50 HOURS Engine Change engine oil. (5) SERVICE INTERVALS –... -
Page 46: Maintenance And Service Adjustments
SECTION FOUR – SERVICE AND MAINTENANCE MAINTENANCE AND SERVICE ADJUSTMENTS This section of the operator’s manual contains service and maintenance information. A planned preventative maintenance program will ensure that this unit has optimum performance, long operating life, and a minimum amount of down time. - Page 47 SECTION FOUR – SERVICE AND MAINTENANCE ENGINE • Check engine oil daily. Ensure that the proper oil level is maintained. Never overfill. • Change the oil after the first 8 hours of operation. Thereafter, Legend Brands recommends changing the oil every 50 hours of operation and the oil filter every 100 hours.
- Page 48 SECTION FOUR – SERVICE AND MAINTENANCE Clean combustion chamber, check and adjust valve clearances and clean and lap valve seating surface every 300 hours of operation. Valve Clearances: Intake - 0.004 to 0.006 in (0.10 ~ 0.15 mm) Exhaust - 0.004 to 0.006 in (0.10 ~ 0.15 mm) Valve Seating Surface Angle 45°...
- Page 49 SECTION FOUR – SERVICE AND MAINTENANCE VACUUM PUMP NOTE: Refer to the provided vacuum pump Operation and Service Manual for specific instructions. • Check the oil level on the gear side daily to ensure the proper level is maintained. Too little oil will damage and ruin the bearings and gears.
- Page 50 SECTION FOUR – SERVICE AND MAINTENANCE WATER PUMP NOTE: Refer to the provided water pump Operation Manual for specific instructions. • Check the crankcase oil level daily to ensure the proper level. If the level has dropped, check for the source of leakage and repair.
- Page 51 SECTION FOUR – SERVICE AND MAINTENANCE VACUUM PUMP BELT REPLACEMENT 1. Disconnect the negative battery cable. 2. Remove hose from waste tank to vacuum pump. 3. Remove left side hood and rear belt guards. 4. Loosen the hose clamp between the vacuum pump and heat exchanger muffler. 5.
- Page 52 SECTION FOUR – SERVICE AND MAINTENANCE CHEMICAL PUMP The chemical pump should be rebuilt every 500 hours. This involves changing the diaphragm, check valves, and inspecting the disk. DO NOT attempt to reuse o-rings after the check valves have been removed. Replace all o-rings when servicing check valves.
- Page 53 SECTION FOUR – SERVICE AND MAINTENANCE SOLUTION MANIFOLD CHECK VALVE AND STRAINER Unscrew the screen and inspect the strainer after the first week of operation. Remove any debris present. Inspect again after 2 and 4 weeks. Thereafter, inspect the strainer and screen at least monthly. If a frequent build-up of debris is noticed, inspect and clean more frequently.
- Page 54 SECTION FOUR – SERVICE AND MAINTENANCE PRESSURE REGULATOR The pressure regulator holds water pressure at a preset point and bypasses the excess water. To adjust: With the unit running, with the cleaning tool valve closed, the pressure gauge should read 0. With the tool valve open, adjust the pressure by turning the adjusting knob so that the pressure gauge reads between 400 - 1500 PSI.
- Page 55 SECTION FOUR – SERVICE AND MAINTENANCE CHEMICAL METERING SYSTEM Check and inspect the packing nut on the chemical selector and metering valves every 250 hours. Keeping the valve packing’s properly adjusted will prevent leaks and add to the overall life of the valves. When turning the knob, there should be some resistance.
- Page 56 SECTION FOUR – SERVICE AND MAINTENANCE HEAT EXCHANGER DIVERTER VALVE Lube the diverter valve shaft every 100 hours with copper anti-seize using a small acid brush. Apply a thin coat to the shaft when it is in the open (heating) position, when the Bimba cylinder is moved forward. Every 100 hours, remove the white vacuum tubes from the Bimba cylinder and add a 5-second shot of WD40 to each side of the cylinder.
- Page 57 SECTION FOUR – SERVICE AND MAINTENANCE BATTERY Before disconnecting the negative (−) ground cable, ensure that all switches are in the OFF position. If ON a spark could occur at the ground connection terminal, which could cause an explosion if hydrogen gas or gasoline vapors are present. ALWAYS disconnect the negative (−) terminal first.
-
Page 58: Troubleshooting
SECTION FOUR – SERVICE AND MAINTENANCE TROUBLESHOOTING DO NOT attempt to service this unit while it is running. High-speed parts as well as high temperature components may result in severe injury, severed limbs or fatality. This section of the operator’s manual describes how to look for and repair malfunctions, which may occur. Accurate troubleshooting is based on a thorough and complete understanding of the WATER, CHEMICAL, VACCUM, HEAT TRANSFER, SAFETY and WIRING systems featured in this unit. - Page 59 SECTION FOUR – SERVICE AND MAINTENANCE ENGINE TROUBLESHOOTING ENGINE WILL NOT START (STARTER DOES NOT TURN OVER) PROBABLE CAUSE SOLUTION Main circuit breaker on the control panel has After inspecting the unit to determine the cause of the tripped been tripped. breaker, press the reset button.
- Page 60 SECTION FOUR – SERVICE AND MAINTENANCE VACUUM PUMP TROUBLESHOOTING LOSS OF VACUUM (while cleaning, engine RPM is normal but vacuum is lower than expected) PROBABLE CAUSE SOLUTION Vacuum gauge is giving an improper reading. Examine the tubing between the vacuum relief valve and the vacuum gauge and remove any blockage.
- Page 61 SECTION FOUR – SERVICE AND MAINTENANCE WATER PUMP TROUBLESHOOTING LOSS OF SOLUTION PRESSURE (CLEANING TOOL OPEN, SOLUTION GAUGE READS LOW) PROBABLE CAUSE SOLUTION Water supply is turned off. Turn the water supply on or up. Check for kinks in the water supply hose.
- Page 62 SECTION FOUR – SERVICE AND MAINTENANCE WATER PUMP DOES NOT ENGAGE PROBABLE CAUSE SOLUTION Water pump circuit breaker has been tripped. Check the water pump circuit breaker on the control panel. Press the circuit breaker reset button. Defective electrical connection in the console Examine switch, electrical connections, and wiring.
- Page 63 SECTION FOUR – SERVICE AND MAINTENANCE HEAT EXCHANGER/TEMPERATURE RELATED TROUBLESHOOTING EXCESSIVE HEATING PROBABLE CAUSE SOLUTION Flow restriction caused by hard water scaling. Descale unit, repair or replace damaged plumbing components as necessary. Install a water softener. Not enough water flowing during normal Check jet size of tool.
-
Page 64: Section Five: Reference Diagrams
SECTION FIVE: REFERENCE DIAGRAMS REFERENCE DIAGRAMS WIRING DIAGRAM .................. 94 HOSE ROUTING AND FLOW DIAGRAM ............ 95 P a g e | 59 118189/49-038 Rev L LEGEND BRANDS MODEL 370... - Page 65 SECTION FIVE: REFERENCE DIAGRAMS WIRING DIAGRAM P a g e | 60 118189/49-038 Rev L LEGEND BRANDS MODEL 370...
- Page 66 SECTION FIVE: REFERENCE DIAGRAMS HOSE ROUTING DIAGRAM P a g e | 61 118189/49-038 Rev L LEGEND BRANDS MODEL 370...
Need help?
Do you have a question about the 370 SS and is the answer not in the manual?
Questions and answers