
Subscribe to Our Youtube Channel
Related Manuals for Broyhill LEGACY A104002101


Summary of Contents for Broyhill LEGACY A104002101
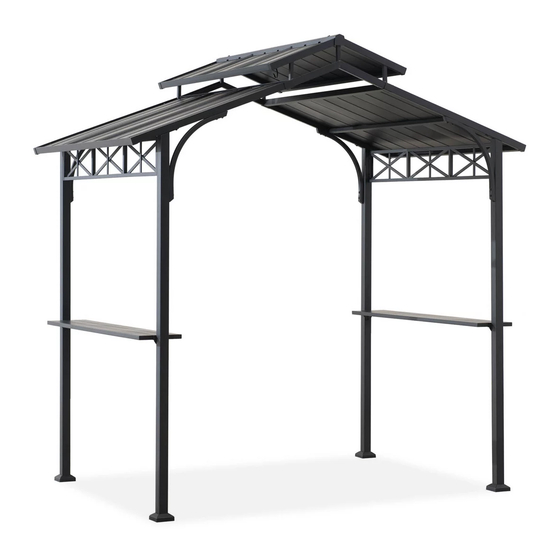
- Page 1 ASSEMBLY INSTRUCTIONS ITEM#: A104002101 SKU#: 810490383 CASTLE PINES HARD TOP GRILL GAZEBO 1 (866) 578-6569 Need help? We are here for you! 24/7 • Toll Free...
-
Page 2: Warranty
GENERAL BEST PRACTICES FOR ASSEMBLY: • Please read and understand this entire manual before attempting to assemble or install the product. • Before beginning assembly of product, make sure all parts are present. Compare parts with package contents list and hardware contents list. -
Page 3: Exploded Drawing
EXPLODED DRAWING 3/19... -
Page 4: Parts List
PARTS LIST Label Part Number Description Part Image Post 1 P000200564 Post 2 P000200565 Ground nail plate P000100407 Ground nail P006100208 cover Support beam1 P000401095 Support beam 2 P000401096 Screen P000401097 P005000540 Slant support Hook P005800001 Top beam P000601871 Bo�om tube P005700796 Big roof slant P000401098... -
Page 5: Hardware List
Small roof P000700901 right cover Small roof P000800322 cover Big roof P000700902 middle cover Big roof cover P000700903 Table panel P002100425 Panel connect P000501523 plate HARDWARE LIST Label Part Number Description Part Image Bolt M6*20 H010020012 Flat washer H050030001 Bolt M6*40 H010020022 Stake H070010003... -
Page 6: Helpful Hints
HELPFUL HINTS • Tools needed and not included: • How many people needed for the installation work • Estimate assemble time: 90~120 minutes Provided in hardware pack How many people needed for the installation work 6/19... - Page 7 STEP 1 Assembled View: Attach the Ground Nail Cover(C) and Ground Nail Plate(B)to the Post(A1, A2) , and tight Ground Nail Plate(B) by Bolt (AA), Flat Washer(BB) and Wrench(Z1) 7/19...
- Page 8 STEP 2 Assembled View: Connect the Support Beam1(E1) to the Support Beam2(E2) by Bolt(AA), Flat Washer(BB),Nut(EE) and Wrench(Z1) 8/19...
- Page 9 STEP 3 Assembled View: Attach the assembled Support Beam (E1,E2)to the Post(A1,A2) by Bolt(AA), Flat Washer(BB) and Wrench(Z1) 9/19...
- Page 10 STEP 4 Assembled View: Attach the Screen(F) to the Post(A1, A2) by Bolt(AA), Flat Washer(BB) and Wrench(Z1) 10/19...
- Page 11 STEP 5 Assembled View: Attach Slant Support(G) to the Post(A1,A2) by Bolt(CC), Flat Washer(BB) and Wrench(Z1) 11/19...
- Page 12 STEP 6 Assembled View: Attach the Big Roof Slant Beam1(K1) to the Support Beam(E1,E2) Bolt(AA), Flat Washer(BB) and Wrench(Z1) 12/19...
- Page 13 STEP 7 Assembled View: Attach the Top Beam(I) and Bottom Tube(J) to the Support Beam(E1,E2) by Bolt(AA), Flat Washer(BB) and Wrench(Z1), then attach the Hook(H) to the Top Beam(I) 13/19...
- Page 14 STEP 8 Assembled View: Put the Small Roof Middle Cover(L1) to the small top, then attach the Small Roof Left Cover(L2) and Small Roof Right Cover(L3) to the Small Roof Middle Cover(L1) by Bolt(AA), Flat Washer(BB) and Wrench(Z1) 14/19...
- Page 15 STEP 9 Assembled View: Attach the Small Roof Cover(M) to the Small Top by Bolt(CC), Flat Washer(BB) and Wrench(Z1) 15/19...
- Page 16 STEP 10 Assembled View: Attach the Big Roof Slant Beam2(K2) and Bottom Tube(J) to the Support Beam(E1,E2) by Bolt(AA), Flat Washer(BB) and Wrench(Z1) 16/19...
- Page 17 STEP 11 Assembled View: Put the Big Roof Middle Cover(N1) to the big top, then attach the Big Roof Cover(N2) to the Big Roof Middle Cover(N1) by Bolt(AA), Flat Washer(BB) and Wrench(Z1) 17/19...
- Page 18 STEP 12 Assembled View: Attach the Panel Connect Plate(P) to the Post(A1,A2) by Bolt(AA) and Flat Washer(BB), then Attach the Table Panel(O) to the Panel Connect Plate(P) Bolt Wrench(Z1) 18/19...
- Page 19 STEP 13 Assembled View: First pulling up the Ground Nail Cover(C), then locked the gazebo to the ground by Stake(DD) 19/19...
Need help?
Do you have a question about the LEGACY A104002101 and is the answer not in the manual?
Questions and answers