Table of Contents
Advertisement
Quick Links
Advertisement
Table of Contents

Summary of Contents for bikemate BLR-12
- Page 1 REAR BIKE CAMERA WITH LIGHT USER GUIDE...
-
Page 2: Table Of Contents
Table Of Contents Table Of Contents Overview Scope Of Delivery Components General Information Reading And Storing The User Guide Intended Use Explanation Of Symbols Safety Explanation Of Instructions General Safety Instructions Product Description Description Setup Charging The Camera Charging Time Standard Seat Mounting Aero Seat Mounting Fitting The Camera... -
Page 3: Overview
Overview Overview Congratulations! You have made an excellent choice with the purchase of this quality BIKEMATE ® product. By doing so you now have the assurance and peace of mind which comes from purchasing a product that has been manufactured to the highest standards of performance and safety, supported by the high quality standards of Aldi. -
Page 4: Scope Of Delivery
Scope Of Delivery Scope Of Delivery Components Rear Camera & Light Charge Cable 2 x Mounting Strap 32Gb, Class 10, Micro SD Card Rubber Wedge... -
Page 5: General Information
General Information General Information This user guide is based on the standards and regulations that are valid within the UK and EU. Also the country specific directives and laws outside of the EU. Reading and storing the user guide This user guide belongs to this Rear Camera Bike Light (referred to as the “product”... -
Page 6: Explanation Of Symbols
Safety Explanation of symbols The following symbols are used on the product and packaging: This symbol indicates additional information on the assembly or operation of the product. This symbol refers to the declaration of conformity. Products marked with this symbol meet all the applicable community regulations of United Kingdom. -
Page 7: Safety
Safety Safety Explanations of instructions The following symbols and signal words are used in this user guide. This symbol denotes situations that could cause WARNING! injury to yourself or others. This symbol denotes situations that could cause CAUTION! damage to the product or equipment as well as possible injury to yourself. -
Page 8: General Safety Instructions
Safety General Safety Instructions Please read this important safety information before you use this product. The following warning and caution information is to prevent injury to yourself or others and to prevent damage to your product or equipment. WARNING! Risk of electric shock! Failure to comply with safety warnings and regulations can cause serious injury or death. - Page 9 Safety WARNING! Risk of electric shock! Failure to comply with safety warnings and regulations can cause serious injury or death. • Avoid exposing your product to very cold or very hot temperatures. Extreme temperatures can damage the product and reduce the charging capacity and life of the installed battery. • DO NOT directly connect the positive and negative terminals. Doing so will cause the product to malfunction.
-
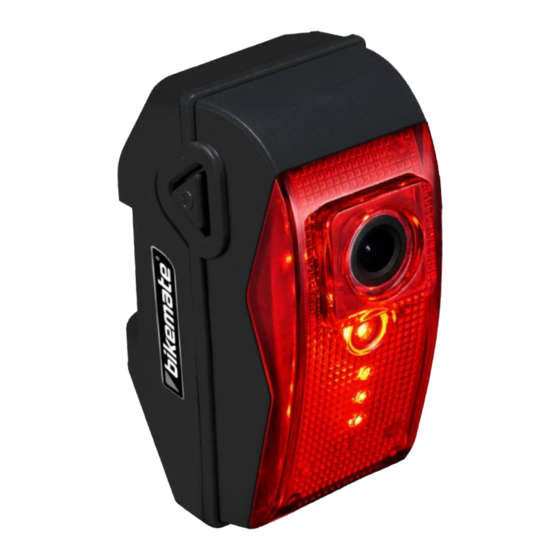
Page 10: Product Description
Product Description Product Description Description Camera Microphone Rear Light Mounting Bracket Light Mode Button Release Catch Dust Cover Vertical Adjustment Screw Light Mount Velcro Strap On/Off Button Rear Strap Mount Speaker Velcro Strap Loop... -
Page 11: Setup
Setup Setup This product has the micro SD card pre-formatted and pre-installed for your convenience. It is recommended that you fully charge the product before use for the best first time experience. Charging The Camera To charge the camera, lift the dust cover and connect the mini USB end of the supplied charge cable . -
Page 12: Charging Time
Setup Charging Time The camera will take approximate 4 hours minutes to fully charge. A full charge will last approximately up to 8 hours. Standard Seat Mounting The camera is mounted to the bicycle seat pole. To fit the camera, first take the mounting strap and place the mounting bracket against the seat post. -
Page 13: Aero Seat Mounting
Setup Aero Seat Mounting To mount the camera to an aero seat pole, use the same process as previously directed in the Standard Seat Mounting section (page 10). Fitting The Camera Use the vertical adjustment screw to release and align the bracket to the preferred position for the camera. - Page 14 Setup Take the camera and slide it on to the mounting bracket When you hear a small click the camera is locked in place. To release the camera, raise the clip and slide the camera off the mount. It is advisable to take the camera with you when you’ve secured your bicycle.
-
Page 15: Using The Camera
Using The Camera This product has the micro SD card pre-formatted and pre-installed for your convenience. It is recommended that you fully charge the product before use for the best first time experience. Turning The Camera On/Off To turn the camera on, press and hold power button for 3 seconds. -
Page 16: Rear Light Options
Rear Light Options The camera has 3 light modes for the rear light: • Constant • Flashing • Multi Strobe To change between light modes give the power button a quick press. Brightness Control The camera has 4 brightness levels for the rear light: • High • Medium •... -
Page 17: Digital Storage
Digital Storage Digital Storage Card Installation & Removal To install the micro SD card, raise the dust cover to expose the ports. Insert the provided micro SD card into the card slot . Push the card in until you hear a click. -
Page 18: Accessing Footage
Digital Storage Accessing Footage There are 2 methods to access the footage stored on the card. Directly off the card and via the use of the USB cable. To access the card directly from the card you will need the use of a Micro SD card adaptor. -
Page 19: Repairing The Micro Sd Card
Digital Storage Double left click with the mouse on the folder icon named “DCIMA”. This folder will give access to all of the recorded video AVI files. Double left click on any of the AVI files to view it in your default playback application. You are able to transfer files to a PC or laptop from DCIMA folder with either the copy and paste or drag and drop functions. - Page 20 Digital Storage On the ‘Format USB Drive’ dialogue box, make sure FAT32 is selected. Firstly try ‘Quick Format’ by making sure the check box is ticked and left click on ‘Start’. A warning box will show, left click to continue to format the card. This will take a few minutes to perform.
-
Page 21: Setting Date/Time
Setting Date/Time Setting Date/Time Setting The Date & Time In the root folder there is a .txt file titled ‘SETTIME’ this contains a brief set of instructions for adjusting the date and time that is displayed in the footage. In the root folder, double left click on the file titled ‘TIME’ to open it. •... -
Page 22: Product Care
Product Care Product Care Please read this important product care information before you store or clean this product. The following information is to prevent damage to your product and to keep it in good working condition. Storing It is recommended for long term storage that you do the following: • DO NOT place heavy items on top of the Camera. -
Page 23: Technical Data
Technical Data / Declaration Of Conformity Technical Data General Approx Weight: 140g Approx Dimensions: 87mm x 40mm x 60mm Mains Power: 5V/1A Available Ports: Mini USB IPX Rating: IPX4 Battery Battery Type: Internal Li-Ion Capacity: 3000mAH Use Time: Approximately 8 hours Camera Sensor Solution: Jieli... -
Page 24: Disposal Information
Disposal Information Disposal Information Packaging The card used in the packaging is made from widely recycled material. Dispose of the box in the council approved recycle bin. Check with your local authority or at www.recyclenow.com to see which items are collected in your area. Product This product uses a 3000mAh Li-Ion internal battery. - Page 26 Warranty Conditions Dear Customer, This warranty offers you extensive benefits: Warranty period: 3 years from the date of purchase. 6 months for wear of parts and consumables under normal and proper conditions of use (e.g. Rechargeable batteries). Costs: Free repair/exchange. Refundable postage cost.
- Page 27 01270 508538 (GB) 1800 995 036 (IE) enquiries@quesh.co.uk PRODUCT CODE 710418 SERVICE CENTRE Quesh LTD. B7, First Business Park, First Avenue, Crewe, Cheshire, UK. CW16BG. www.quesh.co.uk MODEL: BLR-12 Description of malfunction: Your details: Date and location of purchase: Name: Address: Email:...
- Page 28 Great care has gone into the manufacturing of this product and it should therefore provide you with years of good service when used properly. In the event of product failure within its intended use of the course of the first 3 years after the date of purchase, we will remedy the problem as quickly as possible once it has been brought to our attention.