Advertisement
Advertisement
Table of Contents

Related Manuals for FREESKY Himalaya


Summary of Contents for FREESKY Himalaya
- Page 1 USER MANUAL ELECTRIC BIKE...
- Page 2 Himalaya Mountain e-Bike Words to Users Thank you for choosing Freesky! In order to make it easier for you to experience the product and be safe at riding, detailed instruc�on is provided, from which you can find the product’s instruc�on, usage and other informa�on.
-
Page 3: Table Of Contents
Contents User Precau�ons Package List Product Overview Assembly Ba�ery Start-Up Procedure Display Troubleshoo�ng Specifica�ons FAQS Limited Warranty Contact Us... -
Page 4: User Precau�Ons
User Precau�ons 1. Do not ride without wearing a helmet. 2. Do not ride the bike under the influence of drugs or alcohol. 3. Do not ride without being acknowledged local road traffic safety law. Obey the laws and respect pedestrians. 4. -
Page 5: Package List
Package List Carefully check package contents, if anything is missing or damaged, please contact Freesky customer service for support: support@freeskycycle.com 1x Front Wheel Screws 1x User Manual 2x Pedals 1x Wrench 1x Front Wheel 3x Allen Key Wrench 1x Saddle... -
Page 6: Product Overview
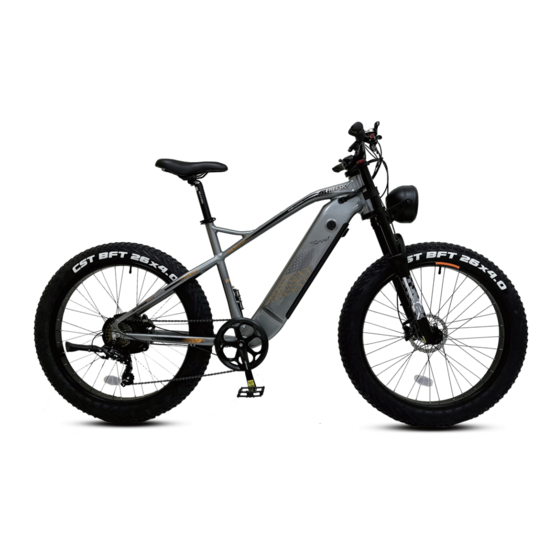
Product Overview LCD Display Derailleur Display Controls Grip Thro�le Ba�ery Saddle Front Light Seat Post Front Fork Pedals Crankset Brake Disc Motor Tire Chain... - Page 7 Headstock Assembly 1. Loosely secure the top of the faceplate. 2. Insert the handlebar into the locknut on the stem. 3. Center the handlebar and adjust the direc�on, 4. Use the wrench to �ghten the screw and fix the make sure the handlebar is centered on the stem. handlebar stem in place.
- Page 8 Front Wheel Assembly 1. Locate the quick release lever. Open the lever and 2. Line up the fork with the axle at the center of the remove the thumb nut and cone spring (opposite wheel. Make sure there's a spacer between the fork the lever).
- Page 9 Front light Assembly 1. Locate the clip, hook the clip onto the buckle from 2. Insert the bolt and �ghten it with a wrench. the inside and close it with the buckle. 4. Plug in the front light connectors. 3. Repeat on the other side.
- Page 10 Saddle Assembly For be�er pedaling, safety and overall riding comfort, posi�oning the seat at the right height is important. The rider's leg length is used to determine the seat's posi�on. When you pedal, your hips should remain level and your legs should be almost fully extended at the bo�om of the pedal stroke, but not over-extended.
- Page 11 Saddle Adjustment Adjus�ng the Seat Posi�on and Angle To change the angle and horizontal posi�on of the seat: (1) Use an Allen wrench to loosen the seat adjustment bolt on the clamp posi�oned immediately underneath the seat, above the rear wheel. Do not remove the bolt fully. (2) Move the seat backward or forward and �lt to adjust the angle.
- Page 12 Suspension Fork Adjustment Adjus�ng the Suspension Fork The suspension fork can move up and down up to 80mm to cushion bumps in the riding surface, which can make riding on a rough road or trail smoother and more comfortable. Depending on a rider’s preference, the suspension fork can be locked out as a rigid fork, which will typically yield higher efficiency while pedaling.
- Page 13 Watch the chain and ensure the chain runs through the drivetrain (the rear cog, chain tensioner, and around the front chainring) smoothly. Note: If the pedal/ chain doesn’t run smoothly, or something seems misaligned, please contact Freesky support.
- Page 14 Ba�ery Key Posi�ons Ba�ery Removing Ba�ery Charging Port Ba�ery Power Bu�on Switch 1.Familiarize yourself with the key port and ba�ery power posi�ons before riding the bike. The photo shows the key port aligned in key posi�on 1, in line with the small lock icon.
- Page 15 Remove the ba�ery For your convenience, the Freesky ba�ery can be removed. 1. Ensure the ba�ery is off. Align the key port with the appropriate off posi�on by inser�ng the key into the keyport and rota�ng to align the key with the off...
- Page 16 Charge Your E-Bike Before using the electric bike, you must fully charge the ba�ery. Charging Port 1.Remove the rubber cover on the charging port on the right side of the ba�ery. 2.Plug the charger into the ba�ery’s charging port. With the ba�ery on or off the bike, place the charger in a flat, secure place, and connect the DC output plug from the charger to the charging port on the side of the ba�ery.
- Page 17 Charge Your E-Bike 1. The ba�ery can be charged off the bike. To remove the ba�ery, carefully hold the ba�ery before turning the key to the “ unlock ” icon incase the ba�ery drops on the floor. 2. Remove the rubber cover on the charging port on the right side of the ba�ery.
-
Page 18: Start-Up Procedure
Start-Up Procedure A�er the bike has been properly assembled according to the assembly video, all components are secured correctly, a cer�fied, reputable mechanic has checked the assembly, and you have read this ensure manual, turn on the bike and select a pedal assist level following the steps below: 1. - Page 19 Display Details 1.Light 2.Ba�ery Level...
-
Page 20: Display
3.Mul�-Func�ons Display TRIP: Single Mileage ODO: Total Mileage TIME: Single Running Time VOL: Current Voltage CUR: Opera�ng Current DST: Unspecified 4.PAS leed 0-5 pedal assist level. 5.Speed Display MAX: Maximum Speed AVG: Average Speed MPH or KM/H: Measuring Unit The panel will calculate the actual travelling speed based on the wheel diameter and signal data (number of magnet steel is needed for Hall motors). - Page 21 Display Se�ngs Long press to turn off the panel when it’s on. Short press the up key to increase the PAS level, short press the down key decrease the PAS level. Specific opera�on 1.Short press the key to increase the PAS level, short press the down key to decrease the PAS level.
- Page 22 Daily Care and Maintenance Cleaning and Storage If you see stains on the bike body, wipe them off with a damp cloth. If the stains won't scrub off, put on some toothpaste, and brush them with a tooth brush, then wipe them off...
- Page 23 Recommended Service Intervals Regular inspec�on and maintenance are key to ensure bikes from Freesky func�on as intended, and to reduce wear and tear on their systems. Recommended service intervals are meant to be used as guidelines. Real world wear and tear, and the need for service, will vary with condi�on of use.
- Page 24 Pre-Ride Safety Checklist No�ce: Before every ride, and a�er every 25-45 miles(40-72 km), we advise following the pre-ride safety checklist. Safety Check Ensure front and rear brakes work properly. 1.Brakes Check brake pads for wear and ensure they are not overworn. Ensure brake pads are correctly posi�oned in rela�on to the rims.
- Page 25 Safety Check Check that the frame and fork are not bent or broken. 8.Frame, Fork, and Seat If either frame or fork are bent or broken, they should be replaced. Check that the seat is adjusted properly, and seatpost quick release lever is securely �ghtened. 9.Motor Drive Ensure hub motor is spinning smoothly and motor bearings are in good working order.
- Page 26 Tire Infla�on and Replacement The Himalaya employs 26"×4"rubber �res with inner tubes. The �res are designed for durability and safety for regular cycling ac�vi�es and need to be checked before each use for proper infla�on and condi�on. Proper infla�on, care, and �mely replacement will help ensure that your bike’s opera�onal characteris�cs will be maintained, and unsafe condi�ons avoided.
-
Page 27: Troubleshoo�Ng
Troubleshoo�ng Symptoms Possible Causes Most Common Solu�ons The bike does not 1.Charge the ba�ery 1.Insufficient ba�ery power work 2.Clean and repair connectors 2.Faulty connec�ons 3.Install ba�ery correctly 3.Ba�ery not fully seated in tray 4.Turn on bike with proper sequence 4.Improper turn on sequence 5.Disengage brakes 5.Brakes are applied 6.Replace discharge fuse... -
Page 28: Specifica�Ons
Specifica�ons ITEM SPECIFICATIONS Himalaya Model 195×72×102(cm) Product Dimensions 158×35×82(cm) Package Dimensions 340 lbs(150kg) Max Load Package Weight 88 lbs 74 lbs E Bike Weight Max Speed 32 mph(50km/h) Input 100-240V 50/60HZ AC Plug; Output 54.6V 2A Ba�ery/Charger 35-50 miles(56-80km) Pedal-Assist Mode... -
Page 29: Faqs
FAQS Q: What if the e-bike arrived missing accessory or broken part? A: Please take a photo and send to Freesky Support Team by sending email: support@freeskycycle.com and Freesky Support Team will reply you soon and send correct accessory or part replacement. -
Page 30: Limited Warranty
● Only the original owner of an e-bike purchased from Freesky online or physical storefront is covered by this Limited Warranty. The Warranty Period begins upon your receipt of the e-bike and shall end immediately upon the... - Page 31 ● For the avoidance of doubt, Freesky will not be liable and/or responsible for any damage, failure or loss caused by any unauthorized service or use of unauthorized parts.
-
Page 32: Contact Us
Contact Us If you have any trouble with setup, please search FREESKY EBIKE on YouTube for assembly video, or contact us online or through our email address: support@freeskycycle.com...
Need help?
Do you have a question about the Himalaya and is the answer not in the manual?
Questions and answers