
Subscribe to Our Youtube Channel
Related Manuals for OSS OSS-EOS-2U-41


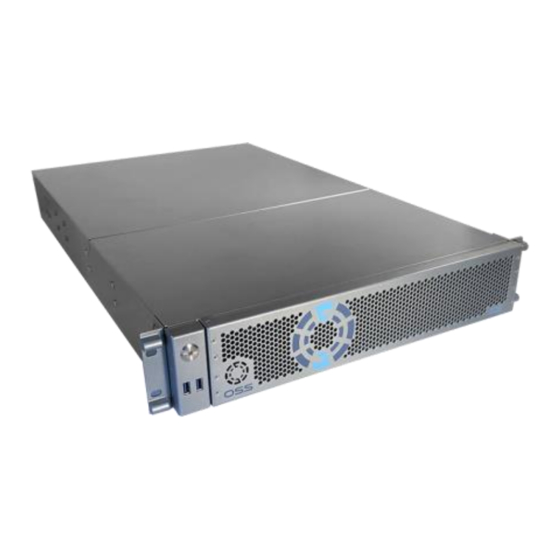
Summary of Contents for OSS OSS-EOS-2U-41
- Page 1 2U EOS Server Expansion Optimized Server User Manual SKU: OSS-EOS-2U-41 www.onestopsystems.com...
-
Page 2: Table Of Contents
Connect Input and Output devices ................................22 Power ON the system ....................................23 Configure BIOS ......................................24 2.10 Install Operating System ..................................27 OSS Target Card Installation ............................28 Attach OSS Expansion Unit ............................30 Connect LINK Cables ....................................30 Power Up ........................................31 M.2 NVME Installation ..............................32 How to Remove Power Supply ............................35... - Page 3 One Stop Systems Contacting Technical Support ............................43 Returning Merchandise to One Stop Systems ........................43 APPENDIX A Compliance ..............................44 FCC ..........................................44 CE ..........................................44 OSS-EOS-2U-4I...
-
Page 4: Preface
Disclaimer: We have attempted to identify most situations that may pose a danger, warning, or caution condition in this manual. However, One Stop Systems does not claim to have covered all situations that might require the use of a Caution, Warning, or Danger indicator. OSS-EOS-2U-4I... -
Page 5: Safety Instructions
Also, before connecting a cable, make sure both connectors are correctly oriented and aligned. CAUTION Do not attempt to service the system yourself except as explained in this manual. Follow installation instructions closely. OSS-EOS-2U-4I... -
Page 6: Protecting Against Electrostatic Discharge
Handle all sensitive components at an ESD workstation. If possible, use anti-static floor pads and workbench pads. Handle components and boards with care. Do not touch the components or contacts on a board. Hold a board by its edges or by its metal mounting bracket. OSS-EOS-2U-4I... -
Page 7: Introduction
8x and 16x NVMe x2 slots require 1 and 2 x16 PCIe HHHL slots respectively (for 24x NVMe x4 use NVMe config) Further expansion up to 4PB possible using OSS JBOF expansion systems 1x M.2 x4 and 2x SATA-DOM internal drive connections NVMe configuration 24x hot-swap NVMe x4 2.5”... - Page 8 China CCC (GB4943), GB9254 Class A, GB17625.1 Taiwan BSMI CNS13438, Class A; CNS14336-1 Korea KN22, Class A; KN24 Russia/GOST ME01, IEC-60950-1, GOST R 51318.22, GOST R 51318.24, GOST R 51317.3.2, GOST R 51317.3.3 TUV-GS (EN60950-1 /IEC60950-1,EK1-ITB2000) Compliance RoHS Compliant WEEE OSS-EOS-2U-4I...
-
Page 9: Overview
One Stop Systems Overview OSS-EOS-2U-4I... - Page 10 One Stop Systems OSS-EOS-2U-4I | 10...
-
Page 11: Motherboard Layout
One Stop Systems Motherboard Layout OSS-EOS-2U-4I | 11... -
Page 12: Quick Reference
One Stop Systems Quick Reference OSS-EOS-2U-4I | 12... -
Page 13: Quick Reference Table
One Stop Systems Quick Reference Table OSS-EOS-2U-4I | 13... - Page 14 One Stop Systems OSS-EOS-2U-4I | 14...
-
Page 15: Motherboard Features
• Low-noise fan speed control • Ten 4-pin fan headers LED Indicators • Power LED • UID/remote UID • LAN activity LED • BMC Heartbeat LED Dimensions 15.12" (W) x 13.2" (L) ATX (384.05 mm x 335.28 mm) OSS-EOS-2U-4I | 15... -
Page 16: Pre-Installation Information
Gather all of the necessary tools required for installation • Read this manual Tools Required for Installation To complete the installation of the product you will need a Phillips-head screwdriver and ESD wrist strap to prevent electrostatic discharge. OSS-EOS-2U-4I | 16... -
Page 17: Set-Up / Installation
Install NVME or M.2 Storage devices Mount your choice of NVME or M.2 storage devices Plug in external IO devices and power cables Power UP System & Configure BIOS Load or install Operating System Connect OSS Expansion system OSS-EOS-2U-4I | 17... -
Page 18: Remove Top Cover
Remove the screw located on each side of the panel, see photo below. Remove the screw located on the top-end of the cover, see photo below Lift the front top cover up and slowly slide it out. OSS-EOS-2U-4I | 18... -
Page 19: Check Storage & Usb 3.0 Cables
Check the “SlimSAS 8-Lane to OCulink 4-Lane x2 cables” are rigidly attached to the ports on the motherboard. Check the other end of the cable (Oculink) is connected to the storage carrier interface board, see photos below. OSS-EOS-2U-4I | 19... -
Page 20: Remove Faceplate
Hold the front face plate on the right-side (as shown from the photos below) and gently pull it to detach. Remove Drive Tray Locate the locking tab, slide it to the left to unlock. Pull the drive tray out from the unit by pressing the release button. The drive tray handle will extend. OSS-EOS-2U-4I | 20... -
Page 21: Install Storage Drive
Grasp the handle and gently pull the drive tray out of the chassis. Install Storage Drive Remove the two screws (A) securing the dummy bracket (B) to the hard drive tray (C). Remove the dummy drive from the hard drive tray. OSS-EOS-2U-4I | 21... -
Page 22: Connect Input And Output Devices
Using the thumb, push against the upper part of the hard drive handle. Push the hard drive into the hard drive bay as illustrated below, until the hard drive clicks into the locked position. Connect Input and Output devices Plug in the USB thumb drive (containing the OS image) to the front USB Port. OSS-EOS-2U-4I | 22... -
Page 23: Power On The System
Plug in the mouse, keyboard, VGA, and Ethernet cables Power ON the system Connect power cables to the power supplies Press the front “Power Button.” Orange LED will illuminate immediately upon powering ON the system Power Supply LEDs will come UP as solid green OSS-EOS-2U-4I | 23... -
Page 24: Configure Bios
D). This is the name of USB bootable thumb drive containing the OS image. Save and reset (See Photo Computer will restart and boot to the external boot device containing the OS Image. You can now load the OS of your choice. Photo A OSS-EOS-2U-4I | 24... - Page 25 One Stop Systems Photo A1 Photo B OSS-EOS-2U-4I | 25...
- Page 26 One Stop Systems Photo C Photo D OSS-EOS-2U-4I | 26...
-
Page 27: Install Operating System
One Stop Systems 2.10 Install Operating System Load or install Operating System of your choice from the Bootable USB. Once you have completed the OS installation, shutdown the system and install the OSS Host card. OSS-EOS-2U-4I | 27... -
Page 28: Oss Target Card Installation
One Stop Systems OSS Target Card Installation CAUTION Power down the system first before installing a PCIe card Begin the installation by first powering down your computer. Remove the power cord. 5VSB (5V Standby) is still available if the power cord is still installed. - Page 29 All PCI cards are susceptible to electrostatic discharge. When moving PCI cards, it is best to carry the cards in anti-static packaging. If you need to set a PCIe card down, be sure to place it inside or on top of an anti-static surface. For more information, see “Protecting Against Electrostatic Discharge” in the Preface. OSS-EOS-2U-4I | 29...
-
Page 30: Attach Oss Expansion Unit
Attach OSS Expansion Unit This section shows on how to connect an OSS Expansion unit to the EOS system. Make sure you are using the same model of Target and Host adapter cards (i.e., OSS-OSS-PCIE-HIB616-X16). Connect LINK Cables Plug in the cables (i.e., SFF-8644) between host and target cards. -
Page 31: Power Up
Connect all available power cables to the expansion unit. The expansion unit will power UP instantly. Other expansion units will require you to manually turn the power switch ON. Connect power cable(s) to the computer. Turn On the computer, Upon powering UP the computer, it will initialize a link between host and target. OSS-EOS-2U-4I | 31... -
Page 32: M.2 Nvme Installation
Step 4: Secure the M.2 SSD using the mounting screw. Press down and hold the M.2 SSD while you replace the mounting screw that was removed in Step 1. This will secure the SDD in place. See photos below. OSS-EOS-2U-4I | 32... - Page 33 M.2 SSD, but when that does not happen, you will need to manually go to the BIOS and set the settings that an M.2 device is connected. Power UP the computer, during the boot-up process, press “Delete” to enter BIOS. Go to Advanced Tab, select, and hit NVME Firmware Source, from the list select “AMI Native Support.” OSS-EOS-2U-4I | 33...
- Page 34 Click "Boot Mode Select", from the dropdown list select "Dual" Click "LEGACY to EFI Support", from the dropdown list select "Enabled" Click "Boot Option #1, find and select the "NAME of your Storage Device" Go to "Save & Exit" tab, click "Save Changes and Reset" OSS-EOS-2U-4I | 34...
-
Page 35: How To Remove Power Supply
One Stop Systems How to Remove Power Supply Pressing and holding the lever towards your right and gently pull the handle to remove power supply module. CAUTION Turn OFF the unit first before removing the power supply. OSS-EOS-2U-4I | 35... -
Page 36: How To Remove Psu Housing
This section will demonstrate on how to dismount or detach the power supply housing. This will allow you to have physical access to the CPU and memory modules. Remove the PSU modules Remove the two mounting screws underneath the metal enclosure Remove the two mounting screws on the back of the unit, see photos below. OSS-EOS-2U-4I | 36... - Page 37 One Stop Systems Remove the three mounting screws located on the side of the unit, see photo below. Remove the air baffle Slowly raise the PSU housing and lay it flat on the top surface of the unit. OSS-EOS-2U-4I | 37...
-
Page 38: How To Remove The Fan
One Stop Systems How to Remove the Fan Loosen up the screw. Grasp the fan on both sides Lift the fan. Pull the fan away from mounting bracket. OSS-EOS-2U-4I | 38... -
Page 39: How To Install The Fan
Align the two metal tabs on top of the two notches. Align the two fan connectors. Slowly push the fan down Check both tabs are fully seated Tighten up the screw to secure the fan Photo below shows the fan is seated properly. OSS-EOS-2U-4I | 39... - Page 40 Make sure the fan is properly installed. Use photos below as reference on how to check if the fan is installed and secured properly. Verify the screw is tightened, see photos below. Verify the fan is fully seated, see photos below. OSS-EOS-2U-4I | 40...
-
Page 41: Bmc
Connect an Ethernet cable to the IPMI LAN Port located on the back of the unit. Connect the other end of the cable to your network. Save BIOS setting and restart / exit. During boot up, the splash screen will flash the BMC IP address. OSS-EOS-2U-4I | 41... - Page 42 • Power Source - show the current readings of power supplies. Also shows the temperature from the power supplies For more information regarding the SuperMicro SMT IPMI interface and settings click the below link: https://www.supermicro.com/products/nfo/IPMI.cfm OSS-EOS-2U-4I | 42...
- Page 43 Returning Merchandise to One Stop Systems If factory service is required, you must contact OSS Service Representative to obtain a Return Merchandise Authorization (RMA) number. Put this number and your return address on the shipping label when you return the item(s) for service. One Stop Systems will return any product that is not accompanied by an RMA number.
- Page 44 This Class A digital apparatus complies with Canadian ICES-003. Cet appareil numériqué de la classe A est conformé à la norme NMB-003 du Canada The product(s) described in this manual complies with all applicable European Union (CE) directives. One Stop Systems will not retest or recertify systems or components that have been reconfigured by customers OSS-EOS-2U-4I | 44...
- Page 45 One Stop Systems OSS-EOS-2U-4I | 45...
- Page 46 One Stop Systems OSS-EOS-2U-4I | 46...
Need help?
Do you have a question about the OSS-EOS-2U-41 and is the answer not in the manual?
Questions and answers