Table of Contents
Advertisement
Available languages
Available languages
Quick Links
Advertisement
Table of Contents

Related Manuals for Princess 01.183318.01.750


Summary of Contents for Princess 01.183318.01.750
- Page 1 Instrucțiuni de utilizare...
- Page 2 ĘŚ Č Č DESCRIEREA PIESELOR...
- Page 3 Instruction manual • WARNING: Spilled food can cause serious SAFETY burns. Keep appliance and cord away from • By ignoring the safety instructions the children. Never drape cord over edge of manufacturer cannot be held responsible for counter, never use outlet below counter, and the damage.
- Page 4 Instruction manual • Do not use frying basket or aero plate if dented • Farm houses. or worn. • Children shall not play with the appliance. • WARNING: Never deep-fry in the Aerofryer, • This appliance shall not be used by children. regardless of whether the lid is on or off.
-
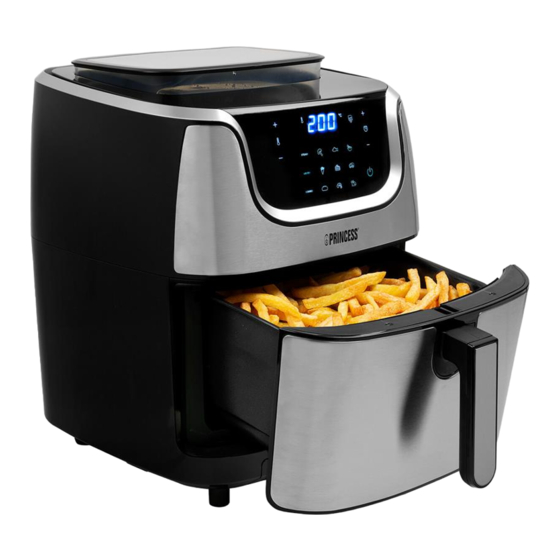
Page 5: Parts Description
Instruction manual • The appliance is not intended to be operated 15. Time Up and Down icons by means of an external timer or a separate 16. Power icon 17. 9 Pre-set cooking programs remote-control system. 18. Steam icon • The appliance is to be connected to a 19. -
Page 6: Operation
Instruction manual OPERATION Functions of the Control Panel Power Time and Temperature display • Press the power icon to activate the appliance when it is in standby • Displays the cooking time or temperature. mode. • Press the power icon to start an operation. Temperature Up and Down Time Up and Down •... -
Page 7: Fill Water
Instruction manual • Press the cleaning/descaling icon to automatically clean and • When using the COMBO feature, press the Steam/ Air Fry icon to descale the appliance. switch from programming the steaming time to programming the time and temperature for air frying. 9 Pre-set programs VEGETABLE, FISH, PASTA, FRIES, CAKE, MEAT, BREAD, FILL WATER... -
Page 8: Air Frying
Instruction manual • Choose for either manual input of the time and temperature for Air • Remove the water tank from the appliance and turn the stopper to Frying, Steaming or for both using the COMBO feature or choose one open it. - Page 9 Instruction manual • Unplug the appliance and allow it to cool down completely before cleaning. Pre-set Programs FILL WATER • For using the pre- set programs press the icon for desired pre- If the water tank runs empty while the appliance is steaming, the FILL set.
-
Page 10: Cleaning And Maintenance
Instruction manual Function Pre - set Minutes °C Manual Manual COMBO Crustacean program Adjustment Adjustment (1st Range - Range - Air Steam (Steam) 1 - 90 Steam then Air (Air fry) 80 – Minutes °C Minutes °C fry) Vegetables 1 - 90 Bread STEAM Fish... -
Page 11: Troubleshooting
Instruction manual When the device has been operating in Steam mode for over 20 • Store the frying basket, aero plate and condensation tray inside hours in total, the Cleaning/Descaling icon will flash indicating that is the unit. time to descale the appliance. You must allow the decaling process •... - Page 12 Instruction manual contribute an important push to the protection of our environment. Ask your local authorities for information regarding the point of recollection. Support You can find all available information and spare parts at www.princesshome.eu!
- Page 13 Gebruiksaanwijzing • Houd voldoende toezicht wanneer een VEILIGHEID apparaat wordt gebruikt door of in de buurt • Als u de veiligheidsinstructies negeert, kan van kinderen. de fabrikant niet verantwoordelijk worden • WAARSCHUWING: Gemorst voedsel kan gehouden voor de mogelijke schade. ernstige brandwonden veroorzaken.
- Page 14 Gebruiksaanwijzing • Ga uiterst voorzichtig te werk wanneer u een • Wanneer het uitneembare frituurmandje leeg is, apparaat verplaatst dat hete olie of andere hete mag u het niet langer dan 10 minuten vloeistoffen bevat. opwarmen, anders raakt het • LET OP: Om schade of een elektrische schok te bereidingsoppervlak mogelijk beschadigd.
-
Page 15: Voor Het Eerste Gebruik
Gebruiksaanwijzing • De connector dient te worden verwijderd ONDERDELENBESCHRIJVING alvorens het apparaat te reinigen. Wees er zeker van dat de inlaat volledig droog is 1. Waterreservoir alvorens het apparaat weer in gebruik te 2. Luchtinlaat nemen. 3. Lcd-display 4. Luchtuitlaatopeningen 5. - Page 16 Gebruiksaanwijzing • Reinig de onderdelen grondig met heet water, een beetje afwasmiddel en een niet-schurende spons. • Reinig de binnenkant en de buitenkant van het apparaat met een vochtige doek. Meer/minder tijd • Plaats het apparaat op een stabiele, horizontale en vlakke •...
- Page 17 Gebruiksaanwijzing • Gebruik de plus- en minpictogrammen voor de temperatuur om • Druk op het AEROFRY-pictogram om de Aerofry-functie te de temperatuur in stappen van 5 °C te verhogen of verlagen. U activeren. kunt de temperatuur tussen 80 °C en 200 °C instellen. COMBO •...
- Page 18 Gebruiksaanwijzing • Haal het mandje voorzichtig uit de Aerofryer. • Raak de binnenkant van het mandje tijdens en enige tijd na het • Plaats de aero-plaat in het mandje, indien gewenst. De aero-plaat is gebruik niet aan, aangezien deze erg heet wordt. Houd het mandje zodanig ontworpen dat deze kan worden gebruikt voor zowel grote als alleen vast aan de handgreep.
-
Page 19: Water Vullen
Gebruiksaanwijzing • Zodra de bewerking is voltooid, klinken er 5 piepjes, waarna het apparaat na 20 seconden wordt uitgeschakeld. • Druk op het pictogram Stomen/Aerofry om van het • Haal de ingrediënten voorzichtig uit het mandje. programmeren van de Combo-stoomfunctie over te schakelen •... - Page 20 Gebruiksaanwijzing • Als u een functie wilt stoppen, drukt u op het aan/uit-pictogram. De Functie Vooraf Minuten °C Handmatig Handmatig ventilator stopt en de zoemer klinkt 5 keer, waarna het apparaat wordt ingesteld aanpassings aanpassings uitgeschakeld. programma bereik - bereik - Stomen Aerofry VOORAF INGESTELDE AEROFRYER-PROGRAMMA'S...
-
Page 21: Reiniging En Onderhoud
Gebruiksaanwijzing Wanneer het apparaat in totaal meer dan 20 uur in de stoommodus COMBO Schaaldier heeft gewerkt, gaat het pictogram voor de reinigings-/ (Eerst ontkalkingsfunctie knipperen om aan te geven dat het tijd is om het stomen (Stomen) 1 - 90 100 apparaat te ontkalken. -
Page 22: Problemen Oplossen
Gebruiksaanwijzing Opberginstructies MILIEU • Haal de stekker van het apparaat uit het stopcontact en laat het apparaat volledig afkoelen. • Leeg het waterreservoir altijd voordat u het apparaat opbergt. Het Dit apparaat mag aan het einde van de levensduur niet bij het water kan bederven voordat u het apparaat de volgende keer gebruikt. - Page 23 Manuel d'instructions • AVERTISSEMENT : Les aliments renversés SÉCURITÉ peuvent provoquer de graves brûlures. Tenir • Si vous ignorez les consignes de sécurité, le l'appareil et le cordon hors de portée des fabricant ne peut être tenu pour responsable enfants. Ne faites jamais passer le cordon des dommages.
- Page 24 Manuel d'instructions • ATTENTION : Pour éviter tout dommage ou • Pour éviter tout dommage éventuel dû à la choc électrique, ne cuisinez pas dans l'unité de vapeur, placez l'appareil loin des murs et des base. Utilisez toujours le moule fourni pour placards pendant son utilisation.
-
Page 25: Description Des Pièces
Manuel d'instructions 2. Entrée d'air 3. Affichage LCD 4. Orifices de sortie d'air 5. Panier à friture • La surface est susceptible de 6. Plaque aéro devenir chaude pendant l'utilisation. 7. Panier • AVERTISSEMENT : Si la surface est 8. Poignée du panier 9. - Page 26 Manuel d'instructions • Placez l'appareil sur une surface stable, horizontale et de niveau et • Appuyez et maintenez enfoncées les icônes Time + ou - pour évitez les surfaces non thermorésistantes. augmenter/diminuer rapidement la durée. • Cette friteuse à air chaud fonctionne à l'air chaud. Ne remplissez pas la cuve avec de l'huile ou de la graisse de friture.
- Page 27 Manuel d'instructions VAPEUR/ AIRFRY • Lorsque vous utilisez la fonction COMBO, appuyez sur l'icône Vapeur/Air Fry pour passer de la programmation de la durée de la cuisson à la vapeur à la programmation de la durée et de la NETTOYAGE / DÉTARTRAGE température pour la cuisson en mode air fry.
- Page 28 Manuel d'instructions Si vous avez une grande portion de nourriture, repliez les pieds sous • Retirez délicatement les ingrédients du panier. la plaque. Pour les petites portions de nourriture, dépliez les pieds • Débranchez l'appareil et laissez-le refroidir complètement avant de le sous la plaque.
- Page 29 Manuel d'instructions • Retirez délicatement les ingrédients du panier. • Réglez la durée du mode air fry à l'aide des icônes Time Up et • Débranchez l'appareil et laissez-le refroidir complètement avant Down. de le nettoyer. • Appuyez sur l'icône d'alimentation pour démarrer le fonctionnement .
- Page 30 Manuel d'instructions PROGRAMMES PRÉRÉGLÉS DE L'AEROFRYER Fonction Programme Minutes °C Plage de Plage de préréglé réglage réglage manuel - manuel - Air Vapeur Minutes °C Minutes °C Légumes 1 - 90 VAPEUR Poisson 1 - 90 Riz / pâtes / 1 - 90 céréales Frites...
-
Page 31: Nettoyage Et Maintenance
Manuel d'instructions processus de détartrage se dérouler complètement. Si l'opération est COMBO Crustacés interrompue avant la fin du détartrage, l'icône de détartrage continue (Cuisson (Vapeur) 1 - 90 100 de clignoter. à la (Air fry) 80 – • Appuyez sur l'icône de détartrage pour commencer à détartrer vapeur l'appareil. -
Page 32: Dépannage
Manuel d'instructions • Videz toujours le réservoir d'eau avant de ranger l'appareil, l'eau peut important. Les matériaux utilisés dans cet appareil sont recyclables. En être altérée avant la prochaine utilisation. recyclant vos appareils, vous contribuez de manière significative à la •... - Page 33 Bedienungsanleitung • Wenn ein Gerät von oder in der Nähe von SICHERHEIT Kindern benutzt wird, sollte dies unter • Beim Ignorieren der Sicherheitshinweise strikter Beobachtung erfolgen. kann der Hersteller nicht für Schäden • WARNUNG: Verschüttete Lebensmittel haftbar gemacht werden. können zu schweren Verbrennungen führen. •...
- Page 34 Bedienungsanleitung • Seien Sie äußerst vorsichtig, wenn Sie ein • Seien Sie vorsichtig, wenn Sie den Frittierkorb Gerät mit heißem Öl oder anderen heißen von der Basis heben. Es wird empfohlen, Flüssigkeiten transportieren. Topflappen zu verwenden. • ACHTUNG: Zum Schutz vor Schäden oder •...
-
Page 35: Beschreibung Der Komponenten
Bedienungsanleitung • Tauchen Sie zum Schutz vor einem • Dieses Gerät darf nur mit einer geerdeten Stromschlag das Kabel, den Stecker oder Steckdose (für Klasse I Geräte) verbunden das Gerät niemals in Wasser oder sonstige werden. Flüssigkeiten. • Um eine Unterbrechung des Luftstroms zu •... -
Page 36: Vor Der Ersten Inbetriebnahme
Bedienungsanleitung 18. Dampfgaren-Symbol • Drücken Sie das Ein-/Ausschalt-Symbol, um das Gerät zu aktivieren, 19. Luftfrittieren-Symbol wenn es sich im Standby-Modus befindet. 20. Kombi-Symbol • Drücken Sie das Ein-/Ausschalt-Symbol, um einen Vorgang zu 21. Dampfgaren-/Luftfrittieren-Symbol starten. VOR DER ERSTEN INBETRIEBNAHME • Entfernen Sie das gesamte Verpackungsmaterial. - Page 37 Bedienungsanleitung DAMPFGAREN Temperatur einstellen • Drücken Sie auf das DAMPFGAREN-Symbol, um die • Verwenden Sie die Plus- und Minus-Symbole für die Temperatur, Dampfgarfunktion zu aktivieren. um die Temperatur in Schritten von 5 °C zu erhöhen oder zu verringern. Die Temperatur kann zwischen 80 °C und 200 °C LUFTFRITTIEREN eingestellt werden.
- Page 38 Bedienungsanleitung • Berühren Sie das Symbol des gewünschten voreingestellten • Verwenden Sie die Auf-/Ab-Symbole für die Temperatur und die Zeit, Garprogramms. Die voreingestellte Zeit und die Temperatur für das um die gewünschte Zeit und Temperatur einzustellen. gewählte Programm werden abwechselnd auf dem Display angezeigt. •...
- Page 39 Bedienungsanleitung WASSERZUGABE Wenn der Wassertank leer wird, während das Gerät dampfgart, blinkt die Kontrollleuchte WASSERZUGABE und ein Alarm ertönt. Bitte füllen Sie den Wassertank auf und setzen Sie ihn wieder auf die • Füllen Sie den Wassertank mit Wasser. Verwenden Sie stets Luftfritteuse.
- Page 40 Bedienungsanleitung • Drücken Sie auf das Ein-/Ausschalt-Symbol, um den Vorgang zu Funktion Voreingest Minuten °C Manueller Manueller starten. elltes Einstellberei Einstellberei • Wenn der Vorgang abgeschlossen ist, piept das Gerät 5 Mal und Programm ch – ch – schaltet sich nach 20 Sekunden ab. Dampfgaren Luftfrittieren •...
-
Page 41: Reinigung Und Pflege
Bedienungsanleitung KOMBI Schalentie (Erst Dampfga (Dampfgar 1 - 90 100 ren, dann Luftfrittier Reinigung/Entkalkung (Luftfrittiere 80 – Wenn das Gerät insgesamt mehr als 20 Stunden im Dampfgarmodus betrieben wurde, blinkt das Reinigungs-/Entkalkungssymbol und zeigt Brot damit an, dass das Gerät entkalkt werden muss. Sie müssen den (Dampfgar 1 - 90 100 Entkalkungsprozess vollständig durchlaufen lassen. -
Page 42: Fehlerbehebung
Bedienungsanleitung • Beachten Sie, dass der Korb, die Aero-Platte und die Sek. wieder an und versuchen Sie das Programm erneut zu starten. Sollte Kondensatschale spülmaschinenfest sind. Wir empfehlen jedoch, sie der Fehler immer noch auftreten kontaktieren Sie bitte den für Ihr Land von Hand zu spülen, da dies für die Lebensdauer des Produkts von zuständigen Kundendienst.. - Page 43 Manual de instrucciones • ADVERTENCIA: Los alimentos que se SEGURIDAD derraman pueden causar quemaduras • Si ignora las instrucciones de seguridad, graves. Es importante evitar que los niños eximirá al fabricante de toda se acerquen al aparato y al cable. Nunca se responsabilidad por posibles daños.
- Page 44 Manual de instrucciones • ATENCIÓN: Para evitar daños o descargas • Este aparato se ha diseñado para el uso en el eléctricas, no se debe cocinar en la base. hogar y en aplicaciones similares, tales como: Utilice siempre el molde suministrado para •...
-
Page 45: Descripción De Los Componentes
Manual de instrucciones 2. Entrada de aire 3. Pantalla de LCD 4. Aberturas de salida de aire 5. Cesta para freír • La superficie puede calentarse 6. Aero plate durante el uso. 7. Cesta • ADVERTENCIA: Si la superficie está 8. - Page 46 Manual de instrucciones • Coloque el aparato sobre una superficie estable, horizontal y nivelada; • Para aumentar o disminuir rápidamente la hora, hay que mantener no coloque el aparato sobre superficies no resistentes al calor. pulsados los iconos de la hora + o -. •...
- Page 47 Manual de instrucciones • Para activar la función VAPOR y FREÍR CON AIRE simultáneamente, pulsar el icono COMBO. La freidora comenzará a cocinar al vapor y luego pasará a freír con aire. VAPOR/FREÍR CON AIRE LIMPIEZA/DESCALCIFICACIÓN • Al utilizar la función COMBO, pulsar el icono Vapor/freír con aire •...
- Page 48 Manual de instrucciones • Si se desea, colocar el aero plate en la cesta. La aero plate está • Al finalizar la operación, el aparato emitirá 5 pitidos y se apagará diseñada para poder utilizarla tanto en porciones grandes como después de 20 segundos.
- Page 49 Manual de instrucciones • A continuación, retirar con cuidado los ingredientes de la cesta. • Antes de limpiar el aparato, hay que desenchufarlo y dejar que • Pulsar el icono de cocinar al vapor/freír con aire para se enfríe por completo. pasar de la programación Combo Vapor a la programación Combo Air Fry.
- Page 50 Manual de instrucciones • Para cancelar una operación, pulsar el icono de encendido. El Función Programa Minutos °C Rango de Rango de ventilador dejará de funcionar y el timbre sonará 5 veces antes de que preestablec ajuste ajuste el aparato se apague. manual - manual - Air Vapor...
-
Page 51: Limpieza Y Mantenimiento
Manual de instrucciones Cuando el aparato haya estado funcionando en modo vapor durante COMBO Crustáceo más de 20 horas en total, el icono de limpieza/descalcificación (Primero parpadeará indicando que es hora de descalcificar el aparato. Es al vapor (Vapor) 1 - 90 100 importante dejar que el proceso de descalcificación siga su curso y luego al (Freír con... -
Page 52: Solución De Problemas
Manual de instrucciones • No utilizar nunca detergentes químicos fuertes, estropajos o polvos en MEDIO AMBIENTE ninguna de las piezas o accesorios. Instrucciones de almacenaje • Se debe desenchufar el aparato y dejar que se enfríe completamente. Este aparato no debe desecharse con la basura doméstica al final •... - Page 53 Manual de Instruções • É necessária supervisão sempre que SEGURANÇA qualquer aparelho for utilizado por ou • O fabricante não pode ser responsabilizado próximo de crianças. por quaisquer danos se ignorar as • AVISO: Os alimentos derramados podem instruções de segurança. causar queimaduras graves.
- Page 54 Manual de Instruções • ATENÇÃO: Para proteger contra danos ou • Este aparelho destina-se a ser usado em choques elétricos, não cozinhe na unidade aplicações domésticas e semelhantes tais base. Use sempre a caçarola fornecida para como: cozinhar. • Zonas de cozinha profissional em lojas, •...
-
Page 55: Descrição Das Peças
Manual de Instruções 3. Visor LCD 4. Aberturas de saída de ar 5. Cesto de fritar 6. Placa da fritadeira • A superfície pode aquecer durante 7. Cesto a utilização. 8. Pega do cesto • AVISO: Se a superfície estiver rachada, 9. - Page 56 Manual de Instruções • Coloque o aparelho sobre uma superfície estável, horizontal e • Mantenha os ícones + e - premidos para aumentar/diminuir nivelada, não coloque o aparelho sobre superfícies não resistentes ao rapidamente o tempo. calor. • Esta é uma fritadeira sem óleo que funciona com ar quente. Não encha a cuba com óleo ou gordura.
- Page 57 Manual de Instruções VAPOR/FRITURA COM AR • Quando usar a funcionalidade COMBO, prima o ícone de vapor/ fritura com ar para mudar da programação do tempo de preparação a vapor para a programação do tempo e temperatura LIMPEZA / DESCALCIFICAÇÃO de fritura com ar.
- Page 58 Manual de Instruções • Coloque os ingredientes no cesto. VAPOR • Volte a colocar o cesto na Aerofryer. • Remova o depósito de água do aparelho e rode a tampa para o abrir. • Toque no ícone de alimentação para ativar o visor. •...
- Page 59 Manual de Instruções • Quando o programa terminar, o aparelho emite 5 bipes e depois desliga-se decorridos 20 segundos. • Remova os ingredientes do cesto com cuidado. • Desligue o aparelho da tomada e deixe-o arrefecer totalmente ENCHER COM ÁGUA antes de o limpar.
-
Page 60: Limpeza E Manutenção
Manual de Instruções Função Programa Minutos °C Limites de Limites de COMBO Crustáceos predefinido ajuste ajuste (1º vapor, (Vapor) 1 - 90 manual - manual - depois (Fritura com 80 – vapor fritura com fritura Minutos °C com ar) Pão Minutos °C (Vapor) 1 - 90... -
Page 61: Resolução De Problemas
Manual de Instruções Depois de um total de mais de 20 horas de funcionamento no modo Instruções de armazenamento Vapor, o ícone de limpeza/descalcificação começará a piscar para • Desligue o aparelho da tomada e deixe-o arrefecer totalmente. indicar que está na hora de descalcificar o aparelho. Deve deixar que •... - Page 62 Manual de Instruções AMBIENTE Este aparelho não deve ser depositado no lixo doméstico no fim da sua vida útil, mas deve ser entregue num ponto central de reciclagem de aparelhos domésticos elétricos e eletrónicos. Este símbolo indicado no aparelho, no manual de instruções e na embalagem chama a sua atenção para a importância desta questão.
- Page 63 Istruzioni per l'uso • Esercitare un'attenta supervisione in caso di SICUREZZA utilizzo di qualsiasi tipo di apparecchio da • Il produttore non è responsabile di eventuali parte o in presenza di bambini. danni e lesioni conseguenti la mancata • AVVERTENZA: Gli schizzi di cibo possono osservanza delle istruzioni di sicurezza.
- Page 64 Istruzioni per l'uso • Prestare la massima cautela nello spostamento • Per evitare eventuali danni dovuti al vapore, di un apparecchio contenente liquidi caldi. usare l'apparecchio lontano da pareti e • ATTENZIONE: Per evitare danni o scosse armadietti. elettriche, non cuocere nell'unità base. Per •...
-
Page 65: Descrizione Delle Parti
Istruzioni per l'uso 3. Display LCD 4. Aperture per la fuoriuscita dell'aria 5. Cestello di frittura 6. Piastra per cottura ad aria • La superficie può riscaldarsi molto 7. Cestello durante l'uso. 8. Manico del cestello • AVVERTENZA: Se la superficie è incrinata, 9. -
Page 66: Funzionamento
Istruzioni per l'uso • Posizionare l'apparecchio su una superficie stabile, piana e regolare, non collocare l'apparecchio su superfici non resistenti al calore. • Questa friggitrice ad aria funziona con aria calda. Non riempire il contenitore con olio o grasso. • Usare solo acqua di rubinetto fresca e fredda, acqua addolcita o acqua minerale gassata. - Page 67 Istruzioni per l'uso VAPORE/FRITTURA AD ARIA • Quando si usa la funzione COMBO, premere il pulsante Vapore/ Frittura ad aria per passare dalla programmazione del tempo di cottura a vapore alla programmazione del tempo e della PULIZIA/DECALCIFICAZIONE temperatura per la frittura ad aria. •...
- Page 68 Istruzioni per l'uso • Reinserire il cestello nella Aerofryer. • Toccare il pulsante di accensione per attivare il display. • Scegliere l'inserimento manuale del tempo e della temperatura per la frittura ad aria, per la cottura a vapore, o per entrambi utilizzando la funzione COMBO, oppure scegliere uno dei 9 programmi preimpostati.
- Page 69 Istruzioni per l'uso Se durante la cottura a vapore il serbatoio dell'acqua si svuota, • Per utilizzare i programmi preimpostati, premere il pulsante del l'indicatore RIEMPIMENTO ACQUA inizia a lampeggiare e scatta un programma desiderato. Il pulsante lampeggerà. allarme. Riempire il serbatoio dell'acqua e riposizionarlo nella •...
-
Page 70: Pulizia E Manutenzione
Istruzioni per l'uso Funzione Programma Minuti °C Intervallo di Intervallo di COMBO Crostacei preimposta regolazione regolazione (prima (Vapore) 1 - 90 manuale - manuale - Vapore (Frittura ad 80 - Vapore Frittura ad aria) Minuti °C aria Frittura ad Pane Minuti °C aria) (Vapore) -
Page 71: Risoluzione Dei Problemi
Istruzioni per l'uso Dopo 20 ore di utilizzo della modalità Vapore, il pulsante di pulizia/ • Scollegare l'apparecchio dall’alimentazione e lasciarlo raffreddare decalcificazione si accende a indicare che è il momento di completamente. decalcificare l'apparecchio. Il processo va portato a termine fino alla •... - Page 72 Istruzioni per l'uso AMBIENTE Questo apparecchio non deve essere posto tra i rifiuti domestici alla fine del suo ciclo di vita, ma deve essere smaltito in un centro di riciclaggio per dispositivi elettrici ed elettronici domestici. Questo simbolo sull'apparecchio, il manuale di istruzioni e la confezione sottolineano tale importante questione.
- Page 73 Instruktionshandbok hängande över bänkkanten, använd aldrig SÄKERHET uttag under bänk och använd aldrig en • Om dessa säkerhetsanvisningar ignoreras förlängningssladd. kan inget ansvar utkrävas av tillverkaren för • Användning av tillbehör som inte eventuella skador som uppkommer. rekommenderas av tillverkaren kan orsaka •...
- Page 74 Instruktionshandbok • VARNING! Flottyrkoka aldrig i luftfritösen, vare • Barn får inte leka med apparaten. sig locket är på eller inte. DET ÄR FARLIGT • Apparaten ska inte användas av barn. Håll OCH KAN ORSAKA BRAND OCH apparaten och dess kabel utom räckhåll för ALLVARLIGA SKADOR.
-
Page 75: Beskrivning Av Delar
Instruktionshandbok • Apparaten ska anslutas till ett vägguttag 20. Kombosymbol med jordad kontakt (för Klass I-apparater). 21. Ång-/frityrsymbol • För att undvika störningar av luftflödet får du inte ställa något på apparaten. Se även till FÖRE FÖRSTA ANVÄNDNING att det finns 10 cm fritt utrymme runt apparaten. - Page 76 Instruktionshandbok • Använd plus- och minussymbolerna för att höja och sänka temperaturen med 5 °C i taget. Temperaturen kan ställas in mellan 80–200 °C. • Tryck och håll ned plus- och minussymbolerna för att snabbt höja eller sänka temperaturen. Öka och minska tiden •...
- Page 77 Instruktionshandbok KOMBO • Lägg ner ingredienserna i korgen. • Tryck på symbolen KOMBO för att aktivera ång- och • Skjut in korgen i luftfritösen igen. frityrfunktionen samtidigt. Luftfritösen börjar med ånga och växlar • Rör vid strömsymbolen för att aktivera displayen. sedan till luftfritering.
- Page 78 Instruktionshandbok • Ta bort vattenbehållaren från apparaten och vrid på stoppet för att Om vattenbehållaren blir tom när apparaten använder ånga blinkar öppna den. indikatorn för att fylla på vatten och ett larm ljuder. Fyll på vattenbehållaren igen och sätt tillbaka den på luftfritösen. Indikatorlampan slutar blinka och larmet slutar ljuda.
- Page 79 Instruktionshandbok • Tryck på strömsymbolen för att börja fritera. ”In operation” visas Funktion Förinställd Minuter °C Manuellt Manuellt på displayen. t program justeringsin justeringsin tervall – tervall – Obs! När produkten inte är i bruk under 20 sekunder återgår ånga luftfritering apparaten till standbyläge.
-
Page 80: Rengöring Och Underhåll
Instruktionshandbok När apparaten har varit i ångläget i över 20 timmar totalt kommer KOMBO Skaldjur symbolen för rengöring/avkalkning att blinka för att visa att det är dags att (Först (Ånga) 1–90 avkalka apparaten. Avkalkningsläget måste köras till slutet. Om processen ånga (Luftfritering) 1–90 80–200... - Page 81 Instruktionshandbok • Förvara fritöskorgen, frityrplattan och kondenseringsbrickan inuti Genom att återvinna hushållsapparater gör du en viktig insats för att enheten. skydda vår miljö. Fråga de lokala myndigheterna var det finns • Förvara enheten i sin originalförpackning på en sval och torr insamlingsställen.
- Page 82 Instrukcje użytkowania miejscu niedostępnym dla dzieci. Nie należy BEZPIECZEŃSTWO przekładać przewodu zasilającego nad • Producent nie ponosi odpowiedzialności za krawędzią blatu, nie należy używać gniazdka, uszkodzenia w przypadku nieprzestrzegania które znajduje się poniżej blatu, nie wolno instrukcji bezpieczeństwa. używać przedłużacza. •...
- Page 83 Instrukcje użytkowania • PRZESTROGA: Aby uniknąć powstania • Jeśli wyjmowany kosz do smażenia jest uszkodzeń lub porażenia prądem, nie należy pusty, nie podgrzewaj go dłużej niż 10 gotować bezpośrednio w jednostce głównej. minut, ponieważ mogłoby to spowodować Do gotowania należy zawsze używać uszkodzenie jego powierzchni.
-
Page 84: Opis Części
Instrukcje użytkowania • Po użyciu powierzchnia elementu grzewczego OPIS CZĘŚCI podlega resztkowemu grzaniu. • Wtyczka musi zostać wyjęta z gniazdka na czas 1. Zbiornik na wodę czyszczenia, upewnij się, że wejście będzie 2. Wlot powietrza całkowicie suche przed ponownym użyciem. 3. - Page 85 Instrukcje użytkowania • Dokładnie wyczyść części, używając ciepłej wody, niewielkiej ilości płynu do mycia naczyń oraz miękkiej gąbki. • Wytrzyj wewnętrzne i zewnętrzne powierzchnie urządzenia wilgotną ścierką. Czas W górę i W dół • Umieść urządzenie na stabilnej, równej i poziomej powierzchni. •...
- Page 86 Instrukcje użytkowania • Za pomocą ikon Temperatura Plus i Minus zwiększaj lub zmniejszaj • Naciśnij ikonę SMAŻENIE GORĄCYM POWIETRZEM, aby włączyć tę temperaturę w krokach co 5°C. Temperaturę można ustawić w funkcję. zakresie od 80°C do 200°C. Tryb KOMBI • Naciśnij i przytrzymaj ikony plus lub minus, aby zwiększać/zmniejszać...
-
Page 87: Gotowanie Na Parze
Instrukcje użytkowania • W razie potrzeby włóż do kosza ruszt. Ruszt jest zaprojektowany • Nie dotykaj kosza w środku w trakcie użytkowania ani przez tak, aby można go było używać zarówno do dużych, jak i małych pewien czas po jego zakończeniu, ponieważ bardzo się porcji. - Page 88 Instrukcje użytkowania • Gdy działanie się zakończy, urządzenie wyemituje 5 sygnałów • Naciśnij ikonę gotowania na parze/smażenia gorącym powietrzem, dźwiękowych, a po 20 s się wyłączy. • Ostrożnie wyjmij składniki z kosza. aby przełączyć z programowania pary do programowania • Wyjmij wtyczkę...
- Page 89 Instrukcje użytkowania PROGRAMY PIECYKA KONWEKCYJNEGO Funkcja Program Minuty °C Zakres Zakres ręcznych ręcznych ustawień – ustawień – Gotowanie Smażenie na parze gorącym Minuty °C powietrzem Minuty °C Warzywa 1 - 90 100 GOTOW Ryby 1 - 90 100 ANIE NA Ryż...
-
Page 90: Czyszczenie I Konserwacja
Instrukcje użytkowania CZYSZCZENIE I KONSERWACJA Tryb Owoce KOMBI morza • Przed czyszczeniem wyjąć wtyczkę z gniazda i odczekać, aż (Najpierw urządzenie wystygnie. (Gotowanie 1 - 90 gotowanie na parze) na parze, (Smażenie 80 - potem gorącym smażenie powietrzem) gorącym Czyszczenie/odkamienianie Chleb powietrze Gdy urządzenie przepracuje w trybie gotowania na parze w sumie ponad (Gotowanie... -
Page 91: Rozwiązywanie Problemów
Instrukcje użytkowania • Kosz, ruszt i tackę ociekową można myć w zmywarce. Zalecamy Kod błędu Problem jednak mycie ich ręcznie, ponieważ wydłuży to okres eksploatacji Odłączony czujnik stanu pracy. urządzenia. Zwarcie czujnika stanu pracy. • Każdy element należy dokładnie wysuszyć. •... - Page 92 Návod k použití nepřetahujte kabel přes okraj pracovní desky, BEZPEČNOST nepoužívejte zásuvku pod pracovní deskou ani • Při ignorování bezpečnostních pokynů nemůže napojení na prodlužovací kabel. být výrobce odpovědný za případná poškození. • Použití příslušenství, které není doporučeno • Je-li přívodní kabel poškozený, musí jej vyměnit výrobcem, může vést ke zranění.
- Page 93 Návod k použití • VAROVÁNÍ: V horkovzdušné fritéze nikdy • V penzionech. nesmažte, bez ohledu na to, zda je víko • Na statcích a farmách. nasazené, nebo odklopené. JE TO • Děti si nesmí hrát se spotřebičem. NEBEZPEČNÉ A MŮŽE DOJÍT K POŽÁRU •...
-
Page 94: Popis Součástí
Návod k použití • Přístroj by neměl být ovládán prostřednictvím 17. 9 přednastavených programů vaření externího časovače nebo odděleným dálkovým 18. Ikona vaření v páře 19. Ikona fritování ovládáním. 20. Ikona Combo • Tento spotřebič má být připojen k zásuvce, 21. - Page 95 Návod k použití • Zapněte spotřebič stisknutím ikony napájení, pokud je v stand-by režimu. • Stisknutím ikony napájení spustíte provoz. Temperature Up and Down (Zvýšení a snížení teploty) • Pomocí ikon Temperature plus a minus můžete zvyšovat nebo snižovat teplotu po 5 °C. Teplotu lze nastavit v rozmezí 80–200 Time Up and Down (Zvyšování...
- Page 96 Návod k použití • Je-li spotřebič v provozu, zobrazují se indikátory postupně na displeji. Použití • Síťovou zástrčku zasuňte do uzemněné zásuvky. STEAM (VAŘENÍ V PÁŘE) • Opatrně vytáhněte košík z fritézy. • Stisknutím ikony STEAM aktivujete funkci páry. • V případě...
- Page 97 Návod k použití • Vložte košík zpět do fritézy. Provoz se automaticky obnoví. • Po dokončení vaření spotřebič pětkrát pípne a po 20 sekundách • Během provozu a těsně po jeho ukončení se nedotýkejte vnitřku se vypne. košíku, protože je velmi horký. Košík vždy držte za rukojeť. •...
- Page 98 Návod k použití • Stisknutím ikony napájení spustíte provoz. Funkce Přednastav Minuty °C Rozsah Rozsah • Po dokončení vaření spotřebič pětkrát pípne a po 20 sekundách se ený ručního ručního vypne. program nastavení – nastavení – • Opatrně vyjměte připravené jídlo z košíku. vaření...
-
Page 99: Čištění A Údržba
Návod k použití COMBO Korýši (nejprve (vaření v 1 - 90 100 vaření v páře) páře a (horkovzdu 80 – poté Cleaning/descaling (Čištění/odvápnění) šné fritování) Pokud spotřebič pracuje v režimu vaření v páře déle než 20 hodin fritování) provozu celkem, začne blikat ikona Cleaning/Descaling, která Chleba signalizuje, že musí... -
Page 100: Řešení Problémů
Návod k použití • Na žádné díly ani příslušenství nepoužívejte agresivní chemické čisticí PROSTŘEDÍ prostředky, drátěnky nebo prášky. Pokyny pro uložení spotřebiče • Spotřebič odpojte ze sítě a nechte jej zcela vychladnout. Tento spotřebič by neměl být po ukončení životnosti vyhazován do •... - Page 101 Používateľská príručka • VAROVANIE: Rozliate jedlo môže spôsobiť BEZPEČNOSŤ vážne popáleniny. Spotrebič a káble • V prípade ignorovania týchto uchovávajte mimo dosahu detí. Kábel nikdy bezpečnostných pokynov sa výrobca vzdáva nenechávajte visieť cez okraj pracovnej akejkoľvek zodpovednosti za vzniknutú dosky, nikdy nepoužívajte zásuvku pod škodu.
- Page 102 Používateľská príručka • VÝSTRAHA: Z dôvodu ochrany pred • Aby ste predišli možnému poškodeniu parou, poškodením alebo úrazom elektrickým prúdom spotrebič pri používaní vždy umiestnite ďalej od nevarte v základnej jednotke. Na prípravu jedál stien a skriniek. vždy používajte pribalený podnos na pečenie. •...
-
Page 103: Pred Prvým Použitím
Používateľská príručka • Pred čistením spotrebiča musíte vytiahnuť POPIS KOMPONENTOV konektor. Ubezpečte sa prosím, že vstup je kompletne suchý, skôr ako spotrebič znovu 1. Nádrž na vodu použijete. 2. Prívod vzduchu 3. LCD displej 4. Otvory pre vývod vzduchu 5. Kôš na smaženie 6. - Page 104 Používateľská príručka • Dôkladne umyte diely teplou vodou, čistiacim prostriedkom a • Pomocou tlačidiel Čas + a − môžete predlžovať alebo skracovať čas s neabrazívnou hubkou. prírastkom 1 minúty. Čas je možné nastaviť v rozsahu od 1 do 90 • Utrite vnútro a vonkajšok spotrebiča vlhkou utierkou. minút.
- Page 105 Používateľská príručka • Stlačením ikony KOMBINOVANÁ PRÍPRAVA aktivujete súčasne funkcie VARENIE V PARE a VZDUCHOVÉ FRITOVANIE. Teplovzdušná fritéza začne varením v pare a následne prepne na teplovzdušné fritovanie. ČISTENIE/ODVÁPŇOVANIE PARA/TEPLOVZDUŠNÉ FRITOVANIE • Stlačením ikony čistenia/odvápňovania spustíte automatické • Pri používaní funkcie KOMBINOVANÁ PRÍPRAVA stlačte ikonu čistenie a odvápnenie spotrebiča.
-
Page 106: Varenie V Pare
Používateľská príručka • V prípade potreby vložte do koša teplovzdušnú platňu. Teplovzdušná • Odpojte spotrebič a pred čistením ho nechajte vychladnúť. platňa je navrhnutá tak, aby ste ju mohli používať na veľké aj malé VARENIE V PARE porcie. Ak máte veľkú porciu jedla, sklopte nožičky pod platňou. Pri •... - Page 107 Používateľská príručka • Opatrne vyberte ingrediencie z koša. • Odpojte spotrebič a pred čistením ho nechajte vychladnúť. Predvolené programy DOPLNENIE VODY • Ak chcete používať predvolené programy, stlačte ikonu Ak sa počas varenia v pare nádrž na vodu vyprázdni, kontrolka požadovaného predvoleného programu.
-
Page 108: Čistenie A Údržba
Používateľská príručka Funkcia Predvolený Minúty °C Rozsah Rozsah KOMBIN Kôrovce program manuálneho manuálneho OVANÁ (varenie v 1 – 90 – – nastavenia – nastavenia – PRÍPRAV pare) Varenie v Vzduchové (vzduchové – – 1 – 80 – pare fritovanie (najprv fritovanie) Minúty °C Minúty °C... -
Page 109: Riešenie Problémov
Používateľská príručka • Žiadne diely ani príslušenstvo nečistite agresívnymi chemikáliami, drôtenkami ani práškami. Pokyny týkajúce sa skladovania • Odpojte spotrebič a nechajte ho úplne vychladnúť. • Pred uskladnením spotrebiča vždy vyprázdnite nádrž na vodu. Čistenie/odvápnenie Voda sa môže pred ďalším použitím pokaziť. Keď... -
Page 110: Životné Prostredie
Používateľská príručka ŽIVOTNÉ PROSTREDIE Tento spotrebič nesmie byť na konci životnosti likvidovaný spolu s komunálnym odpadom, ale musí sa zlikvidovať v recyklačnom stredisku určenom pre elektrické a elektronické spotrebiče. Tento symbol na spotrebiči, v návode na obsluhu a na obale upozorňuje na túto dôležitú skutočnosť. - Page 111 Manual cu instrucţiuni • AVERTISMENT: Mâncarea vărsată poate SIGURANȚĂ provoca arsuri grave. Nu lăsați aparatul și • Dacă ignorați instrucțiunile de siguranță, cablul la îndemâna copiilor. Nu treceți cablul producătorul nu este responsabil de daunele pe sub blat, nu folosiți o priză de sub blat și apărute.
- Page 112 Manual cu instrucţiuni • AVERTISMENT: Nu prăjiți niciodată în • Este interzis ca acest aparat să fie utilizat de Aerofryer, indiferent dacă capacul este pus sau copii. Nu lăsaţi aparatul şi cablul acestuia la nu. ACEST LUCRU ESTE PERICULOS ȘI îndemâna copiilor.
-
Page 113: Înainte De Prima Utilizare
Manual cu instrucţiuni • Aparatul trebuie conectat la o priză cu 20. Pictogramă Combo împământare (pentru aparatele de clasă I). 21. Pictogramă Abur/ Air Fry • Pentru a evita perturbarea fluxului de aer, nu puneți nimic deasupra aparatului și lăsați ÎNAINTE DE PRIMA UTILIZARE întotdeauna 10 centimetri spațiu liber în jurul aparatului. - Page 114 Manual cu instrucţiuni Creșterea sau reducerea duratei de preparare Creșterea sau scăderea temperaturii • Folosiți pictogramele Time + și - pentru a crește sau a descrește • Folosiți pictogramele Temperatură plus și minus pentru a crește sau a durata de preparare, în pași de câte 1 minut. Durata poate fi setată scădea temperatura în pași de 5°C.
- Page 115 Manual cu instrucţiuni • Consultați capitolul „Programe presetate Aerofryer” pentru mai multe informații. Indicatori de funcționare • Rulează consecutiv pe ecran când aparatul este în stare de ABUR funcționare. • Apăsați pictograma ABUR pentru a activa funcția de preparare la abur.
- Page 116 Manual cu instrucţiuni • Apăsați butonul de pornire pentru a porni aparatul. Pe ecran se va • Umpleți rezervorul cu apă. Folosiți apă filtrată pentru a evita afișa „in operation”, iar aparatul începe să gătească. depunerile de calciu. Asigurați-vă că fixați corect dopul. Așezați Notă: Pentru cele mai bune rezultate, unele ingrediente necesită...
- Page 117 Manual cu instrucţiuni Folosiți funcția COMBO dacă doriți să preparați alimentele mai întâi • Apăsați pictograma Pornire pentru a începe prepararea. Pe ecran în modul ABUR, apoi în modul AIR FRY. Alimentele vor fi preparate se va afișa „in operation”. mai întâi la abur, apoi în modul Air Fry.
-
Page 118: Curățarea Și Întreținerea
Manual cu instrucţiuni Funcție Program Minute °C Interval Interval COMBO Crustacee presetat ajustare ajustare (Mai întâi (Abur) 1 - 90 manuală - manuală - Air Abur, apoi (Air Fry) 80 - Abur Air Fry) Minute °C Minute °C Pâine Legume 1 - 90 (Abur) 1 - 90... - Page 119 Manual cu instrucţiuni După ce aparatul a funcționat în modul Abur timp de peste 20 de ore • Nu folosiți niciodată detergenți chimici duri, bureți metalici sau în total, pictograma Curățare/Detartrare va începe să clipească, pulberi pe niciuna dintre piese sau accesorii. indicând că...
-
Page 120: Protecţia Mediului
Manual cu instrucţiuni PROTECŢIA MEDIULUI Acest aparat nu trebuie aruncat la gunoiul menajer la sfârşitul vieţii utile, ci trebuie transportat la un centru de reciclare a aparatelor casnice electrice şi electronice. Acest simbol de pe aparat, din manualul cu instrucţiuni şi de pe ambalaje atrage atenţia asupra acestei probleme importante. - Page 122 IN NEED OF ACCESSORIES? VISIT WWW.PRINCESSHOME.EU/NL NL/CUSTOMERSERVICE/ACCESSORIES SPAREPARTS FOR ACCESSORIES AND SPARE PARTS TO EXTEND YOUR ITEM! © Princess 2022 | Jules Verneweg 87 5015 BH Tilburg | The Netherlands | www.princesshome.eu...
Need help?
Do you have a question about the 01.183318.01.750 and is the answer not in the manual?
Questions and answers