Advertisement
Quick Links
Quick Reference Guide
XLR8/XLR8 Plus
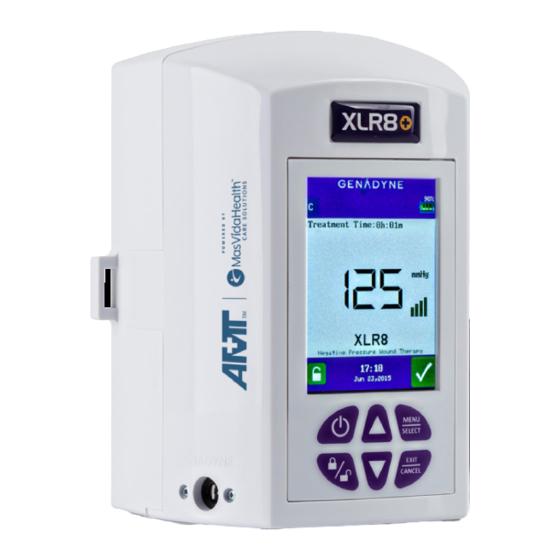
Therapy Mode
"C" = Continuous
Step 3
"V" = Variable
rotocol.
to fit accurately in wound
Cut foam to fit accurately in wound
e.
d overlapping onto intact
bed. Avoid overlapping onto intact
id cutting foam over wound.
skin. Avoid cutting foam over wound.
Treatment Time
r-packing, as this will inhibit
Avoid over-packing, as this will inhibit
Indicates time therapy
of drainage.
filtration of drainage.
has been in progress.
............................................................................................................................
..................................................................................................................................................................
Target Pressure
Time and Date
Keypad Lock/Unlock
Status
Red = Locked
Step 7
Green = Unlocked
to the
erapy by pressing the
Initiate therapy by pressing the
port
on/off button
universal on/off button
. Adjust
as prescribed using the
the
pressure as prescribed using the
On/Off Button
arrows.
up/down arrows.
Lock/Unlock Button
Power Jack Inlet
uestions? Call 1.800.208.2025 or 516.217.0010 | email info@genadyne.com | www.genadyne.com
08.2025 or 516.217.0010 | email info@genadyne.com | www.genadyne.com
Used to charge unit.
Quick Reference Guide
XLR8/XLR8 Plus
Features
Step 4
Step 4
Cover foam with drape by separating
Cover foam with drape by separating
bottom layers 1 and 2 to expose the
bottom layers 1 and 2 to expose the
adhesive drape. Position and place
adhesive drape. Position and place
drape over foam. Remove stabilization
drape over foam. Remove stabilization
layers 1 and 2, then top with layer 3.
layers 1 and 2, then top with layer 3.
Remove white ruler tab.
Remove white ruler tab.
Step 8
Step 8
A secure seal is identified when the
A secure seal is identified when the
foam draws down and the target
. Adjust
foam draws down and the target
pressure is reached.
pressure is reached.
Questions? Call 877.790.5994 | JMeds.com
©2016 Genadyne Biotechnologies, Inc. CLN-003 02/16
©2016 Genadyne Biotechnologies, Inc. CLN-003 02/16
Up/Down Arrow Buttons
Press in main screen to increase/decrease pressure setting.
In Menu/Select screen, press to scroll through menu and
implement functions.
Battery Indicator
USB Entry
Used for engineering
purposes only.
Actual Pressure
This number will naturally
fluctuate above and below
target pressure.
Suction Strength
Green Bars = seal is adequate
Red Bars =
seal may be compromised
Service needed
6 month PM or 4000 hour
check recommended.
System Status
Green Check () =
proper function
Red Exclamation (!) = problem
©JMeds 2020
Menu/Select Button
Press to silence or lock in
user changes.
Exit/Cancel Button
Press to go back to previous,
or main screen.
Advertisement

Related Manuals for AMT XLR8


Summary of Contents for AMT XLR8
- Page 1 Quick Reference Guide Quick Reference Guide XLR8/XLR8 Plus XLR8/XLR8 Plus Features Therapy Mode Battery Indicator “C” = Continuous Step 3 Step 4 Step 4 “V” = Variable rotocol. to fit accurately in wound Cut foam to fit accurately in wound...
- Page 2 General Inquiries: (800) 232-9266 Questions? Call 1.800.208.2025 or 516.217.0010 | email info@genadyne.com | www.genadyne.com Customer Service: (855) 392-9268 AMT - Genadyne - XLR8/XLR8 Plus - Quick Reference Guide - 071322 ©2016 Genadyne Biotechnologies, Inc. CLN-012 02/16 ©2016 Genadyne Biotechnologies, Inc. CLN-012 02/16...