
Related Manuals for Tornado Pro Spotter

Summary of Contents for Tornado Pro Spotter
- Page 1 Pro Spotter Operations and Maintenance Manual For Commercial Use Only Model No. TE011-G03-U...
- Page 2 NOTES...
-
Page 3: Table Of Contents
CONTENTS Getting Started Introduction......................1 Warranty.........................2 Grounding Instructions..................3 Important Safety Instructions................4 Technical Specifications..................6 Operating Instructions Key Features......................7 Operation.......................7 Transport and Storage..................12 Maintenance......................13 Troubleshooting....................14... -
Page 4: Introduction
INTRODUCTION Your new Tornado unit is a high quality, precision-made product. All parts used in the manufacturing of this unit have passed rigid quality control standards prior to assembly. Please safeguard the original receipt/invoice given at the time of purchase. If you experience any problems with your unit during the warranty period, the original receipt/invoice will act as proof of purchase. -
Page 5: Warranty
WARRANTY Within 30 days, to activate the warranty, go to; https://tornadovac.com/services/warranty-registration- form.aspx For warranty information go to www. tornadovac.com Prior to operating the this unit, read and understand completely this owner’s manual paying special attention to warning labels. These labels indicate a potentially hazardous situation that could result in death or serious injury if not avoided. -
Page 6: Grounding Instructions
GROUNDING INSTRUCTION This appliance must be grounded. If it should electrically malfunction, grounding provides a path of least resistance for the current to reduce the risk of electric shock. This machine is equipped with a cord having an equipment grounding conductor and grounding plug. -
Page 7: Important Safety Instructions
IMPORTANT SAFETY INSTRUCTIONS Your new Tornado unit is a high quality, precision-made product. All parts used in the manufacturing of this unit have passed rigid quality control standards prior to assembly. Please safeguard the original receipt / invoice. If you experience any problems with your unit during the warranty period, the original receipt / invoice will act as proof of purchase. - Page 8 IMPORTANT SAFETY INSTRUCTIONS Flammability Warning NEVER fill unit with flammable chemicals. Do NOT use in an area where flammable fumes are present State of California Proposition 65 Warnings WARNING: This product contains one or more chemicals known to the state of California to cause cancer.
-
Page 9: Technical Specifications
TECHNICAL SPECIFICATIONS Model TE011-G03-U Input Voltage 115 VAC Plug Type Cord 15’ with on-board storage .05 with Atomizer Nozzle/.25 with fan nozzle/.25 Extraction Amps Pre Spray Mode 1A/Extraction Mode 8.9A Solution Tank 3.5 Gal/13.2 l Recovery Tank 2.5 Gal/9.5 l Dimensions 23”... -
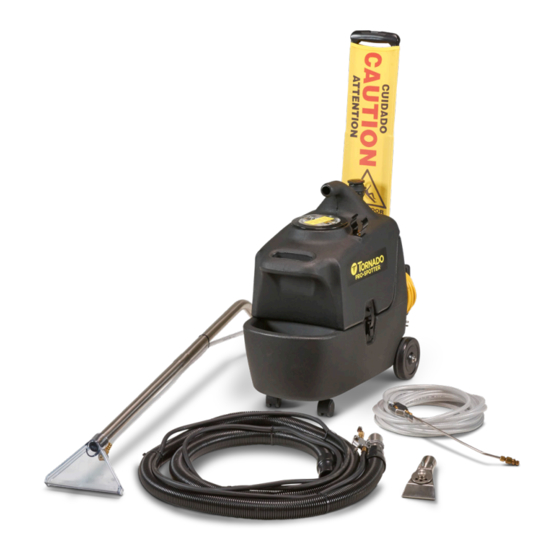
Page 10: Key Features
KEY FEATURES Upholstery Vacuum Hose ToolStorage Attachment Spray Tip (included Wand both an atomizer and fan spray tip) Upholstery Tool Wand Hose OPERATION • Do not break off or pull out the ground prong on the plug. • Do not attempt to repair a warranted machine unless instructed to do so by an authorized shop or the factory. - Page 11 OPERATION This unit can be used as either a Pre Spray or an Extractor unit to use on upholstery and for detail work. The brass atomizing nozzle provides lower saturation when spraying while a larger brass fan nozzle is provided for large area coverage. PRE SPRAY OPERATING INSTRUCTIONS Filling the unit •...
- Page 12 OPERATION The wand will come with two spray tip options. The lower micron size atomizing spray tip will already be installed on the wand. You will also get a higher micron fan nozzle as an option. This additional nozzle option will be taped onto the wand when you receive the unit. The installed atomizing nozzle is best for cleaning office areas, touch points, etc, as it does not saturate things like paper and boxes that could be found in offices, retail, hospitality, restaurant, educational type of environments.
- Page 13 OPERATION EXTRACTOR OPERATING INSTRUCTIONS Filling the unit • Unplug the unit. • Disconnect the solution and recovery tanks. • Remove the upper recovery tank. • Add water and/or chemicals to the lower solution tank. Fill only to the fill line indicated on the label on the inside of the solution tank.
- Page 14 OPERATION Solution Hose Connection 3-Way Switch...
-
Page 15: Transport And Storage
TRANSPORT AND STORAGE Transport: 1. Take extreme care when moving the machine up or down steps or stairs. 2. Incorrect lifting techniques may result in personal injury. 3. As stated earlier in this manual, this machine is heavy. Do not attempt to lift the machine without assistance. -
Page 16: Maintenance
Do not use wire or pins to clean the nozzles as this will cause the spray pattern to become distorted. Besides those outlined above, all additional servicing and repairs should only be performed by an Authorized Tornado Servicing Agent. -
Page 17: Troubleshooting
TROUBLESHOOTING The following checks may be performed by the operator. Any other service or attempt to service by the operator will void the warranty. Possible Cause Solution Problem Pump is not primed. Depress lever on hand tool to No Spray release pressure. - Page 18 PARTS DIAGRAM...
- Page 19 PARTS LISTING Part No Description X9003 Defoamer Warning Label X8295 Screw #8 x 3/4” PX103A Clear Lid 4” w/Ring X9061 Shut Off Disk X9087 Washer X9088 Screw 8-18 x 1/2” PX103AG Lid Gasket X9518 Deflector X9062 Float Ring X9082-KIT Standpipe Sub-Assembly X2046-YEL Label 72821A...
- Page 20 PARTS LISTING Part No Description X9047 Swivel Caster 45Mm 1/4-20 x 3/4” 7BS003 Screw 1/4-20 x 1/2” 00-0600-0503 Washer 30676 Screw 10-24 x 5/8” X9046 Base Plate Weldment X8497B Switch Label X9048 Rocker Switch 3 Position X8008N Lock Nut 1/2” Conduit Strain Relief X9719 Power Cord 18 AWG 20’...
- Page 21 PARTS LISTING X9082-KIT Part No. Qty Description X9082 PVC Pipe 1-1/2” x 6-1/2” Bulkhead Fitting 1-1/2” MPT x X9076 1-1/2” Female Slip PX14A Gasket...
- Page 22 PARTS LISTING PX30-KIT Part No. Description PX30 Solution Tank Filter PX213 Nylon Fitting 1/4” MPT x 1/4” Hose Barb 7DL003 Hose Clamp 71817A Braided Hose 1/4” 250 P.S.I. 7AT006 Brass Fitting 90° 1/4” Barb x 1/4” MPT 72115A Washer 7AJ004 Brass Anchor Connector 1/8”...
- Page 23 NOTES...
- Page 24 T-OM-TE011-G03-U 02/2022...
Need help?
Do you have a question about the Pro Spotter and is the answer not in the manual?
Questions and answers