Advertisement
Quick Links
Advertisement

Related Manuals for Tesla smart HKS0801A1U


Summary of Contents for Tesla smart HKS0801A1U
- Page 1 8X1 HDMI KVM SWITCH HDMI KVM...
-
Page 3: Packing List
HDMI KVM Features : Using only 1 set of keyboard and mouse to control 8 PCs Ÿ Support resolution up to 4K@60Hz 4:4:4 Ÿ Support Unix/Windows/Debian/Ubantu/Fedora/Mac OS Ÿ X/Raspbian/Ubantu for Raspberry Pi and other Linux based systems With EDID emulator in each input port, keep PCs always Ÿ... -
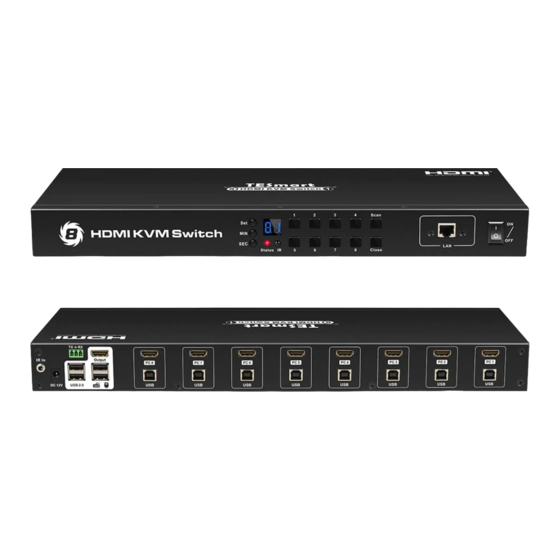
Page 4: Panel Descriptions
HDMI KVM Panel Descriptions : IR In 1 2 4 Scan Status Close 10 11 Name Description Connect IR receiver extension cable to this port, then it is able to use IR control even IR In the KVM switch is installed in a rack DC 12V 12V DC power supply Connect this port to any control... - Page 5 HDMI KVM Name Description Keyboard and For USB keyboard and mouse input, mouse input including wireless keyboard and mouse HDMI inputs Connect to HDMI input source Connect to computer by USB Type A to USB data port Type B cable [MIN]: Press [MIN] to loop between 0~59 minutes [SEC]: Press [SEC] to loop between...
-
Page 6: Connection Diagram
HDMI KVM Name Description By connecting to the LAN through this port, you can use the terminal device in the LAN port same LAN to send TCP/IP commands to control the switching of input port Power switch Turn on or off the power supply Connection Diagram : PC 7 PC 2... -
Page 7: Basic Operation
HDMI KVM Basic Operation : 1. Port selection 1.1 Use front panel keypad Directly press button [1]~[8] to select input port 1~8. 1.2 Use IR remote control Press [1/A], [2/B]~[8/H] directly to select input ports 1~8. 1.3 Use keyboard hot keys Press keyboard [Scroll lock] key two times, then press [1]~[8] within 2 seconds to directly select input port 1~8. - Page 8 HDMI KVM KVM will automatically loop among all the powered on Input sources with a specified time interval, press [Scan] again to stop scanning. 3.2 IR remote control Press [P] button to start auto scanning, then the KVM will automatically loop among all the powered on input sources with a specified time interval, press [P] again to stop scanning.
- Page 9 HDMI KVM pointer to hit left or right bound of the screen within 1 second, the KVM will switch to previous or next input source. Use of RS232 and LAN port : The RS232 and LAN ports are used for selecting input source only, could not transfer keyboard and mouse data or even the video and audio, this is a redundant design for some special application when you want to switch the input sources by a...
- Page 10 HDMI KVM 2. Connect LAN port Follow below diagram to connect the LAN port to local area network router or directly to PC with Cat5e/6 UTP cable. Cat 5e/6 Cable Connect to local area network router or directly to PC...
- Page 11 HDMI KVM Turn on/off auto input detection When plug new HDMI input source to the 8 ports switch or power on the HDMI input source, the HDMI switch will automatically select the input port that is connected to this input source. press [M] again to stop auto input detection Switch will automatically switch among all the...
- Page 12 We warrant this product as free of defects in material and workmanship for a period of one (1) year from the date of shipment. If during the period of warranty this product proves defective under normal use, we will repair or replace this product, provided that this product has not been subjected to mechanical, electrical, or other abuse or modifications.
Need help?
Do you have a question about the HKS0801A1U and is the answer not in the manual?
Questions and answers