Advertisement
Quick Links
EVEREST
2-IN-1 BIKE TRAILER
AND STROLLER
ADULT ASSEMBLY REQUIRED
STYLES AND COLORS MAY VARY
85000
WARNING:
CHOKING HAZARD
Adult assembly required because of
small parts. Keep assembly parts out
of reach of children under 3 years.
Read all instructions BEFORE assembly and USE of product
PASSENGERS MUST WEAR APPROPRIATE HELMET AND SAFETY EQUIPMENT AT ALL TIMES
Customer Experience Center
email: gcs@DeltaChildren.com
Customer Service gcs@DeltaChildren.com
INSTRUCTION MANUAL
KEEP INSTRUCTIONS FOR FUTURE USE.
A1952-001 Jeep
Parent Organizer sold separately on www.DeltaChildren.com
®
1
DCP-IM-07152021-V6
www.DeltaChildren.com
Advertisement

Related Manuals for Delta Children jeep EVEREST


Summary of Contents for Delta Children jeep EVEREST
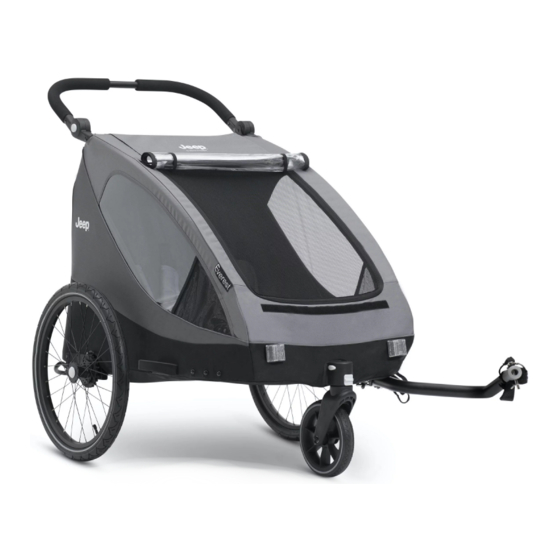
- Page 1 EVEREST 2-IN-1 BIKE TRAILER AND STROLLER INSTRUCTION MANUAL ADULT ASSEMBLY REQUIRED A1952-001 Jeep Parent Organizer sold separately on www.DeltaChildren.com ® STYLES AND COLORS MAY VARY 85000 WARNING: CHOKING HAZARD Adult assembly required because of small parts. Keep assembly parts out of reach of children under 3 years.
- Page 2 Keep these instructions for future reference. • Please follow all of these instructions to ensure the safety of your child. • Failure to follow these instructions could result in serious injury or death. • Avoid serious injury from falling or sliding out. ALWAYS insure that the child is properly positioned by using the safety harness according to these instructions.
- Page 3 Max. 2 passengers Max. 42 inches Minimum age: 9m in stroller mode 12m in Bike Trailer mode Max. Max. Max. 50 lbs. 50 lbs. 13 lbs. Max. Total loaded weight including trailer 113 lbs. 154 lbs. Customer Service gcs@DeltaChildren.com www.DeltaChildren.com...
- Page 4 Before returning this product to the store! Let’s see if we can assist you! • Not sure how to assemble our product? Visit our site for easy to follow instructions along with some Tricks and Tips assembly video’s https://www.deltachildren.com/pages/instructions • If you are missing a piece or have a damaged part Please contact our Consumer Experience Center for assistance at gcs@DeltaChildren.com.
-
Page 5: Limited Manufacturer Warranty
LIMITED MANUFACTURER WARRANTY This Delta product is warranted to be free from defects for a period of 90 days from the date of purchase under normal use. This warranty extends only to the original retail purchaser and is valid only when supplied with proof of purchase, or if received as a gift, when the registration is on file with Delta. - Page 6 PARTS IMPORTANT! Please remove all parts from the package and identify them before assembly. IMPORTANT! Before assembly and each use, inspect this product for damaged hardware, loose joints, missing parts, or sharp edges. NEVER use if any parts are missing or broken. Contact manufacturer for replacement parts and instructions if needed. Never substitute parts.
- Page 7 ASSEMBLY UNFOLDING • Lift the upper frame [A] upward until you see the crossbar with folding handle [B] inside. Pull back firmly on crossbar to make sure the indicator changes from red to green, so that all locks are correctly engaged.
- Page 8 ASSEMBLY ASSEMBLY OF WHEELS • Hold down the central button [C] and push the wheel to the axle. NOTE: To check if the wheel is correctly installed, pull it away from the body – it must not detach itself from the axle. NOTE: Make sure that rear tires are properly inflated to at least 36 Psi, but do not exceed 50 Psi.
- Page 9 ASSEMBLY REMOVE THE FRONT WHEEL • Press the unlock button [M] to remove the front wheel. Then follow the instructions from step 1 on page 12 to mount the drawbar. ADJUSTING HANDLEBARS • To adjust handle: Press BOTH buttons (located on either side of •...
- Page 10 ASSEMBLY OF THE PENNANT • Pin the two pennant pieces together and slide the finished pennant into the fabric tab provided on the left side of the bike trailer. Customer Service gcs@DeltaChildren.com www.DeltaChildren.com...
- Page 11 TO CONVERT TO BIKE TRAILER GO TO PAGE 11 TO CONVERT TO STROLLER GO TO PAGE 17 BIKE TRAILER MODE STROLLER MODE TO CONVERT TO BIKE TRAILER GO TO PAGE 11 TO CONVERT TO STROLLER GO TO PAGE 17 Front wheel Pennant Customer Service gcs@DeltaChildren.com www.DeltaChildren.com...
- Page 12 CONVERSION FROM STROLLER TO TRAILER Note: Before installing the drawbar, make sure the longer side is facing the outside of the bike trailer. REMOVE THE FRONT WHEEL • Press the unlock button [M] to remove the front wheel. Customer Service gcs@DeltaChildren.com www.DeltaChildren.com...
- Page 13 CONVERSION FROM STROLLER TO TRAILER LOCK TAB REMOVING THE SAFETY PIN • Tilt the trailer backwards to make handling easier. Rotate the lock tab [F] to release safety pin from mounting plate. MOUNTING PLATE HOLDER ASSEMBLING THE DRAWBAR • Slide the end of the of the drawbar into the holder on the mounting plate.
- Page 14 CONVERSION FROM STROLLER TO TRAILER SECURING SAFETY PIN TO THE DRAWBAR • Put the safety pin through both holes in the mounting plate. Rotate the lock tab [F] in front of the safety pin to prevent the drawbar from slipping out. Note: push down on drawbar to ensure it is securely attached.
- Page 15 CONVERSION FROM STROLLER TO TRAILER Use this step only for quick release wheels ATTACHING CLUTCH HEAD TO REAR BIKE AXLE (FOR QUICK RELEASE REAR WHEELS). • Undo the rear axle of your bicycle and pull it out. Refer to your bike’s user manual. •...
- Page 16 CONVERSION FROM STROLLER TO TRAILER Use this step only for quick release wheels CLUTCH HEAD ASSEMBLING CLUTCH HEAD (FOR QUICK RELEASE WHEELS) • Tighten the rear axle again. Make sure that the system is completely closed and that the axle cannot come loose. •...
- Page 17 CONVERSION FROM STROLLER TO TRAILER HITCHING TO THE BIKE HITCHING OF THE DRAWBAR • Slide the drawback onto the clutch head and secure it with the safety pin [H]. Note: Make sure the safety pin is well secured in place by pulling outward on the drawbar. FIXATION OF THE SAFETY STRAP •...
- Page 18 UNHITCHING FROM THE BIKE REMOVE THE CLUTCH • Open the safety strap and remove the safety bracket. Pull out the safety pin [H] UNHITCHING FROM THE BIKE • Pull the drawbar off the clutch head. If you are not going to use the Everest Bike Trailer with your bike for a longer period of time, we recommend that you also remove the clutch head to avoid corrosion.
- Page 19 CONVERSION FROM TRAILER TO STROLLER INSTALLATION OF THE FRONT WHEEL • Tilt the trailer backwards to make handling easier. Insert the front wheel into the front hub [K] of the trailer until it clicks into place. Note: Pull downward on wheel to ensure that the wheel is securely locked. REMOVE THE DRAWBAR •...
- Page 20 CONVERSION FROM TRAILER TO STROLLER INSERTING DRAWBAR INTO SLEEVE • In order to transport the drawbar in stroller mode, insert drawbar into sleve until it is fully contained. Locate the two straps on sleeve and attach to bike trailer handlebar LOCKING OF THE FRONT WHEEL •...
- Page 21 CONVERSION FROM TRAILER TO STROLLER USAGE OF THE BRAKE • By pressing the brake lever, the brake locks in with a clear “click” sound. To release the brake, push the brake lever up again. ADJUSTMENT OF THE HANDLEBAR • Press and hold the push buttons [E] on the left and right of the handle. Move the handle to the desired position and make sure it locks in with an audible “click”...
- Page 22 CONVERSION FROM TRAILER TO STROLLER STORAGE OF FRONT WHEEL • While the front wheel is not in use, it can be stored in the bag in the rear storage compartment. UNLOCKING THE BRAKE • When in bike trailer mode, make sure the rear brake is unlocked to allow the wheels to rotate.
- Page 23 FABRIC COVER ASSEMBLY 2-in-1 CANOPY • The canopy consists of all-weather protection [N] and mosquito net [O]. To open the canopy, loosen the Velcro and roll it upwards and fasten with toggle and loops on both sides. STORAGE COMPARTMENT PANORAMA WINDOW •...
-
Page 24: Securing Child
SECURING CHILD Before Placing your Child in Stroller: Close Canopy. Press brake down until it “clicks” into the locked position. Make sure the brake pedal is pressed down completely. Always set the brake pedal when parking the trailer/stroller. Waist Belt Shoulder Waist Belt Straps... - Page 25 USAGE OF THE 5-POINT HARNESS HEIGHT-ADJUSTMENT OF THE HARNESS • To adjust the harness height for smaller children, pull the harness ends through the backrest. Be sure to observe all safety information on page 3! IMPORTANT • If you carry only one child, it should sit on the right side in the direction of travel.
- Page 26 FOLDING BIKE TRAILER/STROLLER REMOVING FRONT AND REAR WHEELS • Remove the rear wheel by pressing the center release button [C]. FOLDING THE BIKE TRAILER/STROLLER FRAME • Press the button on the folding handle and turn the folding handle upwards. • Slide the folding handle forward until the trailer is fully folded.
- Page 27 USING THE RAIN SHIELD TOGGLE AND LOOP WHEN NOT IN USE • Roll up rain guard and fasten rolled up guard to toggle and loop [P]. VELCRO STRIP UNDER RAIN GUARD VELCRO STRIP UNDER OPENING WHEN USING THE RAIN GUARD •...
-
Page 28: Care And Maintenance
CARE AND MAINTENANCE • To clean the trailer/stroller use a mild household soap with warm water on a sponge or clean cloth. Do not use any aggressive cleaning agents. • Carry out regular internal and external cleaning of the cabin. •... - Page 29 Customer Service gcs@DeltaChildren.com www.DeltaChildren.com...
- Page 30 Customer Service gcs@DeltaChildren.com www.DeltaChildren.com...
- Page 31 Customer Service gcs@DeltaChildren.com www.DeltaChildren.com...
- Page 32 Delta Children's Products Corp. 114 West 26 Street New York, NY 10001 gcs@DeltaChildren.com www.DeltaChildren.com © 2021 Delta Children's Products. All rights reserved.
Need help?
Do you have a question about the jeep EVEREST and is the answer not in the manual?
Questions and answers